
Most of you probably know that it is possible to cast your VR experience to an external device (PC, Phone, TV, etc.)
But what about the other way round? More specifically, can you mirror phone to oculus quest 2 in order to watch things from a much larger immersive screen?
Although casting the display from your phone to the Quest 2 is not officially supported, there are ways you can do it. For example, if you want to watch a local video file, you can set up a DLNA server on your phone and stream it to your Quest 2 headset in high definition.
It is also possible to mirror your whole phone display to the Quest 2 by sideloading specific third-party applications to your headset (for example AirScreen and Airdroid). However, since these apps are not officially supported on the Quest 2 you are likely to face problems with screen size and ratio.
I tested these methods out myself, and will next demonstrate the process and the pros and cons in more detail.
1) Cast Videos From Your Phone to the Quest 2 (Mobile DLNA)
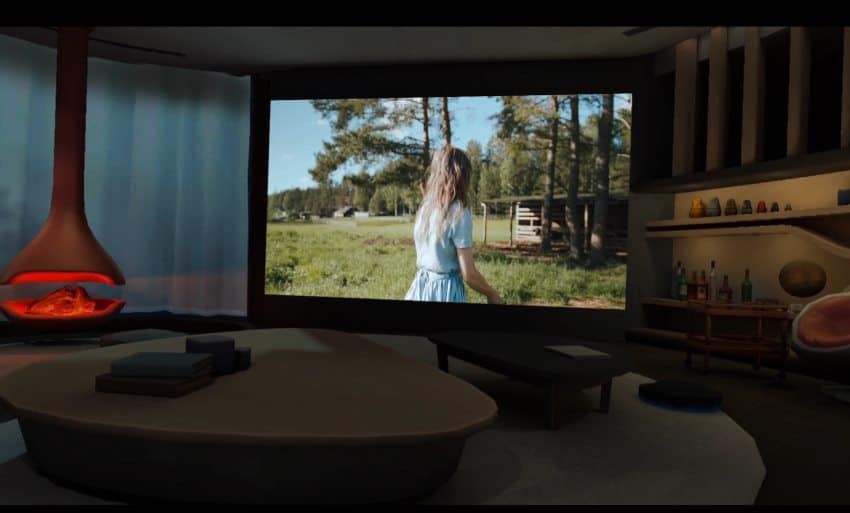
One of the main reasons you would probably want to cast the display of your phone into your Quest 2 headset is to watch videos and movies on a large immersive screen. If for some reason you can’t or don’t want to use the apps that are natively available for the Quest 2.
One way to do this is to set up a DLNA server on your phone and use a video player on your Quest 2 to then stream the video file to your headset. Do keep in mind that this method only works with local video files (MP4, MOV, etc).
In order to successfully play media files from the DLNA server, both your phone and headset must be connected to the same network (either regular Wi-Fi or a mobile hotspot). If this seems something that you are trying to achieve, then follow the upcoming steps to stream video files from your Android phone to your Quest 2.
First, you have to set up a DLNA server on your phone:
- Open Google Play Store on your Phone
- Search and Install “DLNAServer”
- Open the DLNAServer app
- Click on the “+” icon top-right and
- Allow file access and specify your video folder location
- Click on the “Play” icon top right
- Make sure the app says “DLNA Server is Running”
If any of the steps were confusing, I also made a short video demonstrating the process.
Once the DLNA server is running on your phone, you next just have to use a video player (that supports DLNA playback) in your Quest 2 to watch the files on your headset. I personally used Bigscreen and you can see the steps and how to image looks in the video below:
In case you are having problems connecting to the DLNA server, simply stop and then start the media server and try again.
Note! If you are an iPhone user, you should also be able to similarly create and use a DLNA server to stream your media content. Download and test the most popular DLNA server applications for iOS and see if they work. The you can easily mirror an iphone to oculus quest 2.
2) Third-Party Apps to Mirror Your Phone Display to Quest 2
When your goal is not to stream video files but instead to mirror everything you see from your phone display to your headset, then there are also some options available.
I tested two different applications for this purpose (there are more if you Google for them and want to dive deeper). Both of these apps require you to have developer mode enabled in order to sideload and run them on your headset.
2.1) AirScreen
AirScreen is an app that allows you to mirror the display of your devices (e.g phone, tablet) onto a larger screen (most commonly on a TV). I tested it and it is also possible to mirror your phone display into your Quest 2 headset.
Note! Although Airscreen is compatible with Android devices (and the Quest 2 also runs on Android), it is not officially supported. Most likely, for this reason, the mirroring didn’t start correctly each time and there were problems with the screen ratio and resizing the window.
Follow these steps to sideload Airscreen on your Quest 2 and mirror your phone display:
- Enable developer mode on your Quest 2
- Download & configure SideQuest (on your PC or Phone)
- Make sure SideQuest detects your Quest 2
- Download Airscreen APK (e.g from APK Pure)
- Install Airscreen on your Quest 2 using SideQuest
- Launch Airscreen on your headset (from “Uknown source”)
- Follow the guidelines and establish a connection with your phone
- Install “Google Home” to your phone
- Click on “Cast my Screen” and select your Quest 2
After the mirroring has started you are likely to be faced with a window that has an incorrect screen ratio and part of the image cut off. Try rotating both your phone and changing the screen orientation from the Airscreen app settings.
To be totally honest, due to the compatibility and screen sizing issues, I am having a hard time thinking of use cases where this combination could be useful.
However, maybe you have some specific ideas in your mind, and if you think it could work for you, then go ahead and test it out.
2.2) AirDroid & AirMirror
I am going to start with the fact that using the AirDroid (installed on your phone) and AirMirror (sideloaded to Quest 2) combination which was recommended in several forums / Reddit threads is just not an optimal method to mirror your phone display into the Quest 2.
First of all, there is no sound. Secondly, the mirrored image in the headset is too small and can’t be made bigger (much better to view from the phone screen). Half of the time the mirroring didn’t start and the settings in the app became unresponsive. And lastly, the image gets grainy and lags.
It’s quite bad really and I am only describing the option here so that you wouldn’t have to waste your time on it. If you want to mirror your phone screen to the Quest 2, use the previous method (Airscreen) which works much better.
3) Sideload Apps Directly on Your Quest 2 (Instead of Streaming)
Without knowing the exact reason why you want to stream the content from your phone to your headset, I am also going to offer an alternative solution to the ones listed above.
If you are using an Android phone and want to mimic some activity/functionality in your Quest headset, it is worth considering sideloading the specific app directly to your headset.
The thing to keep in mind is that you can google and find an APK file (Android installer) for pretty much any application that you are currently using on your phone. You can then install it on your headset and use it directly in your headset.
Sure, some of the applications will have issues and won’t work perfectly. But it’s definitely worth trying out as running things directly on your headset it’s just a much more optimal way (at least currently).
And that’s all from me. I hope this article was useful and helped to clarify the different possibilities you have for mirroring the activities on your phone to your headset.
HARDWARE USED FOR TESTING AND WRITING THE ARTICLES:
* Meta Quest 2 (My “daily driver” headset, which I absolutely love & recommend)
* Lenovo Legion 5 Pro (AMD Ryzen 5 5600H, Nvidia Geforce RTX 3060, 16GB RAM)
* TP-Link Archer C6 (budget dedicated router for Air Link, see my full setup tutorial)
ESSENTIAL QUEST 2 COMFORT ACCESSORIES:
* VR Cover Foam Replacement (one of the easiest & cheapest ways to improve headset comfort)
* BoboVR M2 Head Strap (reduce pressure on your head and improve the overall fit of the headset)