
The Oculus Quest headsets are super easy to set up and use out of the box. However, like with most tech gadgets you are eventually bound to bump into problems.
If your Oculus Quest or Quest 2 headset does not suddenly boot up correctly and only shows a black screen, then you have arrived at the right place.
In this article, I am going to guide you through various troubleshooting steps and different fixes to help solve your Quest black screen problems.
The first part of the article focuses on general solutions while the second part aims to solve blacks screen errors with Oculus Link. Let’s get started!
Did you hear? Facebook (Meta) is going all-in on virtual reality and the metaverse. Get a Quest 2 headset and be a part of the future of entertainment!
1) Hold Down The Power Button for 10+ Seconds
One of the first things to try out when you are stuck in “black screen” is to hold down the power button for 10 to 30 seconds.
Doing so forces a hard reboot on your Quest / Quest 2 headset and this might help to knock your headset back into its senses and normal working state.
2) Hold Down the Power and Volume Down Buttons
If the hard reboot in the previous step did not work, then another similar, yet slightly different method to try out is following.
Simultaneously hold down the power and volume down buttons until you see a menu appearing in your headset. This menu is your Oculus Quest / Quest 2 headset`s boot options.
Use the volume up and down buttons to navigate to “Boot device” and press the power button to confirm action. See if your Quest launches properly or the black screen problem still persists.
3) Leave Your Headset On and Wait
Sometimes the best course of action is to do nothing at all and just wait. And this is certainly also the case here.
Turn on your headset and also plug in your charger. When your Quest / Quest 2 is stuck in the black screen again just place it on a flat surface and let it stay there for up to 30 minutes.
The thing is that your headset might actually be in the middle of an update and all you have to do is let it complete it properly. If that is the case, it will automatically turn off once completed (led indicators turned off).
So just hold on for a second, let it do its thing and see if this method might solve your black screen problems.
4) Press Controller Menu Buttons
Turn on your headset and when stuck in the black screen again, then press the Oculus button on your right and controller and also the menu button on your left controller to see if anything changes.
In some cases, this has helped users solve their headset problems and resume normal work. If this isn’t the case for you, proceed with the next steps
5) Connect your Headset in the Oculus App
Sometimes the solution to your black screen problem might be as simple as logging into the Oculus app on your phone and connecting your headset there. If nothing changes right away, try launching a game from the mobile app.
The most common scenario for needing to resign into the mobile app is when you have changed password or settings via the browser on your computer and these changes have not been applied to the headset and mobile application.
6) Try Switching Location
If you are usually playing in a single dedicated room (and this is also where your problem currently manifests), it is worth trying your headset in another room to eliminate possible guardian problems.
Turn off your headset and move into another room. Turn on the headset again and see if it will get past the black screen and confirm you to create a new guardian instead.
7) Remove Any Silicon Covers and Custom Foam Paddings
If you are facing black screen problems and do not understand why, a sure thing to try out is to remove any silicon covers or custom foam paddings you have attached to your Quest headset
The reason for this is that these custom modifications might block / interfere with the proximity sensor on your headset. The proximity sensor is used to detect whether your headset is strapped to your head or not (required for power saving and the auto sleep feature).

For both the Quest and Quest 2 headsets, the sensor is located just above the lenses. Remove the custom modifications and see if anything changes.
8) Cover The Proximity Sensor
Cover the proximity sensor with your thumb and see if the black screen goes away and the headset resumes normal work.
If that is the case, your proximity sensor might be failing and not detecting correctly if the headset is strapped on. Try to clean the sensor area to see if it makes any difference.
Another workaround for the problem is to cover the sensor area with dark tape. This will let you continue using the headset (for a while, at least). However, if you have a warranty on your headset, I would recommend you to turn your headset in and replace it with a new one.
9) Retrieve Crash Logs With Logcat
This step assumes your Quest / Quest 2 headset has developer mode enabled and you are able to successfully connect it to your PC / Mac.
Using Android Debug Bridge (ADB) commands, it is possible to retrieve your headset (crash) logs to potentially determine the root cause of your black screen problems.
Follow this oculus manual for a tutorial on how to run the commands and output the logs into a file on your computer. If you are able to retrieve the logs you can try to understand the reason for your problems yourself or forward them to Oculus Support.
10) Factory Reset
Doing a factory reset on your Quest / Quest 2 headset is probably the single most effective measure to solve your black screen (and other) problems.
If you have tried everything else and nothing seems to work (and you are willing to wipe your headset), then follow the Oculus manual for two different ways to complete a factory reset on your headset.
Note! Are you having any worries or doubts about factory resetting your headset? Click on the link to read my previous article where I demonstrate the whole process step-by-step and list specific actions to take before and after.
HOW TO FIX OCULUS LINK BLACK SCREEN ERRORS
This section focuses on black screen problems that appear when you use your Quest / Quest 2 as a PC VR headset using Oculus Link. Follow the steps for different troubleshooting steps which will hopefully resolve your problems.
Note! If you are looking to solve Oculus Air Link black screen issues, you might find help by looking at my detailed troubleshooting guide!
1) Disconnect Cable and Restart Headset and Software
The good old “have you tried turning it off and on again” is a good remedy to solve various tech related problems. This is also the case for black screen problems that occur when using Oculus Link.
Disconnect the cable from your headset and computer. Restart your Quest / Quest 2 and also restart the Oculus software on your PC (or to be sure, reboot your PC). Plug in the cable again and see if the headset works properly now.
2) Update Windows, Oculus Software and Graphics Drivers
There have been loads of examples where the black screen problems are caused by outdated software and drivers.
Make sure your graphics drivers are up to date and if not, update to the latest version. Check the Oculus Software version and if new versions are available, do an update. Lastly, make sure all the latest Windows updates have been applied.
After having updated all the related software and drivers, check if the black screen problems are gone.
3) Make Sure your PC is Compatible with Oculus Link
Head to the Oculus Link compatibility manual and make sure your PC is compatible with the Oculus Link in the first place.
4) Disable NVIDIA Overlay
If you are using a Nvidia graphics card and are stuck in three dots, the problem is likely caused by Nvidia overlay.

Open GeForce Experience, click on the cogwheel icon located top right, go to the General settings tab and disable Ingame Overlay.
5) Try Different USB Ports
Sometimes it is just the case that USB ports act strangely for whatever reason. Try switching the USB port you are using on your PC and see if this will resolve your problem.
6) Remove any Adapters / Extension Cables
You might be surprised how often various problems appear due to incompatible adapters and/or broken extension cables.
I do understand that you are using them for a reason. However, for troubleshooting reasons remove them if possible and test if the problems are resolved.
7) Disable Integrated GPU for Laptops
Laptops often come with dual GPUs and it is quite likely that the black screen problems are caused by Oculus Link using the wrong GPU.
Currently there is no way to configure which GPU to use in the Oculus software. One workaround to get over this problem is to disable the unwanted GPU in your computer using Device Manager and then restart your computer.
See the video below to see step-by-step instruction on how to do that:
So if you have dual GPU-s in your laptop or PC, then test this method out and see if your problems will resolve.
8) Disable USB 3.0 Port Power Saving Settings
Several people have had various problems (including black screen) because of Windows unexpectedly reducing or cutting power output to the USB ports.
To overcome this problem, head to Device Manager on your PC, navigate to “Universal Serial Bus Controllers”, right click and “Properties”, navigate to “Power Management” and disable the “Allow computer to turn off this device to save power”.
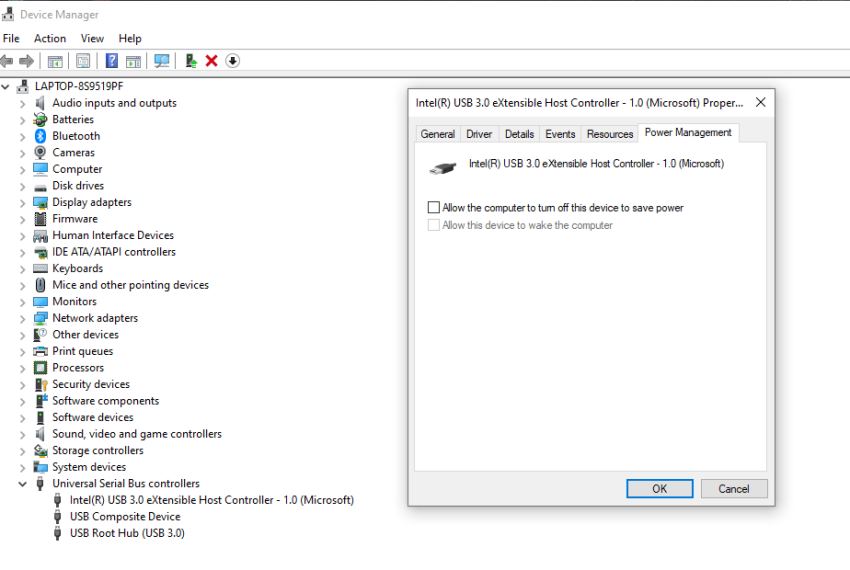
If you are unsure which USB controller is used, do this for all the list items. Restart your computer afterward and see if the black screen problems have now gone away.
9) Uninstall Oculus Software
Software is software and although it is built to cope with different hardware and situations it sometimes still arrives in an undesired set of conditions.
One thing to try out is to do a clean uninstall of the Oculus PC software (also deleting the leftover settings) and then reinstalling the software again.
For a step-by-step tutorial on how to do that, follow the Youtube video below:
After having reinstalled the software, connect your headset again and see if black screen problems are resolved.
HARDWARE USED FOR TESTING AND WRITING THE ARTICLES:
* Meta Quest 2 (My “daily driver” headset, which I absolutely love & recommend)
* Lenovo Legion 5 Pro (AMD Ryzen 5 5600H, Nvidia Geforce RTX 3060, 16GB RAM)
* TP-Link Archer C6 (budget dedicated router for Air Link, see my full setup tutorial)
ESSENTIAL QUEST 2 COMFORT ACCESSORIES:
* VR Cover Foam Replacement (one of the easiest & cheapest ways to improve headset comfort)
* BoboVR M2 Head Strap (reduce pressure on your head and improve the overall fit of the headset)