
Minecraft, the best-selling video game of all time, probably requires no introduction. Initially launched for PC, it was later ported to mobile devices (Android, iOS) and most of the popular gaming consoles.
With the rising popularity of virtual reality, Minecraft was also made available for Gear VR and Oculus Rift. Times have moved forward since and the GearVR platform is now essentially shut down and Oculus Rift rather outdated.
This often raises a question for modern-day Minecraft and VR enthusiasts – can you play Minecraft on the Quest 2 headset? To answer the question briefly:
There is currently no official release of Minecraft VR for Quest 2 available in the Oculus Store. However, if you have a gaming PC, you can enjoy both Minecraft Java and Bedrock editions on your headset. Alternatively, you can sideload the Minecraft GearVR (Bedrock) edition or Java Edition (flat screen experience) on your headset.
Let does look at each of the different options in a bit more detail.
Did you hear? Facebook (Meta) is going all-in on virtual reality and the metaverse. Get a Quest 2 headset and be a part of the future of entertainment!
1) Minecraft Java Edition in VR (with Vivecraft)
The first way to play Minecraft on your Quest 2 is to download the Minecraft Java Edition from minecraft.net. On top of the regular game, we will be installing Vivecraft, a mod that transforms Minecraft into a proper VR experience.
Keep in mind that for this method you will need a gaming computer (check requirements) where the actual game will be installed and run. Since Minecraft is a lot less demanding than most other VR titles, you can probably get away with a below-average PC that has a dedicated GPU and meets the overall minimum requirements.
Note! In this Minecraft Java Edition installation tutorial, I am assuming that you have already configured either Oculus Link, Air Link, or Virtual Desktop to play PCVR games with your Quest 2. Additionally, you will need to have Steam and SteamVR installed and configured.
How to Install & Play Minecraft Java Edition VR on Quest 2
- Purchase and install Minecraft Java edition (minecraft.net)
- Check that your PC has Java installed
- Open Windows Command Promp and type “java -version”)
- If the result is “unrecognized command” then download & install Java
- Go to vivecraft.org and select the latest stable version (not alpha or beta)
- Download “vivecraft-x.xx.x-jrbudda-VR-x-x-installer.jar” from the Github page
- Launch the installer and increase the value of “Profile RAM Allocation” to 4GB
- Close Minecraft (Launcher) if you had it open and “Install” Vivecraft
- Establish an Oculus Link / Air Link or Virtual Desktop connection
- Keep your Quest 2 turned on and start “Minecraft Launcher” from your PC
- Make sure “Vivecraft x.xx” version is selected and click “Play“
- After a bit of loading, Minecraft Java Edition should be running in your headset
If anything was left unclear, make sure to watch my Minecraft Java edition installation video below, where I demonstrate all of the required steps in more detail:
Note! If you are having any issues with installing and/or running the game properly, make sure to check out my article about troubleshooting Minecraft VR issues.
2) Minecraft Windows (Bedrock Edition)
Minecraft Windows (often referred to as Bedrock edition) is a version of the game that you might be familiar with from playing on your phone, Xbox or Playstation.
The Bedrock edition of Minecraft offers multiplayer cross-play with Xbox, Windows 10, PS, iOS, Android and other platforms. In the Java edition of Minecraft described earlier, you can only play against other Java edition players (albeit it has massive multiplayer servers).
The main downside of Minecraft Bedrock is that there are fewer mods available compared to the Java edition.
Requirements
In order to play Bedrock on your Quest 2 headset using the method I am going to describe, you have to meet the following requirements:
- Oculus Link / Air Link compatible gaming PC
- Oculus Link or Air Link set up and working properly
If you are new to this, then (wired) Oculus Link is probably the easiest to start – you can actually use the charging cable to connect the headset to your PC and turn your Quest 2 into a PC VR headset.
The game itself is more optimized and less resource-intensive (compared to the Java edition), which makes it a good choice if you have a PC with below-average specs.
How to Play Minecraft Bedrock VR with Quest 2
The steps to install and play Minecraft Bedrock edition with your Quest 2 headset (in VR( are following:
- Download and install Minecraft Windows (Bedrock) Edition.
- Can be found from minecraft.net or Microsoft Store
- Right-click on your Desktop and select New > Shortcut
- In the shortcut location box, copy and paste minecraft://Mode/?OpenXR=true and select “Next”
- Name the shortcut whatever you like (e.g Minecraft Bedrock VR) and click “Finish”
- Establish an Oculus Link or Air Link connection
- Keep your headset turned on (e.g place it on your forehead) and launch the previously created Minecraft shortcut from your PC
- Pull the headset back in front of your eyes and the game should load briefly
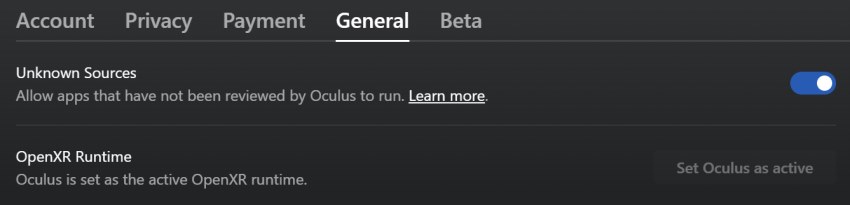
If you are having problems, make sure that “Unknown sources” are enabled and “OpenXR Runtime” is set to “set Oculus as active” in the Oculus PC software.
If you got stuck or need help with any of the installation steps, I have also created a step-by-step Youtube video showing how to install and play Minecraft Bedrock Edition on your Quest 2:
Note! Unfortunately, the Bedrock Edition of Minecraft does not work with Virtual Desktop. If you want to play the game wirelessly you have to use Air Link.
If you are having any issues with installing and/or running the game properly, make sure to check out my article about troubleshooting Minecraft VR issues.
3) Playing Minecraft on Quest 2 Without PC
Next, I am going to list methods you can use to play Minecraft on your Quest 2 headset if you don’t have a gaming PC (or no PC at all).
If you don’t have a PC, you will be using your Android phone and software called Bugjaeger to install (sideload) Minecraft on your headset. Sideloading can also be done (and is more comfortable) with a non-gaming PC (using SideQuest)
So with these tiny notes out in the open, let’s get started.
3.1) QuestCraft – Standalone Minecraft Java Edition
It’s here! The full-blown VR version of Minecraft Java Edition on your Quest 2. In standalone mode! As mentioned earlier, do keep in mind you will need a PC (or your phone) to sideload the application on your headset.
The steps to sideload QuestCraft on your Quest 2:
- Enable developer mode on your Quest 2
- Download and install SideQuest on your PC
- Connect your headset and PC via USB cable
- Allow the USB debugging prompt in headset
- Make sure your headset is successfully detected in SideQuest
- Go to QuestCraft page in SideQuest library
- Download QuestCraft APK (the “Download App (Sideload)” button)
- Install the downloaded APK file on your headset using SideQuest
- Click the arrow next to the “Download App (Sideload)”
- Download the PCVR app
- Extract the downloaded zip file
- Copy the “Android” folder to your Quest 2 storage (overwrite content)
- Turn on your Quest 2 and go to apps (“Unkown sources”)
- Open PojavLauncher
- Sign in to your Minecraft account
- Go to Settings->Video and Renderers-> Click Renderers and select the third option
- Select the latest Fabric profile
- Click “Play” and enjoy!
If any of the steps were not clear, look at the tutorial video in QuestCraft or watch the Youtube video below (which also explains how to sideload without a PC):
If you have any issues, leave a comment under the Youtube video or ask for help on the official QuestCraft discord channel.
3.2) Minecraft Java Edition (2D) using PojavLauncher
As the second method, I am going to describe how you can sideload Minecraft Java edition on your Quest 2 and play it in flat screen (2D) mode. With the release of QuestCraft, this method is not the preferred option anymore. I mean, you want Minecraft in VR after all, right?
However, if you have any issues with QuestCraft, or for some reason you prefer playing in 2D, you might still give it a go.
Playing just with Oculus Touch controllers is possible, but very uncomfortable (try it out for yourself). The best option for this method is to pair a Bluetooth Xbox controller with your Quest 2 where the controls are mapped correctly.
Note! When you are thinking of playing with a Bluetooth keyboard and/or a mouse, then the latter was messed up for some reason and did not work properly. Keyboard works.
The steps to install Minecraft Java edition on your Quest 2:
- Enable developer mode on your Quest 2
- Download PojavLauncher (Minecraft Launcher) APK to your phone from:
- PojavLauncher GitHub (slightly outdated) or
- Find and Download a newer APK from Google Play Store
- Find Bugjaeger from Google Play Store & install it on your phone
- Connect your Quest 2 with your phone using a suitable USB cable
- Allow connection dialogs both on your phone & Quest 2
- If connected successfuly click on the “+” icon in the Bugjaeger app
- Locate and sideload PojavLauncher on your phone
- You can now unplug the cable and continue with your Quest 2
- Pair and connect your Xbox Bluetooth controller (optional)
- Navigate to your Quest 2 apps and select “Unkown sources” from top right-hand filter
- Launch PojavLauncher
- Sign in to the account you are using
- Select “Play” to download and install your preferred Minecraft version
- Not all versions seem to work properly with Quest 2. If you are having problems, test different versions until you find a working one (e.g 1.12.2)
- Enjoy playing
If you are having trouble at any point, make sure to check out the Youtube video below for step-by-step instructions on using PojavLauncher to play Minecraft Java edition on your Quest 2:
Note! I personally had problems signing in to PojavLauncher with my Microsoft account. I ended up getting it working by typing in my e-mail (no password) and selecting the “Login as offline account” option. After that my account was present in the “Select account” section and I could continue installing and playing.
3.3) Minecraft GearVR (Bedrock) Edition
The last method to play Minecraft on your Quest 2 is to sideload the GearVR edition of Minecraft to your headset.
The GearVR edition of Minecraft is actually the Bedrock Edition. The difference here is that it will be installed and run on your Quest 2 headset, instead of your PC which was described earlier in the article.
Note! Mojang, the developer for Minecraft ended the support of Minecraft Gear VR in 2020 (the latest version released was 1.16.x). So for this method, you will have to use outdated releases which oftentimes have to be downloaded from shady places. Continue at your own risk!
What you need:
- Android phone (to sideload Minecraft on your Quest 2)
- Bugjaeger
- Find a working minecraft Gear VR APK
- Google & download at your own risk
To set up sideloading using Bugjaeger follow this manual. The complete step-by-step guide to installing and running Minecraft GearVR on your Quest 2 headset can be found in the Youtube video below:
Note! Some older Minecraft GearVR versions seem to work with the Oculus Touch controllers (e.g 1.14.x), for others, you need a Bluetooth Xbox controller.
4) Bonus: Voxel Works Quest (MineCraft Alternative)
If you like the general concept of Minecraft and are willing to try something new, Voxel Works Quest is definitely worth checking out.
In the standard mode, you can use controller buttons for locomotion and mining. There is also a Sportive mode that utilizes Oculus Quest`s hand tracking for mining and other activities and you need to imitate running to move around in the world.
The game is still pretty much “work in progress”, but gets regular updates and new features added. Go ahead and test it out and show the developer some love and/or feedback on how to improve the game further down the line.
What you need:
- Quest 2 headset
- Any PC / Mac (for file transfer and SideQuest, no gaming PC needed)
- Install and set up SideQuest
- Voxel Works Quest (Free)
The installation requires you to set up Sidequest for sideloading games. Refer to the official manual or use the guidelines provided earlier in this article.
And that’s it! Happy Minecrafting!
HARDWARE USED FOR TESTING AND WRITING THE ARTICLES:
* Meta Quest 2 (My “daily driver” headset, which I absolutely love & recommend)
* Lenovo Legion 5 Pro (AMD Ryzen 5 5600H, Nvidia Geforce RTX 3060, 16GB RAM)
* TP-Link Archer C6 (budget dedicated router for Air Link, see my full setup tutorial)
ESSENTIAL QUEST 2 COMFORT ACCESSORIES:
* VR Cover Foam Replacement (one of the easiest & cheapest ways to improve headset comfort)
* BoboVR M2 Head Strap (reduce pressure on your head and improve the overall fit of the headset)