
Some people prefer a smooth VR experience. Others aim for maximum visual fidelity. And there are numerous ways you can optimize the PC VR experience to match your personal preferences and hardware capabilities. The most obvious ones are adjusting the render resolution, headset refresh rate, and in-game graphics.
Those who have an Nvidia graphics card can additionally change various settings from the Nvidia Control Panel. I personally have an Nvidia Geforce RTX 3060 laptop GPU and I decided to test out if and what effects do Nvidia settings have on the overall VR performance and visual quality.
With that being said, here are my OpenVR Benchmark test results on how changing Nvidia settings affects the overall VR performance:
| SETTING | VALUE | AVG FPS | 1% LOW FPS | 0.3 LOW FPS |
|---|---|---|---|---|
| Baseline (Default Settings) | Default | 40.756 | 30.578 | 27.994 |
| Power management mode | Prefer Maximum Performance | 40.890 | 31.088 | 28.480 |
| Anisotropic Filtering | 16x | 41.298 | 31.584 | 29.200 |
| Antialiasing – FXAA | On | 40.518 | 30.434 | 27.932 |
| Antialiasing Mode / Settings | Override application settings / 8x | 40.112 | 32.324 | 27.634 |
| Antialiasing – Transparency | Multisample | 40.370 | 30.642 | 28.080 |
| Antialiasing – Transparency | 8 x (supersample) | 40.612 | 30.106 | 26.954 |
| Low Latency Mode | On | 40.756 | 30.02 | 27.402 |
| Low Latency Mode | Ultra | 41.257 | 31.977 | 29.693 |
| Multi-Frame Sampled AA (MFAA) | On | 41.367 | 30.687 | 28.500 |
| Texture Filtering – Quality | High Performance | 41.920 | 31.720 | 29.333 |
| Vertical sync | Fast | 41.750 | 31.847 | 29.623 |
| VR pre-rendered frames | 3 | 41.390 | 30.417 | 27.353 |
| COMBINED SETTINGS | ||||
| NVIDIA PERFORMANCE PRESET | 41.490 | 31.700 | 29.348 | |
| NVIDIA BALANCED PRESET | 41.218 | 31.373 | 28.953 | |
| NVIDIA QUALITY PRESET | 40.785 | 29.320 | 26.893 | |
| CUSTOM PERFORMANCE SETUP | 41.688 | 31.805 | 29.420 |
Quick Summary
Based on my benchmark tests using the OpenVR Benchmark utility, modifying Nvidia Control Panel settings made only minor differences in both the VR performance (+- 1.5 frames per second) as well as visual quality (very slightly sharper textures with anisotropic filtering and less jagged edges with antialiasing).
The truth is that you can (and should) change most of these settings (antialiasing, anisotropic filtering, etc) in the game you are playing, where the settings provide more optimized results. Additionally, adjusting VR refresh rate, in-game graphic settings, and render resolution will give much better results whether you are optimizing for performance or quality.
Do give you a quick example – let’s say you want to optimize your game for better performance. In my tests, optimizing the Nvidia settings for better performance gave an improvement of about 1 frame per second. However, lowering the resolution from 1.0x (3264 x 1648) to 0.9x (2944 x 1504) gave an improvement of about 7 frames per second compared to the base scenario.
Sure, the results might vary for different games/hardware. However, based on all my previous experience with VR and the tests conducted for this article, you should start optimizing your games by modifying rendering resolution/refresh rate / PC and in-game graphics settings first.
Use Nvidia control panel settings for “final touches” or when some setting is missing from the specific game you are playing. Most of the time, however, it should be totally fine to leave the Nvidia settings untouched altogether.
Testing Methodology
Benchmarking VR performance is not a trivial task. In order for the tests to be accurate and comparable, you would have to make sure that each benchmark run gets identical frames with the same head movement. This is almost impossible to achieve with regular VR games.
OpenVR Benchmark
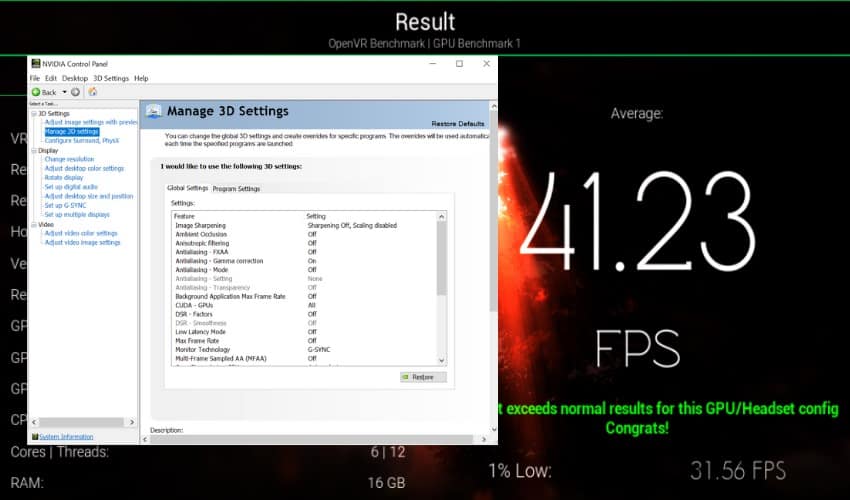
In order to get reproducible VR performance tests, I used a VR benchmark tool called OpenVR Benchmark. This free utility runs a 60-second simulation inside your headset and presents you with result scores (nominated in frames per second).
As also stated in the software, the results don’t indicate the actual FPS you can expect from real games. Additionally, the tool represents a specific type of graphics rendering (Voxels), that may or may not represent other types of games accurately.
However, we can definitely use the test to compare if and what effect do Nvidia control panel settings have on the VR performance and quality.
System Specifications & Settings Used
Testing Process
The process I used for testing the Nvidia settings (and how I got the average frame per second metrics listed in the table) is following:
- Apply specific Nvidia Control Panel setting
- Restart PC
- Launch Oculus Air Link and OpenVR Benchmark
- Run each test 5 consecutive times (5 x 60 seconds test)
- Calculate average values based on 5 runs (listed in the table)
The reason I ran each test multiple times is that I saw quite a big variation (+/- 1.5 FPS) in the results for the same test. Running the same test multiple times and calculating the average values should help to get closer to “real values” and better eliminate outlier values.
I initially also started running the tests consecutively for all different Nvidia settings. However, I started seeing the FPS values decreasing gradually. For this reason, I restarted my PC after testing each separate Nvidia setting.
Nvidia Control Panel Setting for VR (Tested & Explained)
Next, I am going to give a very brief overview of the Nvidia Control Panel settings I used for my tests and give a short description of what they actually do. For settings that affect the visuals of the VR experience, I have also included a side-by-side comparison video with the baseline scenario.
Note! Don’t be discouraged by the same thumbnails shown in the video examples below. They will actually show you the video comparison of that specific Nvidia setting.
Power Management Mode
One of the most common recommendations to improve your VR performance seems to be enabling “Prefer Maximum Performance” in the power management mode. This keeps the graphics card at a maximum performance state when 3D applications are running (regardless of actual GPU usage).
One definitive result you can be sure of by applying this setting is increased electricity consumption. When it comes to the actual improvements in the performance, my tests showed that there was barely any difference.
Anisotropic Filtering
Anisotropic Filtering makes surfaces in the game appear more detailed and clear with a relatively small effect on the performance. For most PCs, you can safely turn it up to the maximum value (16x) without noticing any significant drop in frames per second.
This is one of the few settings I would recommend enabling from the Nvidia Control Panel. However, if the game you are playing has a setting for configuring Anisotropic Filtering, make sure you do it there and leave Nvidia settings untouched.
Antialiasing (AA)
Antialiasing reduces the jagged edges (staircase effect) of 3D objects in the game. Most applications have AA built-in, which is also the reason, the default value for the setting in the Nvidia control panel is “Application-controlled”
For the video above, I changed the antialiasing mode “Override any application setting” and applied 8x antialiasing which should provide a “smoother” image. Applying the setting gave the worst FPS result of all the tests I did, however, I had a hard time noticing the improved smoothness of the image. Maybe it is because of the “cube-like” jagged nature of the test itself.
Antialiasing – FXAA
FXAA stands for “fast approximate antialiasing” and it should reduce the “jaggedness” of essentially every line you see in the game (sometimes resulting in unwanted blurriness). This AA method should work at a lower “performance penalty” compared to other antialiasing which also shows in the test results (sort of at least).
Antialiasing – Transparency
Antialiasing transparency is meant to reduce the jaggedness on the edges of transparent textures. The problem here is that for most games, this is already built-in, and modifying the setting in Nvidia Control Panel can cause compatibility conflicts in games.
For testing purposes, I did try turning it on (both the multisample as well as 8 x supersample). Even though multisampling should offer better performance (compared to supersampling), in my tests it was the opposite. When it comes to the visual changes, I had a hard time noticing any difference at all.
Low Latency Mode
This setting used to be called “Maximum pre-rendered frames” and controls the number of frames the CPU can prepare before the frames are processed by the GPU. While setting the option “On” had literally no effect, selecting “Ultra” did increase the FPS by about 0.5 compared to the baseline test.
One of the reported downsides of enabling Low Latency Mode, however, is input lag. If you do decide to enable this option, take note of whether you experience a delay in your controller actions to be registered in the game you are playing. I personally would (and do) keep the option disabled altogether.
Multi-Frame Sampled AA (MFAA)
Multi-Frame sampled AA is yet another method for antialiasing (reduce “staircase effect”), which is similar to MSAA (multisample anti-aliasing) but at virtually no cost to the overall performance.
This is proven by the fact that when MFAA was enabled in benchmark tests, the FPS was actually better compared to the baseline scenario. Since it does improve the visual experience at no cost, this is one of the only Nvidia settings I would recommend keeping enabled.
Texture Filtering – Quality
Modifying the “Texture Filtering – Quality” option enables you to choose whether you prefer quality, performance, or a balanced option between the two. The default option is “Quality”
When I set this option to “High Performance”, I was actually able to achieve the highest average FPS of any of the combined test runs I did. So if you are struggling with your VR performance and are looking for ways to improve, this actually might be one of the viable options to do it.
Vertical Sync
Vertical sync is the synchronization of your GPU with the monitor (headset’s) refresh rate. To be honest, even after reading about the topic, I didn’t fully understand whether the setting applies to VR headsets or not. I do know for sure that VR headsets utilize v-sync internally, but I am not sure how it relates to the current setting.

A comment from Guy Godin (the developer of Virtual Desktop) seems to indicate that it does something at least. But “something” doesn’t mean anything good here and it caused them to change the setting to “Use the 3D application setting” each time you launch Virtual Desktop.
Based on the OpenVR Benchmark test runs I did, it does seem to improve the frame per second count when set to “fast”. So, if you have the time and the need (e.g performance issues) then go ahead and test it out and see if it makes any difference for you.
Virtual Reality Pre-Rendered Frames
Similar to “Low Latency Mode” (or maybe it is the same?), this setting controls the number of frames the CPU can prepare before the frames are processed by the GPU. The default value is 1 (frame).
Selecting a higher value can improve the performance at the cost of increased latency. My benchmark tests showed that raising the value (to 3) did indeed seem to offer a higher FPS count on average. However, the test did not cover the “latency” issue which you must find out for yourself.
Nvidia Presets (Quality / Balanced / Performance)
When you open the Nvidia Control Panel and open the first settings tab (“Adjust Image Settings with preview”), you have the option to use Nvidia preset configuration sets (Performance, Balanced or Quality). The default option is “Quality”.
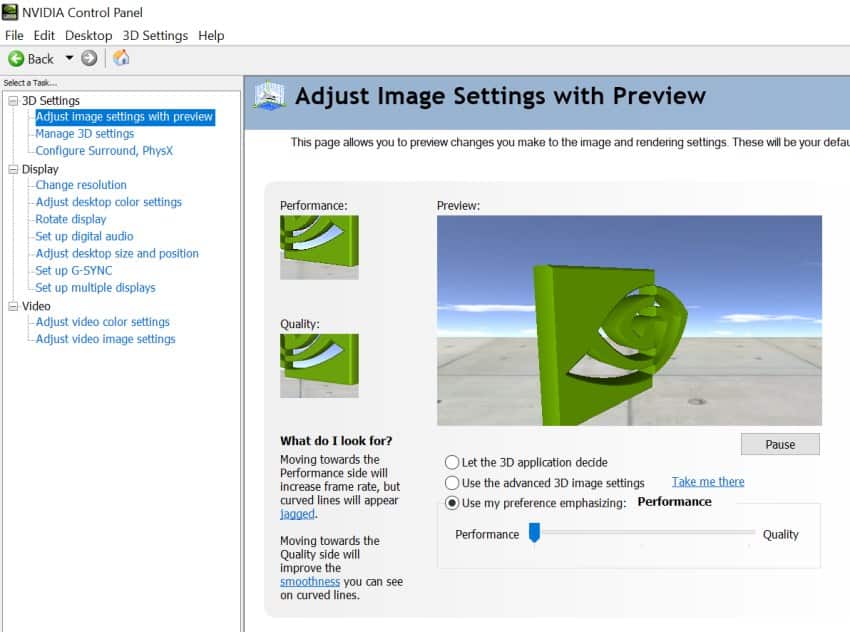
If you choose any of the three preset configurations, it automatically adjusts a combination of values (which you can see and compare from the “Manage 3D settings” tab. Since the default values are based on the “Quality” preset, I also did the benchmark runs with the “Balanced” as well as the “Performance” preset.
And the test runs do indeed show a gradual improvement in the average frame per second count. You can see the visual differences of “Quality” vs “Performance” from the video below:
Custom Performance Setup
The “custom performance setup” is based on one of the current most popular Youtube videos for achieving high FPS in games (flat screen games in this case). The settings are as follows:
- Image Sharpening (Off)
- Ambient Occlusion (Off)
- Anisotropic Filtering (Off)
- Antialiasing (Off)
- Background Application max Frame Rate (Off)
- CUDA – GPUs (All)
- DSR- Factors (Off)
- Low Latency Mode (Off)
- Max Frame Rate (Off)
- MFAA (Off)
- Power Management Mode (Max Performance)
- Shader Cache (On)
- Texture Filtering (High Performance)
- Threaded Optimization (On)
- Triple Buffering (Off)
- Vertical Sync (Off)
- VR Pre-Rendered Frames (1)
- VRSS (Off)
Using these settings to run the benchmark tests, I got a fairly good average FPS count. However, in the grand scheme of things, 1 FPS improvement over the baseline test is not that much.
Conclusion
Changing Nvidia Control Panel settings does have “some” effect on the overall VR quality and performance. However, the improvements are not very significant and you should instead focus on finding the best balance between render resolution, refresh rate, and in-game graphics settings first.
After you have found the sweet spot and are looking for further “tweaks” then turn your eyes towards Nvidia Control Panel settings and see if you can further fine-tune your overall VR experience.
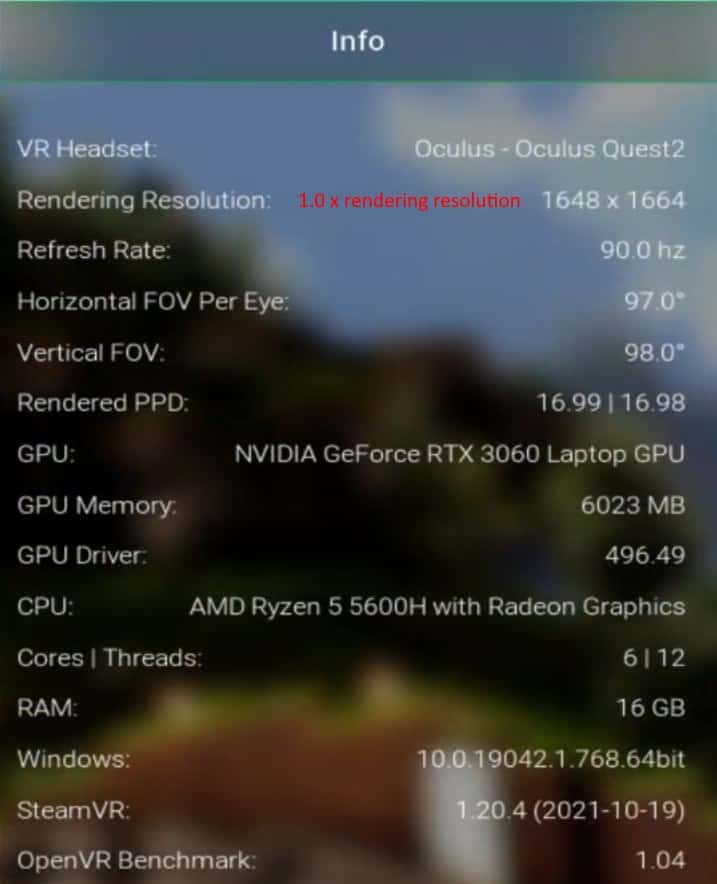
HARDWARE USED FOR TESTING AND WRITING THE ARTICLES:
* Meta Quest 2 (My “daily driver” headset, which I absolutely love & recommend)
* Lenovo Legion 5 Pro (AMD Ryzen 5 5600H, Nvidia Geforce RTX 3060, 16GB RAM)
* TP-Link Archer C6 (budget dedicated router for Air Link, see my full setup tutorial)
ESSENTIAL QUEST 2 COMFORT ACCESSORIES:
* VR Cover Foam Replacement (one of the easiest & cheapest ways to improve headset comfort)
* BoboVR M2 Head Strap (reduce pressure on your head and improve the overall fit of the headset)