
That feeling. The feeling when you are trying to power on your beloved Oculus Quest 2 headset and it just start won’t start. I have experienced this myself first hand I know it is not good.
But don’t throw in the towel just yet! In this article, I am going to list several easy steps for you to try out that might just knock life back into your Quest 2 in no time.
The first thing to try out when your Oculus Quest 2 is not turning on is to do a hard reboot on your headset by holding down the power button for 30+ seconds. If that does not work, plug in the charging cable (make sure the LED light turns on), let it charge until full and try booting the device again.
Let does next look at the different steps you can try out in greater detail.
Did you hear? Facebook (Meta) is going all-in on virtual reality and the metaverse. Get a Quest 2 headset and be a part of the future of entertainment!
How to Turn On the Oculus Quest 2?
Without knowing whether you are an experienced user or totally new to VR, let does start with the basics.
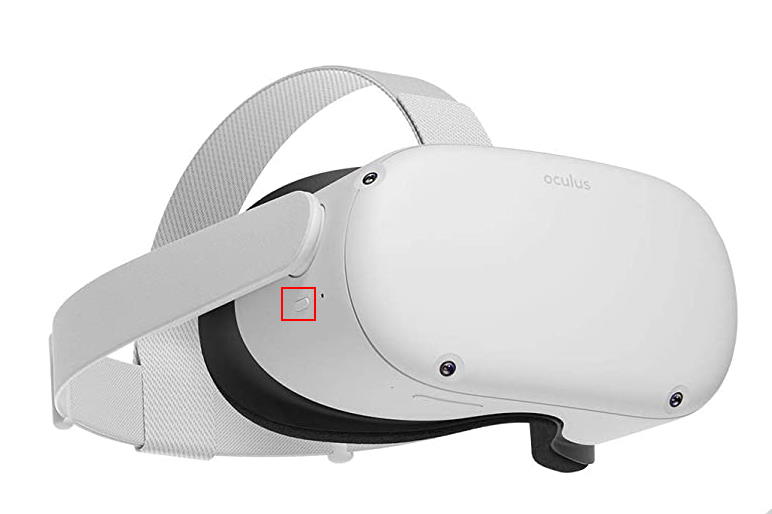
To power on your Oculus Quest 2 headset, press the Power button on the right side of the headset for up to 3 seconds. If the LED light next to the button shows solid white, this means the headset has started booting up.
If the normal way of powering up your Quest 2 does not work (which I believe is the case), then let does next to turn to more advanced troubleshooting steps.
1) Hold down the Power Button for 30+ Seconds
The next step to potentially solve the power issue with your headset is to do a hard reboot. Hold down the power button for up to 60 seconds, until the LED light turns white.
While researching the topic, I found out that there are numerous cases where the Quest 2 had entered into an unexpected state which the hard reboot was able to solve. Try it out!
2) Hold the Power and Volume Down Buttons for 20+ seconds
The next step to potentially start your Quest 2 headset is to simultaneously hold down the Power and Volume Down buttons for 20+ seconds.
Doing so should launch the headset`s boot menu. Use the volume up/down buttons to navigate to the “Exit and Boot Device” option and briefly press the power button to confirm.
3) Leave your Quest 2 Charging For up to 2 hours
Sometimes when the battery of your Oculus Quest 2 is completely depleted, it won’t have enough juice to power the charging circuit. It can take up to a few hours plugged in to get it to charge properly.
Try plugging in the charging cable. If the LED light does not turn on (red / orange) right away, leave your Quest 2 plugged in for up to 2 hours.
If you are able to successfully get your headset charging properly, try to do boot up the device normally or via hard reboot.
4) Try Alternative Cable for Charging
If you are unable to get your Quest 2 charging (no charging light), there might be a problem with your power outlet, charging cable, or power adapter.
If you have a spare USB cable lying around (from your phone, tablet, etc) try charging your Quest 2 with that one. Test charging with another wall outlet in your house. Alternatively, try charging your headset from your PC instead of using a wall outlet and power adapter.
5) Factory Reset
Sometimes, when nothing else seems to help, the best course of action is to reset your Oculus Quest 2 to factory default settings. This is especially true if you can not get your headset powered on anyway.
To complete factory reset on your Oculus Quest 2:
- Hold down the power and volume down (-) buttons on your headset until the boot menu appears
- Using volume buttons navigate to “Factory Reset” option and press power button to confirm
- Select “Yes” option and press power button to confirm.
You can also do factory resetting using your Phone and the Oculus App. This is assuming that you are able to connect your Quest 2 with the phone app.
Note! Are you having any worries or doubts about factory resetting your headset? Click on the link to read my previous article where I demonstrate the whole process step-by-step and list specific actions to take before and after.
6) Contact Oculus Support
When you are completely out of ideas and things to try out, it is usually a good idea to contact the support of the product manufacturer.
Now, I am going to be honest with you – Oculus Support is quite unlikely to provide you with additional ideas to test out in this specific matter, but it is worth trying out nevertheless. Depending on where and how you bought your headset, they might also recall your device and offer a replacement unit.
When submitting your Support Ticket, make sure to list out all of the steps you have already taken to solve the issue. This is crucial to avoid the basic “Have you tried this..” recommendations from the Oculus support team and get to the actual root cause of the problem more quickly.
7) Return Your Headset Under Warranty
Depending on where and how long time ago you bought your headset, it might be possible to return your Quest 2 under warranty and get a new one (or your money back).
Go ahead and investigate all the options you have in this case and if needed (and possible), return your headset.
HARDWARE USED FOR TESTING AND WRITING THE ARTICLES:
* Meta Quest 2 (My “daily driver” headset, which I absolutely love & recommend)
* Lenovo Legion 5 Pro (AMD Ryzen 5 5600H, Nvidia Geforce RTX 3060, 16GB RAM)
* TP-Link Archer C6 (budget dedicated router for Air Link, see my full setup tutorial)
ESSENTIAL QUEST 2 COMFORT ACCESSORIES:
* VR Cover Foam Replacement (one of the easiest & cheapest ways to improve headset comfort)
* BoboVR M2 Head Strap (reduce pressure on your head and improve the overall fit of the headset)