
If you are struggling to get your Meta (Oculus) Quest 2 controllers turned on, then you have arrived at the right place! In this article, I am going to describe how to check if the controllers are turned on and what to do if they are not.
For those that are in a hurry and looking for quick answers:
The first step to take when your Quest 2 controller is not turning on is to remove the battery. Check the battery compartment and clean the contact pins of any corrosion and residue. Make sure the battery is fully charged and inserted the right way. If possible, test with different kinds of AA batteries.
Let’s get into more details and discuss all of the different steps (and a surprising fix) in more detail!
How To Check If Quest 2 Controllers Are Turned On
The first thing you want to do is check whether your Quest 2 controllers are actually turned on. We need to make sure that the controllers are getting power from the battery and luckily there is a simple way to check it.
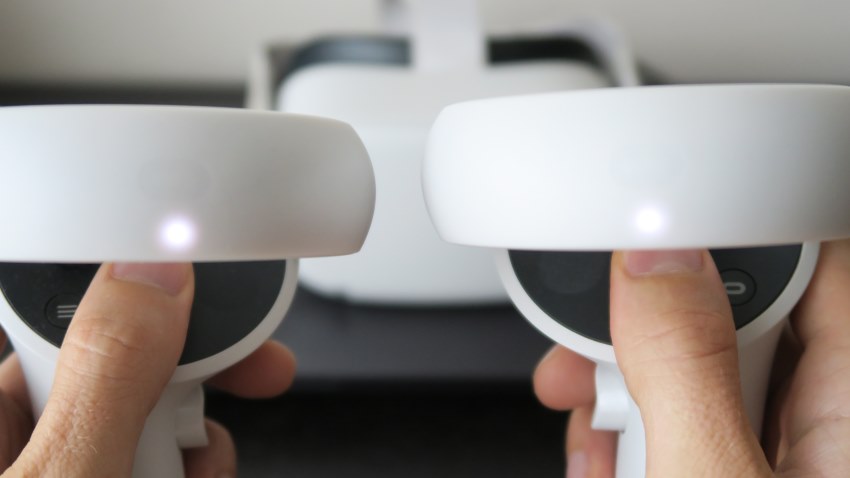
In order to check that the Quest 2 controllers are getting electricity and are turned on, you first have to turn off the headset. Then take your controllers and press the X button on the left one and the A button on the right one repeatedly. If you see lights flashing on the ring of the controllers then this means your controllers are turned on.
If your controller lights turned on you can likely skip this article, and proceed with my follow-up article about troubleshooting Quest 2 controller connection and pairing issues.
However, if you don’t see the controller light flashing three times when pressing buttons (see the featured image), then this means the controller(s) are not turned on (no power) and this is the problem we are going to have to start solving.
Note! Even if your controller lights did turn on, there are cases where a weak connection between the battery and the contact pins can cause disconnects, tracking, or pairing issues. I am discussing this later on in the article.
Quest 2 Controller Not Turning On? Do This…
In this section of the article, I am going to list different troubleshooting steps you can take to understand why your controllers might not be turning on and give tips on how to solve the issue. If you prefer video format, then make sure to watch my Youtube video below:
Remove Battery & Clean the Battery Compartment
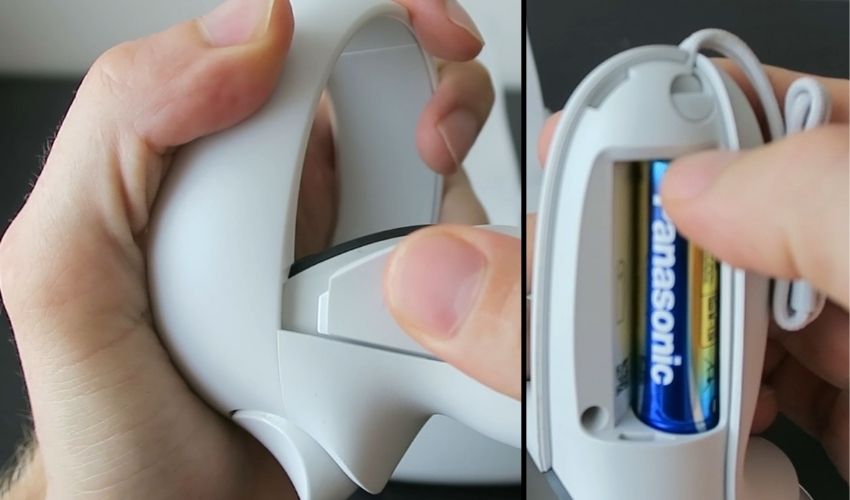
The first thing you want to do is remove the battery from the controller. Press firmly on the battery cover and slide it downwards. Don’t worry if you don’t get it open the first time – try different angles and apply more pressure and you will get it eventually.
Once the battery cover is open, press the battery downward with your thumb from the positive side. There is a spring on the other side which will contract and help you get the battery out.
Check the battery compartment and clean any excess residue and/or corrosion. This is especially important for both of the contact pins which complete the actual electrical circuit.
If you are unsure about how to clean the Quest 2 battery compartment and contact pins then here are things you need:
- Toothbrush (or similar)
- Lemon Juice (or any other acid such as vinegar)
- Paper towel
First, grab the toothbrush and scrub off any loose corrosion that you see. Next, pour a little bit of lemon juice on your brush and scrub over the battery compartment and the contact pins. This helps to neutralize any base residue that might have leaked from the battery.
Finally, wipe the battery compartment and contact pins clean with a paper towel. You might want to dampen the paper towel slightly (not soaking wet!) for better results.
Reinsert Battery
Keep the battery out for approximately 2 minutes before inserting it back into the controller. This will help to reset the connection. After reinserting the battery (make sure you place it in the right way), check and see if the light on the controller starts flashing when you press the buttons.
Try Different Batteries
When cleaning and reinserting the batteries didn’t solve your issue, it would be a good idea to test the controller with different types of AA batteries (preferably new).
The advantage of new batteries is obvious – you can be sure that they are actually fully charged. The reason for testing different types of batteries is that batteries actually differ in build and size (see the image below).
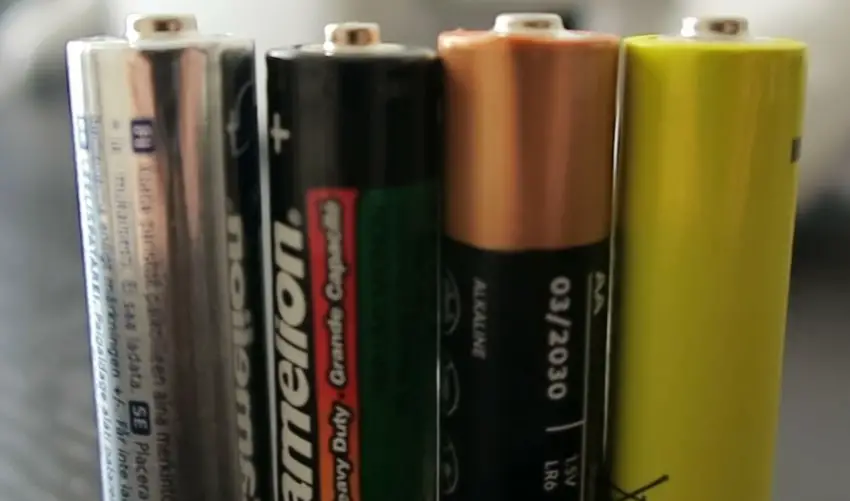
You can clearly see that one of the batteries is significantly shorter than the others while there are also differences in the shape and size of the contact pin. Ideally, all AA batteries should work properly with the Quest 2 controller, but practical examples have shown that this is not the case.
Use Aluminum Foil For Better Connection
If testing out new batteries didn’t work either, the reason for your Oculus controller not turning on might actually be the bad build quality of the controller itself.
To be more precise, there is a spring behind the negative contact pin which can become weaker over time. This in turn can cause the issue that the battery is not properly pushed against the positive contact pin on the other side of the controller.

To solve the issue and help the controller complete the circuit you can place aluminum foil between the contact pin and the battery to help make the contact tighter.
- Grab a piece of aluminum foil
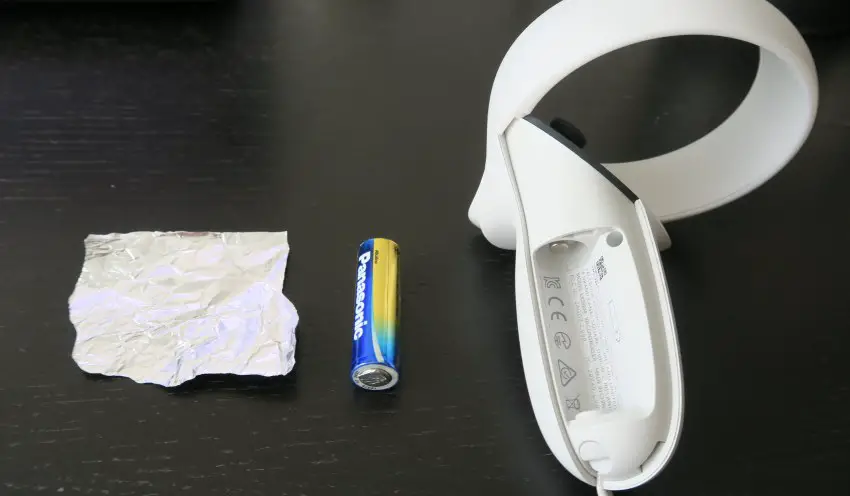
- Fold the aluminum foil and place it on the battery

- Carefully put the battery in the controller

This workaround solution will help to compensate for the weakened spring on the Quest 2 controller contact pin and tighten the connection so the electrical circuit is properly completed.
If anything was left unclear then I have also demonstrated the process in video format here.
Broken Controller
Lastly, I want you to touch and feel the battery temperature when inserted into the controller. If the battery gets warm (or hot) without the controller actually working, there is likely a short circuit somewhere and the controller is broken.
Of course, there are reasons that may cause your Quest 2 controller to stop working – accidentally dropping it on the floor or hitting something while playing are the most common reasons.
If that’s the case for you, send the controller to Meta for replacement or contact your reseller to discuss warranty options.
HARDWARE USED FOR TESTING AND WRITING THE ARTICLES:
* Meta Quest 2 (My “daily driver” headset, which I absolutely love & recommend)
* Lenovo Legion 5 Pro (AMD Ryzen 5 5600H, Nvidia Geforce RTX 3060, 16GB RAM)
* TP-Link Archer C6 (budget dedicated router for Air Link, see my full setup tutorial)
ESSENTIAL QUEST 2 COMFORT ACCESSORIES:
* VR Cover Foam Replacement (one of the easiest & cheapest ways to improve headset comfort)
* BoboVR M2 Head Strap (reduce pressure on your head and improve the overall fit of the headset)