
If you are currently facing tracking issues with your Oculus Quest 2 headset (or Meta Quest 2 as they now call it) then I am glad to let you know that you have arrived at the right place!
Having used the Quest 2 extensively for gaming as well as for testing and writing articles here in this blog, I have had my share of problems with the tracking of the headset. So to help you out, I am going to guide you through the most common problems and solutions that have helped me and might help you as well.
Without further ado, let’s dive in!
It’s Quite Common for Quest 2 To Keep Losing Tracking (Unfortunately)
Before we start, I would like to calm you down a bit and assure you that most likely there is nothing wrong with your headset. It’s just that the Quest 2 tracking system is basically a tech-world equivalent of a spoiled brat.
Room is too dark? Doesn’t work.
Room is too bright? Doesn’t work.
Reflective items? Doesn’t work.
Software update? Doesn’t work.
I could go on and on with this list and even though I know most of the things that affect the Quest 2 tracking negatively, I still bump into tracking glitches (mostly at startup) probably more than a quarter of all the times I use the headset.
However, the good news is that I personally have always gotten around the tracking problems eventually, and hopefully, the upcoming steps will help you do the same.
1) Hold Your Headset Steady & Controllers In Sight
When the tracking of the headset gets glitchy for whatever reason, there are a couple of things you can do to help the headset map your play area properly and resume normal work:
- Hold your head(set) steady. No rapid head-turning at this point.
- Slowly looking up and down and to the sides can help the Quest 2 with room mapping.
- Make sure you are not covering the cameras on the headset with your hands.
- Place your controllers in sight of the headset. Move them around in front of you while also repeatedly pressing buttons.
- Be patient. Sometimes the image jumps around for quite some time until suddenly it starts working again.
Doing this has quite often helped me overcome temporary glitches and tracking lost errors thrown by the headset.
2) Turn Quest 2 Tracking On Manually Again
If the headset was unable to correctly identify your surroundings and disabled tracking, you can try turning it back on manually. Go to headset “Quick Settings” and click on the “Guardian (Off)” icon which will then prompt you whether you want to enable tracking.
Alternatively, you can go to the full list of headset Settings→ “System” → “Headset Tracking” → enable the tracking toggle.
For whatever reason, sometimes enabling the tracking manually (after the headset has disabled it) has helped me get around tracking issues. Maybe it has something to do with the time factor and the Quest 2 being able to probe the surroundings longer.
3) Reboot Your Headset
The good old “Have you tried turning it off and on again” is a good remedy to various tech problems, and the Quest 2 headset is no exception here.
Hold down the power button until you see a dialog with the “Restart” option. Complete the reboot and see if anything changes. Alternatively, you can try shutting down the headset by pressing and holding down the power button for 10+ seconds and testing again.
4) Clean the Cameras
The four cameras that are located on the front plate of the headset are used for both room mapping as well as tracking your controllers. It is therefore essential that the cameras have no smudges/dust/hair on them for optimal tracking.
Grab a clean piece of clothing (preferably micro-fiber) and wipe clean all of the four cameras in a circular motion. Reboot the device after cleaning the lenses. The solution to your Quest 2 tracking lost issues might be as simple as that!
5) Modify Play Area Lightning Conditions
As mentioned earlier, the Quest 2 really is very sensitive to the play area’s lighting conditions and it is quite likely that here lies the root of your problems.
The first thing you wanna do is remove any bright lights (or add a shade/cover) that are directly visible to your headset. Make sure that no LED lights are pointed directly at you or in a position to interfere with the LEDs on your controllers (christmas lights, ring lights, web cameras, etc).
If the sun is shining in through the window (causing patches of light) then close the blinds. Also, remove any reflective items that are in plain sight (mirrors are a good place to start). Even the light coming from your monitor or laptop screen might interfere with the tracking.
Ideally, you also want your room to be well and evenly lit. After making changes to the room lightning, reboot your Quest 2 and try again to see if tracking issues are gone.
6) Try Playing in Another Room
If you did your best to ensure that your headset has optimal room lighting conditions but the problems still persist, go ahead and try using your Quest 2 in another room.
You never know what might interfere with the Quest 2 tracking and it is worth giving it a shot. For example, power cables, appliances, fluorescent lights, and various wireless devices could theoretically be interfering with the tracking.
Based on my personal experience the headset also doesn’t like when the play area is crowded with different objects (my table is often quite messy). Clean and flat surfaces in the room are the best for optimal tracking.
In addition to different lighting conditions and ruling out interfering devices, trying a different play area will help to rule out problems with the saved guardian in your primary gaming location
7) Delete Your Saved Guardians
When you create a guardian, your Quest 2 headset will store it so you can resume playing the next day without having to recreate the guardian for the same room.
There are occurrences, however, where a slight change in your room (different lighting conditions, objects moved around) might confuse the tracking of the headset.
It is worth trying to delete saved guardians (Settings – Guardian – Clear Guardian History) and try again with a new guardian.
Note! Starting from Oculus Quest build 33.0, clearing guardian history will also delete guardian maps and tracking data (in addition to boundary data). If you have previously tried deleting guardian data without seeing improvements in tracking, it is worth trying the functionality again.
8) Unpair and Reconnect Your Controllers
Similar to turning off / on the headset, it is sometimes worth trying to do the same for your controllers.
Disconnecting and then repairing the controllers can be done using the Oculus mobile app on your smartphone. Go to Menu → Devices → Controllers → Choose one of the controllers → Unpair Controller.
Once you have successfully disconnected, pair the controller again. If you want more information, I have made a step-by-step tutorial for pairing/unpairing Quest 2 controllers. Proceed to complete the procedure for the second controller and test to see if your tracking issues still persist.
Note! If you don’t have the Oculus app in hand, a quick workaround to unpair controllers is to simply remove the batteries from the controllers for a minute or two.
So leave the batteries out for about 2 minutes to reset the wireless link. After that, reinsert the batteries, push some buttons on the controllers to repair, and see if there are any changes with the tracking.
9) Switch Between Controller & Hand Tracking
The Quest 2 is able to automatically switch between controller and hand tracking. The problem here is that in some cases (and software releases) this can cause tracking issues.
If you have hand tracking enabled on your Quest 2 headset, try turning it off. To do so go to Settings → Hand and Controllers → Toggle “Hand Tracking” off.
Alternatively, if you have not used hand tracking, try turning it on and using your heads instead of your controllers to see if there is any difference in terms of the tracking issues you are facing.
10) Turn Headset Off (Instead of Standby Mode)
One thing I have noticed with the Quest 2 is that the tracking tends to be much more glitchy after waking the headset up from sleep mode.
I quite often have to reboot my headset after waking it up from sleep because the tracking just gets glitchy. If that’s the case for you as well, I recommend turning the headset off instead of leaving it in standby mode.
11) Change Tracking Frequency
Another thing to try is to change the tracking frequency which can be done from “Settings”→ “System” → “Headset Tracking” → “Tracking Frequency”.
Although the “Auto mode” should automatically detect your country’s electric system polarity switching frequency, you can find out the correct value from the previous link and set it manually within your Quest 2 settings.
It can’t hurt to try the alternative tracking value either (so if you live in the USA and it’s 60Hz, try 50Hz as well). If you see no improvements in the Quest 2 tracking, make sure to restore the default value (“Auto”).
12) Place your Headset & Controllers on The Floor
This recommendation might seem weird, but I want you to place your headset and controllers on the floor in your play area (with the controllers in sight of the cameras), power on the headset, and leave it there for about a minute.
What this does is that it offers your headset an alternative and steady view of your play area which surprisingly may help the Quest 2 map your room correctly. Since it is so quick and easy, go ahead and do it – you have nothing to lose.
13) Change Controller Batteries
If you are using rechargeable 1.2V batteries in your controllers, make sure to test your controllers out with regular good-quality AA batteries (1.5V). Although in theory battery voltage should not affect your tracking, some people have claimed that this was the root cause of their tracking problems.
I have also seen the Oculus support team suggesting putting in a fresh pair of batteries when facing tracking issues, so I guess it can’t hurt to try it out, right?
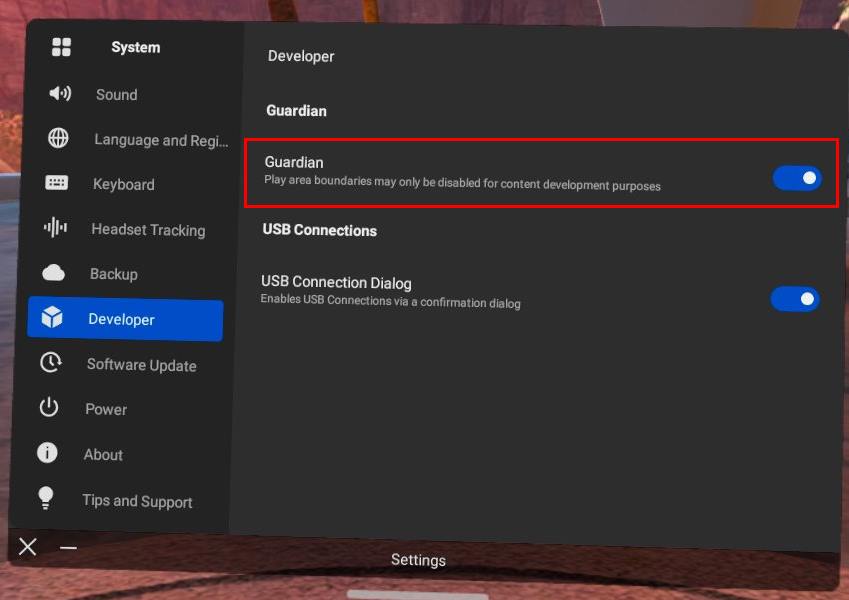
14) Turn Off Guardian
Another workaround that might help you overcome the Quest 2 tracking issues, is simply to disable the Guardian on your Quest 2. Do keep in mind that the guardian is there for a reason (to protect you and your property) and turning it off is really not feasible in small spaces where you risk bumping into things.
However, when you have a large enough play area and/or can place a carpet/mat beneath your play area (to help you understand your location in the room), you can also play without the guardian set in place.
In order to turn off the Guardian, you will first need to enable developer mode on your Quest 2. Once you have done that go to “Settings”→ “System” → “Developer” → toggle the “Guardian” option off.
15) Update Your Device
If your Quest 2 is not at the latest software revision, be sure to update your headset. Oculus has released plenty of software releases where they have tried to specifically address the tracking issues (e.g Oculus Quest build 38.0, which is the latest one at the time of the writing).
The Quest 2 headsets will update automatically when connected to WiFI and turned on. Just make sure that:
- The device is fully charged
- The headset is turned on (sleep mode is considered as “on”)
- Your Quest lies on a flat surface without movement or blocking the inside sensor for an extended period of time.
Alternatively, you can opt to check and apply updates manually by going to “Settings”→ “System” → “Software Updates”. If you know that a new version has been released but you don’t see it yet, then just leave your headset in sleep mode with the charging cable plugged in. Your headset will then eventually receive and apply the update.
16) Do a Factory Reset
As a last resort option to solve your tracking problems, you can do a factory reset to your headset.
I have personally overcome tracking issues with the Quest 2 using other methods in this list. However, several users in the community have resorted to factory resetting the headset and it has helped them to overcome tracking problems (at least temporarily).
Note! Are you having any worries or doubts about factory resetting your headset? Click on the link to read my previous article where I demonstrate the whole process step-by-step and list specific actions to take before and after.
17) Contact Oculus Support
If you have tried everything and can’t seem to solve your headset tracking problems, it might just be the case that there is a problem on the hardware side.
Create a ticket to Oculus Support, describe the problem and the solutions you have tried. I recommend being thorough here because otherwise you will be receiving very standard answers from Oculus Support and bouncing information back and forth will take too much time.
If your headset is new and still under warranty (bought from a reseller) you can also ask for a refund or replacement unit.
HARDWARE USED FOR TESTING AND WRITING THE ARTICLES:
* Meta Quest 2 (My “daily driver” headset, which I absolutely love & recommend)
* Lenovo Legion 5 Pro (AMD Ryzen 5 5600H, Nvidia Geforce RTX 3060, 16GB RAM)
* TP-Link Archer C6 (budget dedicated router for Air Link, see my full setup tutorial)
ESSENTIAL QUEST 2 COMFORT ACCESSORIES:
* VR Cover Foam Replacement (one of the easiest & cheapest ways to improve headset comfort)
* BoboVR M2 Head Strap (reduce pressure on your head and improve the overall fit of the headset)