
If you are trying to play VRChat on your Quest 2 (whether in standalone or PCVR mode) and are having issues, I am happy to let you know that you have arrived at the exact right place!
Since different problems with VRChat are quite common, I did some testing/installations and additionally gathered information from other users to compile an extensive list of steps you can take to solve your current problems with VRChat.
So without further ado, let’s get started!
Three Ways of Playing VRChat (with Different Issues)
The first thing that is important to know is that depending on how you are trying to install and play VRChat, there are also different issues and troubleshooting steps to solve the problem.
The three main ways you can currently play VRChat on the Quest 2 are:
- VRChat in Quest 2 Standalone Mode
- PC VR and VRChat from Oculus PC Games Library
- PC VR and VRChat from Steam
To make sure that you didn’t miss anything in the installation process, make sure to check my step-by-step VRChat installation guides from the Youtube video below:
If you seem to have done the installation process correctly but are facing problems, then go ahead and proceed to the actual troubleshooting part of this article. I am going to start.
VRChat Not Working In Quest 2 Standalone Mode (No PC)
In theory, installing and playing VRChat in Quest 2 standalone mode should be the most stable and least problematic option. However, if you are having problems, follow these steps to potentially solve your issue.
1) Restart Your Headset
The first step to start with if you are having problems with VRChat is to simply restart your headset by holding down the power button until the shutdown menu appears. Select “Restart”to complete the reboot process and try launching VRChat again.
2) Try a Different Network Connection
One of the most common problems with the Quest 2 standalone version seems to be that users get stuck on the loading screen or are simply unable to log in properly. This is most commonly caused by VRChat servers denying the network connection.
To overcome the issue, my recommendation is to try an alternative internet connection. If you have dual Wi-Fi connections set up at your home, try the second one. Or maybe you have access (or can ask) access to the neighbor’s Wi-Fi.
Another way to overcome the problem is to create a mobile hotspot and connect your Quest 2 to that network. This is probably not ideal as a permanent solution. However, if VRChat works for you this way, it can give you confirmation that network issues are indeed the root cause of your problems.
From here you could then proceed and try to find the final solution to your issue (e.g force a network restart and a new dynamic IP to be allocated.
2.1) Power Off Your Router for ~60 seconds
The common characteristic of most routers and network setups is to “remember” the IP address you have been assigned. You can potentially overcome this by turning off your router for approximately 60 seconds and then turning it back on.
2.2) Use a VPN
Using a virtual private network (VPN) service changes your external IP address by rerouting all the network traffic through an external server node. For this reason, using a VPN software (e.g NordVPN, Surfshark, etc) can potentially solve your VRChat connectivity issues
3) Just Wait It Out
Although most modern service providers have usually tried their best to implement a robust and “always up” infrastructure, service outages can still happen (both for Oculus/Meta as well as VRChat).
So if VRChat previously worked nicely, but you are now suddenly having issues loading the game and/or logging in, the best course of action to save your nerves might simply be to wait it out (whether that be for an hour or try again the next day).
4) Check if Other Games are Working
Somewhat tied to the last point, but if you are having unexpected issues with VRChat, go ahead and try if other online games are currently working for you. If they are not, you will know that the issue is more general and not directly related to VRChat.
5) Try Alternative Accounts for VRChat
If you are using a VRChat account to log in, for debugging reasons try to create a new account and use this one to play the game. You can also try using your Oculus account instead of your VRChat account (and vice versa).
This will help you understand if the current issues are potentially related to the account you are using.
6) Delete VRChat Temp & Account Data
If you can launch VRChat but are having unexpected issues with the game, one step to take is to clear all the downloaded content cache and account data.
In order to do that, navigate to VRChat settings and go to “Advanced Settings”. Here you should go on delete all the downloaded data:
- Downloaded Content Cache
- Local Profile Data
- Local Avatar Data
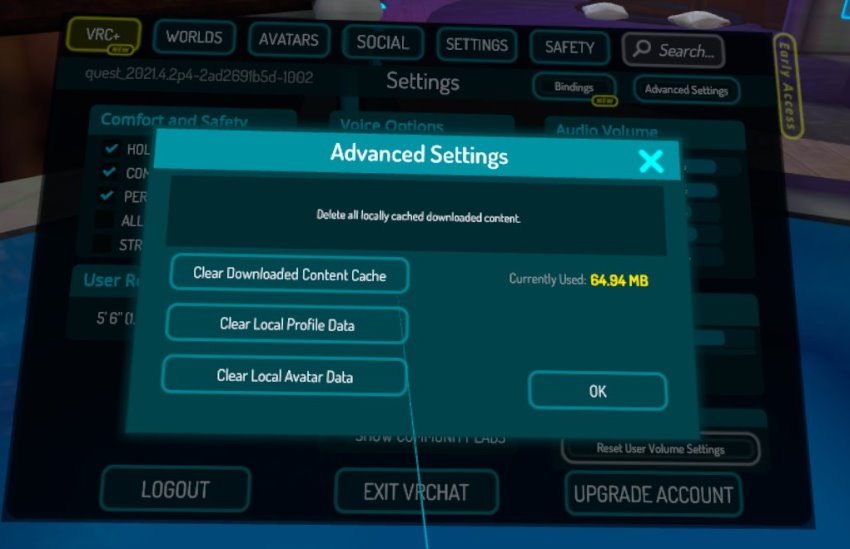
After that is best to quit the game and then launch again to see if the issues still persist.
7) Make sure Your headset Is Up to Date
Generally, the software version your Quest 2 is running on should not affect the functionality of separate games. But in rare cases, it can. So make sure you have all the latest updates applied to your headset.
8) Reinstall VRChat
If you have come this far and haven’t solved the issue you are having, then one of the last things I can recommend is trying to uninstall and then reinstall VRChat on your headset.
In order to uninstall VRChat, navigate to your Apps, point your controller to the VRChat application, click on the 3 dots and select “Uninstall”. Go ahead and then reinstall VRChat and try again.
9) Factory Reset
I am not a big fan of this, but sometimes factory resetting your Quest 2 can solve various “mysterious” issues. I have gone through this a couple of times (albeit not with VRChat specifically) and found it to be helping.
Note! Are you having any worries or doubts about factory resetting your headset? Click on the link to read my previous article where I demonstrate the whole process step-by-step and list specific actions to take before and after.
10) Contact Oculus / VRChat Support
My final recommendation is to contact both the Oculus as well as VRChat support to help you solve your issue. Be as detailed as possible in describing the issue you are having and also the things you have already tried to solve the problem
Troubleshooting VRChat Issues In PC VR (Link / Air Link / VD)
In this section of the article we are going to look at the different troubleshooting steps and solutions if you are having issues with the PC VR version of VRChat (either using Oculus Link / Air Link or Virtual Desktop).
1) Check PC Requirements
The most common reason I see people having issues with the PC VR version of VRChat is using a PC that simply is under specced for running games in VR. If you are unsure, go ahead and check the requirements for Oculus Link from my previous article.
Note! If you have a PC slightly below the minimum requirements for Oculus Link, then using Virtual Desktop has (sometimes) proven to offer better results. Keep in mind it is a paid app and there is no guarantee you will get PC VR running.
2) Restart your PC and Headset
If PC VR games generally work for you, but you are having sudden unexpected issues with VRChat, the first thing to try is restarting both your PC and Quest 2 headset.
After restarting, go ahead and try launching VRChat again to see if anything has changed.
3) Delete VRChat Temp & Downloaded Files
If you can generally launch and access VRChat but are facing unexpected issues later on (e.g going to specific worlds), then navigate to VRChat advanced settings and delete all temporary and downloaded files (also described earlier in the article)
If VRChat is not launching at all (or crashes) and you can access the in-game menu, you can try deleting the VRChat files manually.
- Type “cmd” in Windows taskbar search
- Right-click on “Command Prompt” and select “Run as administrator”
- Copy and run the code below which will automatically delete the files.
rmdir /S /Q "%AppData%\..\LocalLow\VRChat\vrchat\Cookies" 2>nul & rmdir /S /Q "%AppData%\..\LocalLow\VRChat\vrchat\HTTPCache" 2>nul & rmdir /S /Q "%AppData%\..\LocalLow\VRChat\vrchat\Unity" 2>nul & rmdir /S /Q "%AppData%\..\LocalLow\VRChat\vrchat\VRCHTTPCache" 2>nul & rmdir /S /Q "%TEMP%\VRChat" 2>nul & rmdir /S /Q "%UserProfile%\.cache\youtube-dl" 2>nul & REG DELETE HKCU\Software\VRChat\vrchat /vaIf you face any issues and/or errors during the process, refer to the VRChat official manual for additional steps to delete the required files and folders separately.
3) Verify Integrity of VRChat Game Files (Steam)
The next step you can take to solve the VRChat crash issues with your Quest 2 is to check the integrity of the VRChat game files. In order to do that, follow these steps:
- Head over to the Steam Library
- Right-click on the VRChat game name and click on Properties.
- Choose “Verify Integrity of Game Files” under the Local Files tab.
If the process detects any problematic files, go ahead and resolve the issues and then try playing VRChat again.
4) Reset Your Avatar
Another potential reason why you might have issues with VRChat is conflicts with your uploaded avatar(s). Go to the VRChat website, log in and select “Reset to Default Avatar” from the “Avatars” section.
5) Update Drivers & Software
The next step I would recommend is to check that all of the required software and drivers are updated to the latest revision. This includes:
- All Windows Updates Applied
- Graphics Card Drivers
- Headset Firmware
- Oculus PC Software
- Steam / SteamVR
If any of the items in the list have updates available, go ahead and apply them and try launching VRChat again.
6) Add Firewall Exceptions
Another thing to look out for is that firewall and antivirus software may accidentally be blocking connection to VRChat servers. For example, if you are facing a stuck loading screen and/or are unable to log into the game, this might very well be caused by a blocked outbound connection.
The easiest way to check this is to temporarily disable the real-time protection of your Anti-Virus and firewall software. If this fixes the issue, you’ll know that you have to add expectations for VRChat in one or both of the installations.
Note! Never leave your Antivirus and Firewall disabled permanently! They are installed on your PC for a reason and without them, you are open to various vulnerabilities and potential external attacks.
7) Try Alternative VRChat Login Methods
Next, go ahead and try alternative methods for logging into VRChat. So if you are playing VRChat from the Steam Library, test both the VRChat and Steam login methods. For Oculus, test both the VRChat and Oculus login options.
If you are currently using a VRChat account, I would also recommend you to create a new blank VRChat account and test the game out with that.
8) Test different PCVR & VRChat Methods
Another thing that can potentially help you troubleshoot and solve the current VRChat issue, is to test with alternative PCVR and VRChat methods.
If you are currently playing VRChat from the Steam library, go ahead and also test the game from the Oculus library. And vice versa.
Additionally, test out different PCVR methods. So if you are currently having issues with regular wired Oculus Link, then give Air Link and Virtual Desktop a try. This way you can potentially narrow down the issue and/or find a working solution.
9) Disable SteamVR Beta
If you have opted into downloading a SteamVR Beta client, try disabling it again and rolling back to the previous known stable version. In order to do that:
- Open Steam Desktop application (not SteamVR)
- Open Library and go to SteamVR
- Open the “Settings” cogwheel
- Select “Properties”
- Select “BETAS” tab and select “None”
Once you have rolled back the SteamVR client version, test VRChat again.
10) Reinstall VRChat
Reinstalling VRChat is one of the last things I can recommend doing if you are still having issues. After uninstalling VRChat, make sure that you also manually delete all the downloaded content and temporary files. Then go ahead and reinstall VRChat to test if the problems are gone.
11) Oculus / VRChat Support
My final tip is to contact both the Oculus and VRChat support representatives. Be very specific and detailed in your problem description and also list all of the steps you have already tried to solve the issue. Make sure to also gather and include log files from your PC to help the support team understand the issue better.
That is currently all from me. I do hope this article helped you get to the root cause of your VRChat! If you have any questions, feel free to leave a comment on my VRChat installation video and I’ll certainly reply if I can.