

Virtual Desktop might easily be one of the best and most useful applications ever made for VR enthusiasts. This is especially true if you own an Oculus Quest / Quest 2 headset and want to enjoy the wonders of wireless PC VR gaming.
But what to do if you just can not get Virtual Desktop running properly? Various lagging, stuttering, and high latency issues are unfortunately quite common and can totally ruin the overall gaming experience.
Luckily, most of the time you can solve these problems with a bit of troubleshooting and that is exactly what we are going to do in this article. So without further ado, let does dive right in!
Did you hear? Facebook (Meta) is going all-in on virtual reality and the metaverse. Get a Quest 2 headset and be a part of the future of entertainment!
1) Use Performance Overlay To Determine Bottlenecks & Measure Changes
When you are debugging performance issues and doing any changes, wanting to improve your Virtual Desktop performance, you’ll surely want to know if the modifications have had any positive effect. Sometimes it’s obvious (e.g you get rid of lagging altogether and everything works smooth).
Oftentimes, however, the improvements in performance (or deterioration for that matter) are marginal and thus hard to detect with your bare eye. It’s therefore important to measure the performance and the effect of the changes you are making to see if you are heading in the right direction.
This is where Virtual Desktop performance overlay comes to help. You can enable the feature in Virtual Desktop Streaming settings tab and it will then show the following information when playing games.
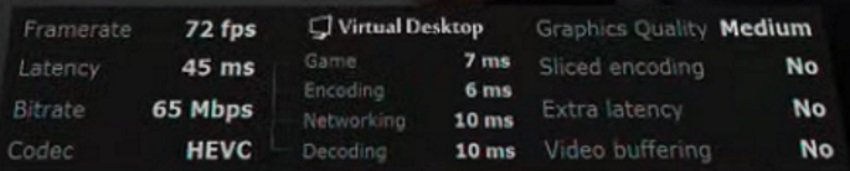
Several of the items listed here just show configurations made in the application settings. The Virtual Desktop performance metrics that help us debug problems and measure changes are:
- Latency – the average total time it takes to complete everything required for gaming (game rendering, network communication, video encoding in PC, and then decoding in your Quest / Quest 2). Ideally, you want the latency to be less than 40ms for an optimal gaming experience.
- Game – the time it takes your PC to render the game. If the metric goes into high values too often, it means you need to lower the VR Graphics Quality and/or VR Framerate. You can also tune down graphics in the game settings. Look in your Windows Task Manager for processes that are showing high GPU (and CPU) utilization.
- Encoding – the time it takes the encoder (GPU) to receive the video frames and encode them. If you have high encoding latency, try switching the encoding codec (HEVC / H.264) or lowering the Bitrate. Also, try turning on “Sliced Encoding”
- Networking – performance of your home network and the router you are connected to. If network latency is high, make sure your PC is wired to the router and you are using a 5 GHz Wifi (with optimized router settings) for the headset.
- Decoding – the time it takes your Quest / Quest 2 to decode the compressed video. If decode latency is high, try switching to H.264 Codec and/or reducing Bitrate.
2) Use Cable to Connect your PC and Router for Lower Latency
No matter how good your WiFi connection, using an ethernet cable for connecting your PC and router will always provide a more stable and faster connection with lower latency.
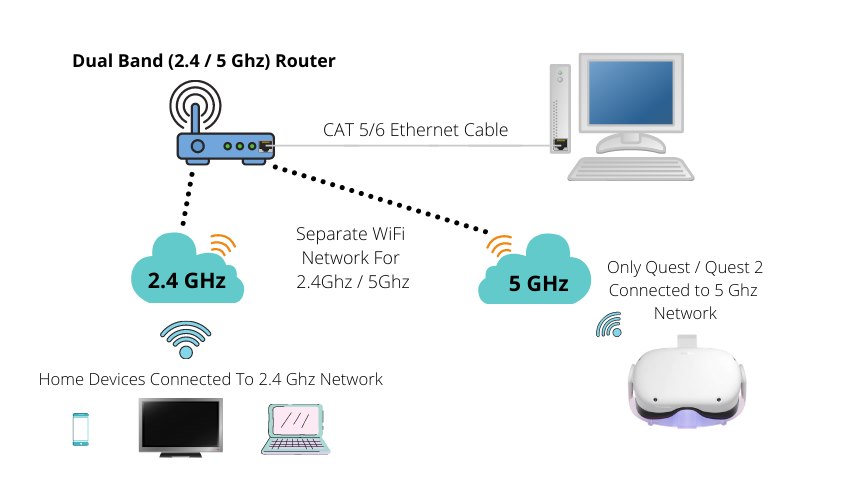
Using a wired connection is also recommended in the Virtual Desktop frequently asked questions section. So if you were previously using a WiFi connection for your PC, be sure to use an ethernet cable (CAT 5 or 6) for reduced latency and lagging.
3) Use a Dedicated 5GHz WiFi Network for Your Quest / Quest 2
Most of us who are planning to use Virtual Desktop will be using the network router that we were given by our internet service provider. More times or not, this was a long time ago and the router just doesn’t meet the requirements for an optimal Virtual Desktop gaming performance.
To avoid latency spikes and lagging when using Virtual Desktop, it is highly recommended connecting your Quest / Quest 2 to a (preferably dedicated) 5GHz WiFi network.
What are 2.4GHz / 5GHz Band Frequencies? Why Does It Matter?
The band frequency numbers refer to the two different “bands” that your WiFi can use for its signal. In the computer world, higher is usually better and this is mostly true in this case well.
The main differences between 2.4GHz / 5GHz WiFi band frequencies are:
- Speed – in ideal conditions, 2.4GHz will provide a maximum network speed of around 300-600 Mbps whereas 5GHz will go up to ~1300Mbps
- Congestion – 2.4Ghz band frequency is usually much more congested than 5Ghz. This is especially true if you live in an apartment or condo surrounded by other people which in turn may cause dropped connections, reduced signal quality and network speed.
- Signal Range – 2.4GHz signal has longer effective range and better transmission through walls and solid objects (part of the reason it is used more often). 5 GHz is more suitable if you are in the same room or near the router.
The key takeaway here is that with a 5GHz Wifi network, you will get higher network speeds and a more stable connection, provided that you are in close proximity to the router.
Check If Your Router Supports Dual Band Frequencies
The first thing you want to check, whether your specific router supports dual (or tri) band (2.4 / 5 GHz) frequencies. Go look up your router model and just google “[your router] frequency band”. If it lists as “dual band” or “2.4 GHz / 5 GHz” then it’s a good sign and means that you can create separate WiFi networks for the two frequencies.
If you have a single band (2.4GHz) router, you will most likely have to purchase a secondary dual (or tri) band router for optimal performance (discussed later in the article)
Split Your 2.4GHz & 5GHz WiFi Networks
With dual band routers, you can create separate WiFi networks for 2.4GHz and 5Ghz frequency bands. For that, you need to be connected to the router via WiFi or Ethernet and use a web browser to log into the web management interface.
Follow the information on the bottom of the router (or use the manual) to get instructions on how to enter the management console. Since there are also many different manufacturers and routers, you will additionally have to google how to split the frequencies into two different networks (if you can’t figure it out yourself)
For example, here is a manual for splitting the frequencies on TP Link routers.
If you have successfully created separate WiFi networks for 2.4GHz and 5GHz, connect all your home devices to the 2.4GHZ and leave the 5GHz network solely for your Oculus Quest / Quest 2 to use.
Note! Sometimes, even if you have a dual-band router that supports 5GHz, the performance issues still origin from the router itself, which just might not meet the requirements for Virtual Desktop gaming. I have described setting up a dedicated router for VD gaming later in the article.
4) Be Close To the Router
As discussed, the 5GHz WiFi band frequency has a shorter effective distance range and is quite sensitive to walls and other solid objects. For this reason, you want the router to be in the same room as your Quest / Quest 2 with straight visibility to the headset.
If there is no way for you to move the router or play in the same room, you might consider purchasing a dedicated router for your Virtual Desktop setup. Click on the link to navigate to the part of the article explaining this setup in more detail.
5) Fine-Tune Your Router 5GHz Wifi Network Settings
Use your router’s management console to do the following changes on the 5GHz WiFi network you previously configured. Make sure you are editing the 5GHz Wifi network and not the 2.4Ghz one.
5.1) Change Network Mode to 802.11ac or 802.11ax
Most routers have been configured to use mixed network modes with default settings. You want to change this and configure it to use 802.11ac or 802.11ax only.
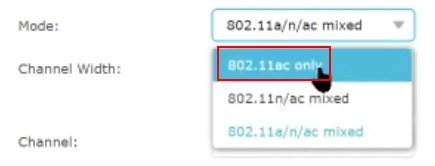
Depending on the router you have, selecting 802.11ac/ax only is the most optimal choice for Virtual Desktop.
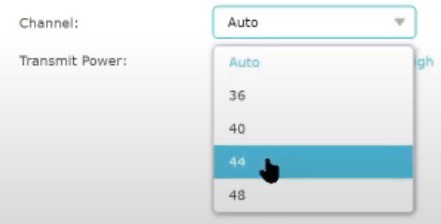
5.2) Find and Use the Least Congested WiFi Network Channel
In addition to different band frequencies (2.4 and 5 GHz), wireless networks also use different network channels to forward and receive data. These channels can overlap for different wireless networks and can cause degraded performance, especially in crowded urban areas.
In most cases, routers automatically choose which channel to use for your connection by default. However, you want to choose the channel manually and make sure that your router is the only device operating on the specific network channel.
One way to approach this is just to test different channels and see how they perform. However, the more methodical and accurate approach would be to use a WiFi scanner for this purpose:
- Windows / Mac – WifiScanner
- Android – WifiAnalyzer
- iPhone (iOS) – Airport Utility
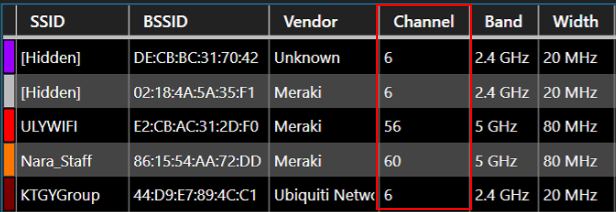
Based on the WiFi networks in your proximity (and the channels they use), pick a channel for your WiFi network that is currently not in use (or used the least)
5.3) Change Channel Width to 40 or 80 MHz
The channel width is simply the frequency range for the channel(s) used. 20 MHz used to be the norm and only option for channel width but with WiFi 5 (802.11ac) and WiFi 6 (802.11ax), channels can be bonded together for a maximum channel width of up to 160 MHz.
Choosing a larger channel width means higher throughput (which we want for wireless VR gaming), but it also means a higher probability for channels overlapping and thus interferences.

If you live in an isolated area with not many other 5GHz WiFi networks around, set your channel width to 80Hz. If however, you happen to live in a very crowded area with many other networks nearby, test both the 40Mhz and 80Mhz options to see which works better for you.
The information from WiFI analyzers can help you determine how “crowded” WiFi networks are in your area and thus whether to use 40Mhz or 80MHz channel width.
5.4) Disable Smart Connect
Smart Connect is a feature available in many modern routers that automatically switches devices between different band frequency connections (2.4GHz / 5GHz) based on signal strength, network congestion and other factors.
For our specific Virtual Desktop scenario, we want our Oculus Quest / Quest 2 connected and locked into a dedicated 5GHz WiFi network. So go ahead and disable the “Smart Connect” option from your router settings.
5.5) Disable Quality of Service (QoS)
Quality of Service (QoS) is a feature of routers that prioritizes traffic so that more important traffic can pass first. The setting does not match too well with Virtual Desktop and has caused issues for numerous people. Disable QoS on your router and see if the performance improves.
6) Adjust Virtual Desktop Settings
Next, we are going to dive into the settings you can modify within Virtual Desktop. Since each of us is running on slightly different hardware, it’s impossible to give the best “one-fits-all” settings that are applicable for everyone.
You are just going to have to modify the settings and test things out to find the optimal balance between graphics and performance. The general rule for debugging lagging problems would be to start with “low” settings and move upwards from there.
6.1) Change Codec to H.264 (Streamer App)
Switching the codec from “Auto” to “H.264” in the Desktop Streamer app has shown to reduce latency and give better performance (especially for Oculus Quest 1 users).
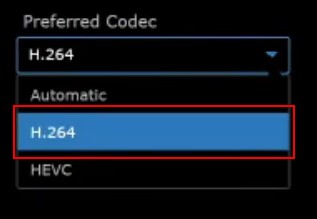
Try out H.264 first and see if your overall experience improves. If not, then test HEVC as well to establish a comparison point between the two codecs (and which one to proceed forward with).
6.2) Adjust VR Graphics Quality and VR Frame Rate
In case of performance issues and lagging, start with setting your VR Graphics Quality setting to “Medium” and VR Frame Rate to 72 fps. You can then start going up from here if you see improvements regarding your overall gaming performance.
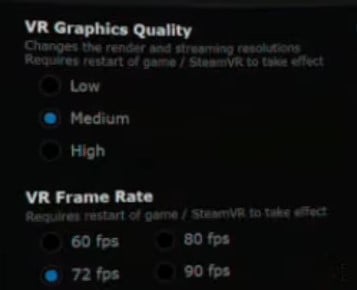
If you know that your PC specs are on the lower end then you could also go for “Low” and 60 fps. With the lowest settings, you might just not be satisfied with the overall gaming experience even if you get rid of your lagging issues.
6.3) Reduce VR Bitrate
Video bitrate is the amount of video data transferred in a certain period—the lower you have this set, the more “compressed” the video will look.
The first thing you want to do is determine an optimal value range for Bitrate that your network can handle. To do this, enable “Automatically adjust bitrate” in the VR Streamer App. When this option is enabled, Virtual Desktop automatically determines an optimal VR Bitrate value each time you launch the application.
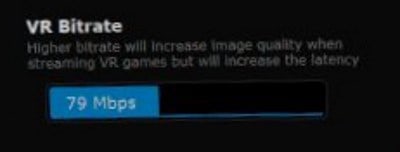
Do a couple of test runs to see what Bitrate value Virtual Desktop thinks is most optimal for you. Once you have a general idea of what the “optimal value” is, turn off “Automatically adjust bitrate” and set the Bitrate to a lower value (from your headset under the “Streaming” tab)
Test the performance with a lower Bitrate and see if you see any improvements in performance and the lagging/stuttering issues you were having.
6.4) Sliced Encoding / Extra Latency mode / Video buffering
It’s hard to give a single best recommendation regarding how to set these settings, as people have had so many different results. One combination that has worked well for many people:
- Sliced Encoding ON – causes frame encoding to be forwarded in parts, thus improving throughput and reducing latency.
- Extra Latency mode OFF – an internal function of Quest headsets that adds one frame of latency to help with consistent frame delivery.
- Video buffering OFF – Feature of Virtual Desktop that queues one frame (but only at the point a frame is dropped and only then will it add latency).
If you find there is no improvement with the given settings, try enabling both Extra Latency mode and Video buffering. Although Sliced Encoding ON generally gives better results for most people, be sure to measure your performance when it is also switched off.
7) Disable SteamVR OpenVR Input Emulator Addon
Although you probably installed the addon for a reason, OpenVR Input Emulator has been reported to create a wobbling effect and reduced framerate. For testing purposes, disable the addon and see if your performance improves.
8) Uninstall OpenVR Advanced Settings
OpenVR Advanced Settings has caused people numerous different issues when used together with Virtual Desktop. The definitive method to remove the addon and restore SteamVR to defaults is to do a clean reinstall by following this manual.
9) Disable Nvidia in Game Overlay and Shadowplay
If you are using an Nvidia graphics card and have Geforce Experience installed, be sure to disable the in-game overlay and also Shadowplay features. Both of these features have been reported to cause a variety of errors and performance issues when used together with Virtual Desktop.
10) Disable Windows Xbox Game Bar
If you have Windows Xbox Game Bar installed, then go ahead and disable it from the game bar settings. If enabled, the application might be utilizing your GPU resources and thus degrading the performance of Virtual Desktop.
11) Fix Periodical Lag Spikes (Windows Settings)
Sometimes you don’t see constant lagging / stuttering when using Virtual Desktop, but instead periodical (e.g every minute) latency spikes. There might be several reasons for this.
Take note of the Performance Overlay metrics to narrow down the possible root cause of the stuttering issues. If you see spikes in the “Game” metric, then most probably it has to do something with your PC. Use the tips in this article to possibly solve the issue. Additionally, monitor the performance of your PC using Windows Task Manager, to determine whether anything stands out during the time when the lag spikes happen.
When the latency spikes happen because of the networking metric, there could again be several reasons for this. A couple of possible solutions you could try to solve the problem:
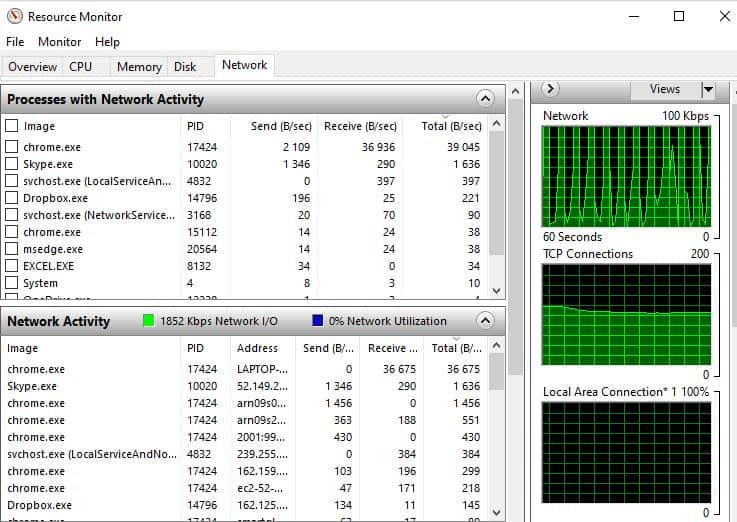
- Use Windows “Resource Monitor” to troubleshoot network spikes.
- Turn off automatic WiFi scanning
- Disable Hotspot 2.0
The output of the Windows Resource Monitor (accessed via Task Manager) is shown below. From here it is possible to determine whether any specific applications are causing the network spikes.
To disable automatic WiFi scanning, start “Command Prompt” in administrator mode and use the following command:
netsh wlan set autoconfig enabled=no interface="your wifi interface name here"To disable Hotspot 2.0 in Windows, follow this manual. Test and see if the following methods help you remove the periodical lag spikes you were facing.
12) Update Software & Drivers
Make sure that ALL your software and drivers are up to date. This includes:
- Oculus Quest / Quest 2 firmware
- Virtual Desktop Streamer and Client
- GPU Drivers
- Apply Windows 10 Updates
There are loads of examples where outdated graphics card drivers have caused a variety of performance issues. The same goes for other items on the list. So just make sure everything is up to date and test your Virtual Desktop performance again.
13) Test Performance With Oculus Link
One method that will not directly solve your issues with Virtual Desktop but might give valuable information is to test your gaming performance with Oculus Link.
If you see that the same game has lagging and stuttering issues with Virtual Desktop but works without problems when using Oculus Link, you can turn your attention to Virtual Desktop and network-related settings and problems. When neither option performs well, it most probably has to do something with your PC.
14) Use a Separate Dedicated Router for Virtual Desktop
When you seem to have tried everything and the performance issues are still not resolved, it is quite likely that the current router you are using is just not good enough for Virtual Desktop gaming purposes.
There are loads of examples where people have taken hours and days trying to solve their problems, only to find out that there was nothing they could actually do.
If you are serious about getting your Virtual Desktop setup to work and are willing to spend some money to purchase a separate router, the setup itself is really not difficult at all. The basic topology is following:
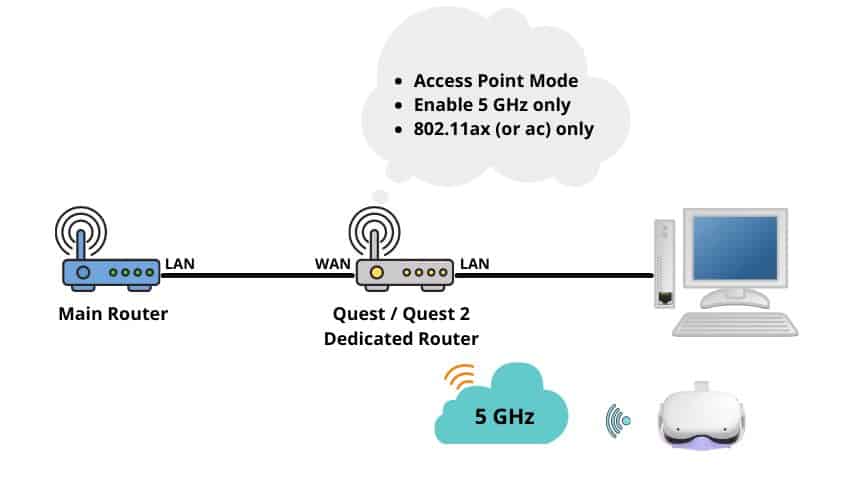
- Connect a cable from ISP Router (LAN port) to the WAN port of the new router
- Connect PC to the new router via Cable
- Set the router in “Access point” mode
- Make the configuration optimizations described earlier in the article
The routers that Guy Godin (developer of Virtual Desktop) has personally recommended in Virtual Desktop Discord are following:
- Low End – TP-Link Archer A6
- Mid-range – Asus AX55
- High End – Asus RT-AX86U
If you are unsure about how to exactly connect and configure the dedicated router, you can either read the article I wrote or watch my step-by-step instruction video below. You can also ask for help and recommendations from the Virtual Desktop Discord.
And that’s it! I really hope this article was useful for you and helped you solve the Virtual Desktop performance and lagging issues you were facing.
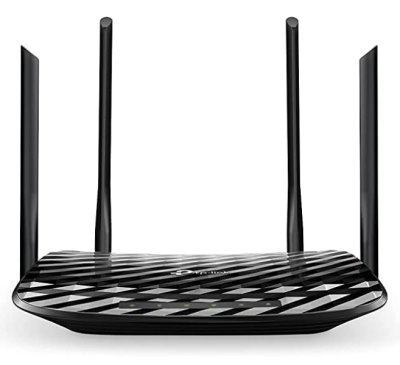
Wireless PCVR gaming does not have to be expensive! TP-Link AC1200 router (recommended by Guy Godin, developer of Virtual Desktop) has proven to offer excellent performance at a reasonable price! See my step-by-step video tutorial on how to set the router up.