

What to do if you are trying to use your Oculus Quest 2 as a PC VR headset via Oculus Link, but it keeps disconnecting for no apparent reason? Since the issue is quite widespread, unfortunately, I took the time to do some research and list out the steps you can take to solve the problem.
The most common reason the Oculus Link connection with Quest 2 keeps disconnecting is an underpowered USB port on your PC (try other ports, use a powered USB hub). Faulty cable, selective USB suspend and several driver-related issues are also known to cause the disconnection issue.
Let does next look at the potential steps you can take to solve the issues you are having.
Did you hear? Facebook (Meta) is going all-in on virtual reality and the metaverse. Get a Quest 2 headset and be a part of the future of entertainment!
1) Try a Different USB Cable
One of the easiest things you can do, to narrow down the possible root cause of your disconnection issues, is to try an alternative USB cable for establishing the Oculus Link connection.
Most of us have a spare USB cable lying around somewhere in the house. Do not worry about the specifications / performance of the cable, the goal here is just to test whether the disconnection issues persist or not. So if the cable matches your Quest 2 and the ports available on your PC, just test it out.
When you don’t have a spare cable, I have listed some cheap Oculus Link cable alternatives in my previous article.
2) Update USB Drivers
Another thing always worth doing (since it’s so easy), is to update the USB drivers on your PC. The easiest way to do that:
- Click on “Start” in the Windows taskbar
- Start typing “device manager” and open the application
- Expand the “Universal Service Bus controllers”
- For each controller, right-click and select “Update driver”
The following article describes the process and alternative methods for updating USB drivers in greater detail.
3) Disable USB Power Saving
Another possible cause for Oculus Link disconnects is when Windows unexpectedly cuts power from USB ports. You can disable the USB Power Saving feature following these steps:
- Open Windows “Device Manager”
- Expand the “Universal Service Bus controllers”
- Right-click on a controller and select “Properties”
- Open the “Power Management” tab
- Untick the “Allow computer to turn off this device to save power” option
- Repeat the process for all USB controllers
Note! For some USB controllers, there won’t be an option to disable the feature. Turn it off for all controllers that have the option.
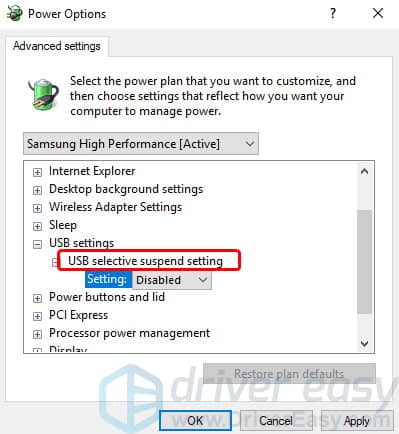
4) Disable USB Selective Suspend
The Windows operating system has an optimization feature called “USB Selective Suspend” that automatically puts USB ports into a low-power state. For Oculus Link, however, we need maximum power output at all times.
For this reason, it’s almost always a good idea to disable “USB Selective Suspend” when using Oculus Link. To disable the feature:
- Open Windows “Control Panel”
- Select “Hardware and Sound”
- Under “Power Options”, select “Edit power plan”
- Click on “Change advanced power settings”
- Expand “USB Settings”
- Disable the “USB selective suspend settings”
5) Try a Different USB Port
Another sure thing to try out when you are facing disconnect issues with Oculus Link is to test all the USB ports on your PC / laptop. With a PC setup, you should generally prefer USB ports wired straight to the motherboard (usually located on the back of the PC case).
The ones on the front tend to be connected to the motherboard via thin wire connections, which often reduce the maximum throughput and stability of the USB connection.
If you have both USB-A and USB-C ports on your PC / laptop, be sure to test the connection with both of them. While researching the topic, a common finding was that using USB-A ports often tends to work better than USB-C ones. If possible, be sure to test out both scenarios yourself.
6) Update / Downgrade Graphics Drivers
In 99% of scenarios, you want to have the latest graphics card drivers installed when using Oculus Link. So if you are currently having disconnects when using the Oculus Link connection, make sure that your GPU drivers are up to date.
Do keep in mind, however, that there have been problems both for AMD and NVidia graphics cards with certain driver releases. If you updated your GPU drivers recently and started having problems afterward, it might be a good idea to roll back the drivers to the previous release.
7) Disable Nvidia GeForce Experience In-game Overlay
If you are using an Nvidia graphics card with Geforce Experience installed, go ahead and disable the in-game overlay option. The has caused numerous unexpected lagging, black screen, and also disconnect issues when used with Oculus Link.
To disable the feature, open Geforce Experience, click on the cogwheel “Settings” option and toggle the “In-game overlay” option to disabled.

8) Disable Integrated GPU for Laptops
If you are using a laptop for an Oculus Link connection with your Quest 2, another step you can try is to disable the integrated graphics card.
In theory, your laptop should automatically prefer and use the dedicated graphics card (when not configured otherwise). In reality, there are cases where the integrated graphics card somehow still jumps into action and causes different problems (including Oculus Link disconnects)
Although this is more of a workaround rather than a permanent solution, it might help you pinpoint the issue and help to proceed forward from thereon.
9) Raise OVRServer_x64.exe Process Priority
OVRServer_x64.exe is a Windows process that is launched when you install and run Oculus software. Numerous people have got rid of various stuttering and lagging issues with Oculus Link by raising the OVRServer_x64.exe process priority higher than “Normal”.
A few people have also claimed that raising OVRServer_x64.exe process priority has helped them with Oculus Link disconnection issues. Since it is so easy to do via Windows Task Manager, go ahead and try it out! If you are unsure how, go ahead and watch the video below for instructions.
10) Consider Purchasing a Powered USB 3.0 Hub
Oculus Link disconnect issues often seem to be related to an underpowered USB port. Oculus Link is quite demanding in this matter and requires a stable connection with optimal throughput at all times.
If you have tried all USB ports on your PC and the disconnection issues still remain, you might want to consider purchasing a powered USB 3.0 Hub. These little handy gadgets ensure that the Oculus Link connection to your PC is stable and with an excellent throughput rate – thus have also solved disconnect and crashing issues for many people.
When picking a specific product, essentially any USB hub will do – just make sure it is powered and that the ports on the hub match your personal needs (and the cable you have available)
11) Let the Battery Drain
This might seem like a bizarre recommendation, but I want you to also try the following – drain your Oculus Quest 2 battery down to about 50% before plugging in the Oculus Link cable to potentially solve the disconnect issues.
While researching the topic, I found out loads of examples where people were facing Oculus Link disconnects and crashes when the battery level was above 90%. These issues didn’t happen when the battery level was lower than 80-90%.
It’s hard to tell why for some people the disconnect issues seem to appear with a fully charged battery. Since it is relatively easy to test out, go ahead and drain your battery slightly. If it solves your problem, you at least have a workaround to your disconnection issue.
12) Oculus Software Repair
When facing crashing/disconnect issues with Oculus Link, another simple thing to try is the Oculus app “Repair” functionality.
- Download the Oculus setup executable
- Execute and select “Repair”
- Let the repair process run, download and install.
- Relaunch the Oculus App
Completing the “Repair” process was recommended by the Oculus Support team, so why not give it a go. If it didn’t help with your issue, proceed to the next somewhat related step.
13) Oculus Software Manual Reinstall
When Oculus repair does not give the desired results, you might want to try a clean reinstall of the Oculus software. Simply follow these steps:
- Disconnect your PC from the internet
- Create a backup of your Oculus software installation
- Launch your PC in Safe Mode
- Uninstall Oculus software using Control Panel
- Delete All Oculus folders from C:Program Files
- Remove Oculus Folders from:
- C:UsersYourUserProfileAppData
- C:UsersYourUserProfileAppDataLocal
- C:UsersYourUserProfileAppDataLocalLow
- C:UsersYourUserProfileAppDataRoaming
- C:OculusSetup-DownloadCache
- Restart your PC and launch in Normal mode
- Download and reinstall Oculus Software
After reinstalling the Oculus software, relaunch your Oculus Link connection and see if the problems are now solved.
14) Gather Logs & Contact Oculus Support
If you have tried all of the steps listed in the article and nothing seems to help, go ahead and contact Oculus Support and create a support ticket.
Make sure to include a detailed list of all the steps you have already taken to solve the issue yourself. In addition to that, gather Oculus software related logs and include them in the support ticket:
- Open the Run window (Windows key + R)
- Execute “C:Program FilesOculusSupportoculus-diagnosticsOculusLogGatherer.exe”
- Select “Full logs”
- Select “1 day” from the “Collect last” drop-down list.
- Wait for the log collection to finish.
- Get the log “.zip” file from the desktop
If you are more tech-savvy, you might want to have a look at the logs yourself too. However, they are most useful to the Oculus Support team who can rely on the information to significantly narrow down the cause of the issue you are having.
15) Try Oculus Air Link Instead
If you can not get to the bottom of your wires Oculus Link connection issues, go ahead and try the wireless Air Link connection instead. If you have tried and it didn’t work well for you, make sure to check out my previous article about how to set up and fine-tune your Air Link connection.
That’s all from me! I hope this article was useful and helped you closer to solving your Oculus Link issues! Happy VR gaming!
HARDWARE USED FOR TESTING AND WRITING THE ARTICLES:
* Meta Quest 2 (My “daily driver” headset, which I absolutely love & recommend)
* Lenovo Legion 5 Pro (AMD Ryzen 5 5600H, Nvidia Geforce RTX 3060, 16GB RAM)
* TP-Link Archer C6 (budget dedicated router for Air Link, see my full setup tutorial)
ESSENTIAL QUEST 2 COMFORT ACCESSORIES:
* VR Cover Foam Replacement (one of the easiest & cheapest ways to improve headset comfort)
* BoboVR M2 Head Strap (reduce pressure on your head and improve the overall fit of the headset)