

So you have bought yourself an Oculus Quest 2 headset and enjoyed the world of VR wonders. However, you are now looking to broaden your choices by using the Oculus Link functionality to additionally gain access to various PC VR titles.
You complete the Oculus Link setup, connect your headset and everything seems fine at first. But wait… this isn’t right. How in the world did you suddenly arrive at this massive lag festival? This isn’t what you signed up for.
If this situation seems familiar and you are currently experiencing various lagging / stuttering / low FPS issues when using Oculus Link with your Quest 2, then you have arrived at the right place!
In this article, I am going to guide you through various troubleshooting steps and fixes which will hopefully help you solve your Oculus Link performance issues. Let’s get started!
Note! If you are actually looking to solve wireless Air Link performance issues then click on the link to read my troubleshooting guide. You might still get useful ideas from this article as well, so make sure you at least skim over the subheadings!
1) Make sure Your PC / Laptop is Oculus Link Compatible
This is quite obvious, but without knowing your specific situation, I think it’s always a good idea to start from the very beginning.
Go ahead and navigate to Oculus Link Compatibility requirements and check that your PC meets the minimum specifications. I have also written a separate article where I gathered real-life user performance feedback, describing the gaming experience you can expect with different PC specifications.
If your graphics card, CPU and operating memory indeed meet the requirements, then great! Do keep in mind, however, that minimum is not optimal. If your PC specs are on the lower end, then here might be the main cause for lagging issues (especially for the more demanding games).
Did you hear? Facebook (Meta) is going all-in on virtual reality and the metaverse. Get a Quest 2 headset and be a part of the future of entertainment!
2) Use Performance Overlay (HUD) to Measure Changes
When you are debugging performance and lagging issues, make sure that you enable the Oculus Performance HUD to understand the current situation better and see if the changes you are making have a positive (or sometimes negative) effect.
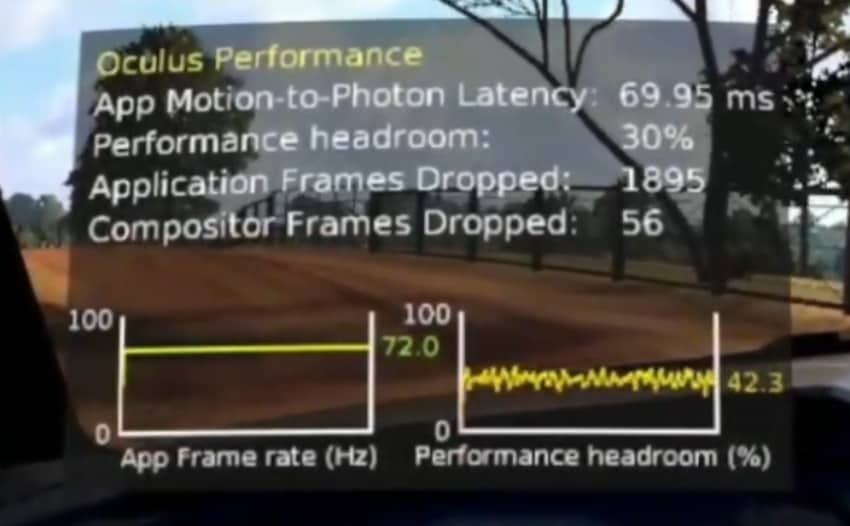
You can enable the performance overlay using the Oculus Debug Tool application that comes with Oculus Link software. If you want to know more, I have previously written a detailed article on how to enable and use the Oculus performance HUD to troubleshoot and optimize VR performance.
3) Restart PC / Headset and Kill Unnecessary Processes
When debugging various tech-related issues, it is always a good idea to start from a blank sheet. This way you can be sure to get all the resources your PC has to offer and avoid any “bad states” and unwanted interdependencies.
- Unplug the USB cable from your PC
- Turn your Quest 2 off and then back on again
- Restart your PC
- Use the Windows Task Manager to kill processes that you don’t currently need and drain resources (Google Chrome, …)
- Start the Oculus software
- Plug in your Quest 2 headset
Launch Oculus Link again and test whether there is any difference in the terms of the lag and stutters you are experiencing.
4) Try Testing With Oculus Games First
People generally tend to prefer Steam over the Oculus game library. In order to isolate the issue, go ahead and leave Steam out of the equation for this moment and test your Oculus Link performance with a game from the Oculus library.
The fact is that SteamVR adds an extra layer of software (and therefore added complexity) to the equation. If the Oculus games run fine for you, but games from SteamVR are stuttering and lagging, then we know where to turn our attention to.
5) Update Your Graphics Card Drivers
The general rule for software is that you want to be running on the latest drivers and releases. Outdated drivers and software may cause unwanted compatibility, security and also performance issues.
With Oculus Link and gaming in general, you will always want you graphics card drivers to be up to date. Go ahead and navigate to Nvidia or AMD and install the latest drivers for your specific graphics card.
There are so many cases where updating GPU drivers has solved various performance issues and this might very well also solve your stuttering issues with Oculus Link.
6) Update Your Quest 2 and Oculus Software
Make sure that both your Oculus Quest 2 and also the Oculus Software on your PC are up to date and running on the same release versions.
To check the current software version installed on your Oculus Quest 2 and read about updating your headset, follow this useful article from UploadVR.
To update the Oculus software, download the latest version from Oculus or complete the update when prompted by the software itself.
7) Update Windows
If you are the type of guy / girl who sees a Windows update prompt, and annoyed by the interruption, quickly schedules the update to the furthest future date possible, then go ahead and complete the updates this time.
This is especially true if you have been postponing updates for an extended period. Although Windows updates are probably the least likely remedy from this article to solve your lagging issues, you just never know what problems and interdependencies might appear with outdated software.
So go ahead and apply updates to your Windows. It won’t do you any harm but might get you closer to solving your problem.
8) Change OVRServer_x64.exe Process Priority To High
Although Windows should be clever enough to properly allocate and share system resources, this doesn’t seem to be the case for Oculus Link.
Many people have had success in solving their lagging problem by raising the process priority of a specific Oculus link process (OVRServer_x64.exe).
You can do this with Windows Task Manager and the video below gives you a step-by-step guide on how exactly to do so.
9) Adjust Refresh Rate and Render Resolution (Oculus Software)
The two main settings (related to performance) that you can change within the Oculus software are refresh rate and render resolution.
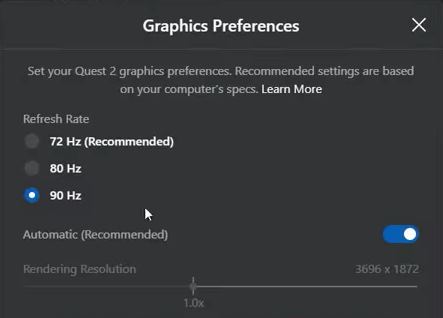
These settings can be accessed when you click on “Devices” from the left hand menu → “Quest 2 and Touch” → Graphics Preferences.
You`ll notice that when you change the refresh rate, the software also automatically adjusts the render resolution. This is because the Oculus software takes into consideration your specific PC specs and tries to provide the optimal values.
If however you are experiencing lagging issues with the provided settings (or you have previously changed them yourself), here is what I recommend you to do:
- Set the refresh rate to 72Hz
- Toggle the “Automatic” option for “Rendering Resolution” off
- Decrease the “Rendering Resolution” to the minimum value
By doing so, we are demanding the least resources from your PC and giving ourselves the best chances to avoid lagging issues. If you notice now that the lagging is indeed gone, then great!
Stay with 72Hz for now and start raising the render resolution until you find the best balance between visual quality and performance. You could also test with 90Hz and see if you can find the optimal ratio.
Be sure to also watch the video below, explaining this topic a bit further and also discussing other methods for solving lagging issues with the Oculus Link and Quest 2.
10) Disable USB Power Saving and Selective Suspend
With Oculus Link and VR gaming, there’s a lot of data moving from your PC to your Oculus Quest 2 headset. In fact, there’s so much data that prior to directing it through your USB port and cable, the data is first compressed and once it reaches your Quest 2 it is then decompressed again.
To accommodate this, you want your USB ports going at full power at all times, because Oculus Link really is quite picky in this matter. There have been loads of examples where Windows USB optimization methods cause various hiccups and performance issues.
To overcome this issue:
Click on the links to find my previously written tutorials on how to disable these features. Make the changes and see if your performance improves.
11) Try Different USB Ports
If you are experiencing stuttering problems with your Quest 2 and Oculus link, it is also a good idea to test out different USB ports on your PC.
Even when the Oculus Link connection is displayed as successful (and is USB 3.0) you will still want to test out other USB ports as well. You never know what is happening behind the curtains and you really got nothing to lose as well, right?
To get an actual measurable metric to these tests, go ahead and do a “USB Test” from the Oculus Software which will show you the actual data bandwidth for each USB port.
12) Try a Different USB Cable
In case of lagging issues with your Oculus Link connection, be sure to try different USB cables for establishing the Link connection.
That is even when the cable is brand new and you know it supports USB 3.0. Cases where switching the USB cable used for Oculus Link connection solves various problems are not rare at all.
If you don’t have any spare cables lying around, I have previously written an article on the cheaper Oculus Link cable alternatives you could test out.
13) Reduce Encode Bitrate (via Oculus Debug Tools)
As mentioned earlier in the article, the data is compressed for Oculus Link before transferring it to your headset. You can change the encode bitrate and see if this can help solve your performance issues.
To change the encode bitrate:
- Navigate to C:\Program Files\Oculus\Support\oculus-diagnostics.
- Right-click on “Oculus Debug Tools” and open as Administrator
- Look for “Encode Bitrate” in the Settings
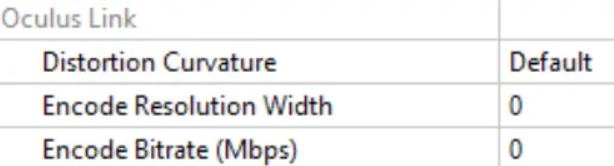
Start testing with values starting from 150 MBbs up to 250Mbps. Anything above will offer diminishing returns as stated by an Oculus product owner. To restore the default value, enter the value 0.
14) BONUS TIP – Use Air Link or Virtual Desktop Instead of Oculus Link
Oculus Link in itself is a very neat feature for the Oculus Quest 2. But what you may or may not have known is that you can actually play your PC VR games wireless using either Oculus Air Link or Virtual Desktop.

The graphics for wireless PCVR are actually usually on par compared to using Oculus Link. But the biggest advantage here is that there will be no more wires tripping on your way and ruining the immersion.
Additionally, many people who have had problems with Oculus Link lagging and stuttering have had none when using either Air Link or Virtual Desktop. If you are out of ideas and want to try an alternative way of playing PC VR games make sure you test these methods out.
And that`s it. I really hope you found something useful from this article which helped you solve the Oculus Link lag issues you were having.
HARDWARE USED FOR TESTING AND WRITING THE ARTICLES:
* Meta Quest 2 (My “daily driver” headset, which I absolutely love & recommend)
* Lenovo Legion 5 Pro (AMD Ryzen 5 5600H, Nvidia Geforce RTX 3060, 16GB RAM)
* TP-Link Archer C6 (budget dedicated router for Air Link, see my full setup tutorial)
ESSENTIAL QUEST 2 COMFORT ACCESSORIES:
* VR Cover Foam Replacement (one of the easiest & cheapest ways to improve headset comfort)
* BoboVR M2 Head Strap (reduce pressure on your head and improve the overall fit of the headset)
