
Trying to enjoy some wireless PCVR gaming with Oculus Air Link, but simply can not get optimal performance out of your setup?
You are definitely not alone! To help you out, I did some testing and research on my own to find the most common issues and solutions to Oculus Air Link performance issues.
So if your Oculus Air Link is laggy or stuttering, here are the most common steps to solve the issue:
- Use Peformance Overlay to Find Bottlenecks
- Use Ethernet Cable to Connect Your PC and Router
- Use a Dedicated 5GHz WiFi Network
- Be Close To The Router
- Fine-Tune Your Router Settings
- Set Encode Bitrate Value to 0
- Raise OVRServer_x64.exe Process Priority
- Update Windows and GPU Drivers
- Adjust Oculus Graphics and Refresh Rate Settings
- Manually Adjust Air Link Bitrate
- Purchase Dedicated Router
- Contact Oculus Support
Let does next look at each of the steps in a bit more detail. If you are more of a visual/audio person, make sure you also watch my Youtube video below:
Note! Before jumping in, make sure that your PC meets the system requirements for Oculus Air Link. If the steps in this article do not help, make sure you check out my detailed Oculus Air Link troubleshooting guide that might also help with performance issues.
1) Use Oculus Performance HUD To Find Bottlenecks
Being a software engineer, I don’t like to do things “on a hunch”. I want quantifiable numbers, statistics, results – and this is where the Oculus performance overlays come into play.
Before you start testing any of the recommendations listed in this article, go ahead and launch your Oculus Air Link session with the Oculus performance HUD enabled (using Oculus Debug Tools). I have previously written a detailed article on how to enable performance overlay and use it for troubleshooting Air Link lagging issues. Make sure to check it out.
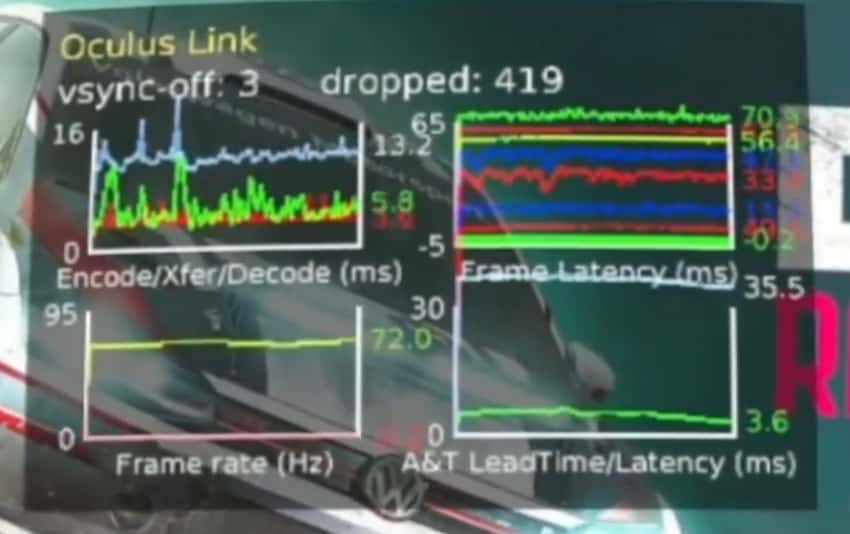
If you are looking for quick answers, make sure that the network latency (green bar) on the first graph is less than 10ms and without large spikes. If it is higher and/or spiking, you might have to fiddle with current router settings or possibly opt to buy a dedicated router for Air Link (link to my previous article describing my 40$ router setup)
High encode/decode time usually means that your GPU and PC are the bottlenecks. Reduce resolution and/or in-game graphics settings. Cutting the bitrate (testing lower static bitrate values) might also sometimes do the trick.
I recommend you go ahead and proceed with the steps listed in the article and make sure you keep the performance overlay enabled, to see if and what effect the changes have on the overall performance metrics.
2) Use a Cable to Connect Your PC and Router
The first step for optimal Air Link connection performance is to make sure that you are using an ethernet cable (CAT 5 or 6) to connect your PC and router.
Sure, some people may claim that they are able to use Oculus Air Link by using WiFi in both the PC and headset. Good for them.
Since you are having performance issues I recommend doing it the right way from the start and use an ethernet cable instead of a wireless connection.
If the router in your house is too far away from your PC, you really might want to consider purchasing a dedicated router for your Oculus Air Link.
3) Use a Dedicated 5GHz Wifi Network
Ideally, you want your Quest / Quest 2 headset connected to a dedicated 5GHz network that no other device in your home is using.
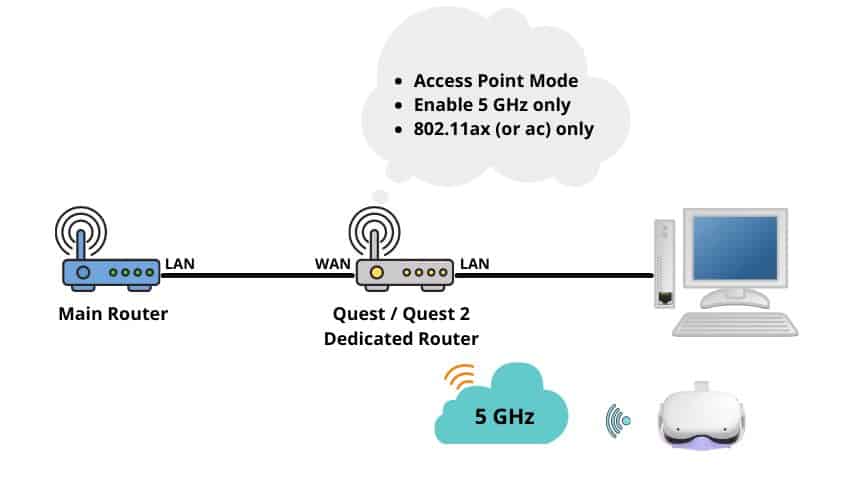
So when also taking into consideration the previous recommendation, the topology of an optimal Air Link setup might look something like this:
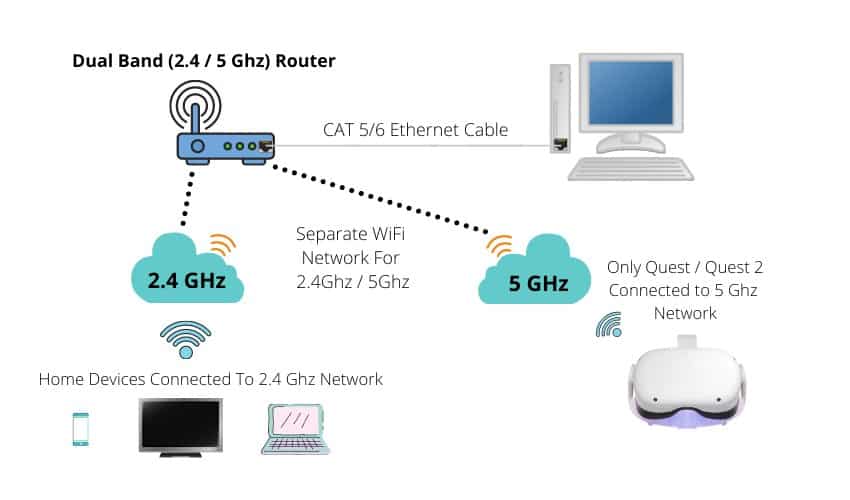
Most modern routers support dual-band connections (2.4GHz and 5GHz). Quite often it is the case that both frequencies are used concurrently within a single SSID (Wi-Fi network), leaving for the router to decide which connection to use.
Oculus Air Link works best with a 5GHz network connection. It would therefore be a good idea to create separate 2.4GHz and 5GHz WiFi networks (refer to your router manual) and only connect your headset to the 5GHz WiFi network.
Did you hear? Facebook (Meta) is going all-in on virtual reality and the metaverse. Get a Quest 2 headset and be a part of the future of entertainment!
4) Be Close To The Router
Another critical factor when you want to get low latency and stable Air Link Connection is to make sure that you are close to the router.
Ideally, you want to have the router in the same room where your play area is (with straight visibility to your headset). Raising your router off the ground (at least 1m) is also recommended for optimal signal strength.
You might get away with the router being in the room next to you, but too many walls/obstacles between your headset and router will certainly diminish the network signal strength and connection stability.
5) Fine-Tune Router Settings
Oftentimes getting the basics right, is enough for a good and stable Oculus Air Link performance.
If this is not the case for you, you might want to dive into your router`s settings (refer to the manual) and make the following changes (if applicable to your specific router):
- Change network mode to 802.11ac or 802.11ax only
- Find and use the least congested Wi-Fi network channel
- Change channel width to 40 or 80 MHz
- Disable Smart Connect
- Disable Quality of Service (QoS)
I have discussed each of these configuration aspects in a bit more detail in my previous article.
6) Set Encode Bitrate Value to 0
If prior to using the wireless Air Link you have also used the regular wired Oculus Link, you yourself might have caused the current performance issues.
The thing is that for regular Oculus Link, it is often recommended to play around with the “Encode Bitrate (Mbps)” value in the Oculus Debug Tool to get the best performance and quality out of your setup.
For Oculus Air Link, leaving the Encode Bitrate anything other than the default value (0), is likely to cause severe lagging/stuttering issues.
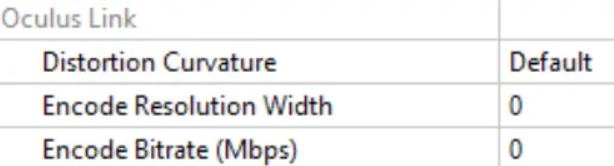
You can find the Oculus Debug Tool from “C:Program filesOculusSupportOculus-diagnostics”. Check that the Encode bitrate value is set to 0 – if not then change it back and test your Air Link connection performance again.
Note! If you want to find out how Oculus Debug Tool can help you improve your Air Link experience instead of ruining it, make sure to click on the link to read my detailed article about how and when to configure debug tool settings.
7) Change OVRServer_x64.exe Process Priority To High
In my previous article about solving Oculus Link performance issues, one of the recommended solutions was to raise the OVRServer_x64.exe Windows process priority to High (or Realtime).
This technique also applies to Oculus Air Link and has been reported to fix (or at least significantly improve) the performance issues people were having.
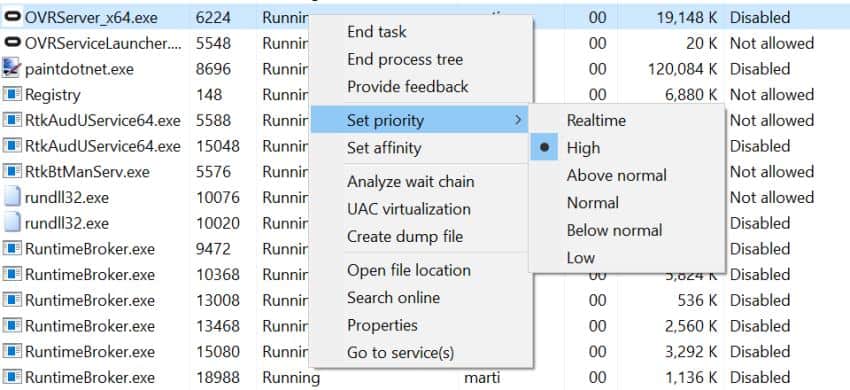
So go ahead and try raising the process priority by following these steps:
- Open “Windows Task Manager” (CTRL+ALT+DELETE)
- Navigate to the “Details” tab
- Find OVRServer_x64.exe process
- Right Click and “Set priority” to High or realtime
Do keep in mind that you have to change the process priority each time you restart the computer or exit / disconnect the Oculus Link software.
Note! I decided to test this recommendation out and documented the results in my Youtube video. Unfortunately, based on my tests, raising the OVRServer process priority did not have any positive effect on the performance. However, since other users have reported performance improvements, I am keeping the recommendation in the article.
8) Update GPU and Windows Drivers
With Oculus Air Link lagging and general performance issues, it quite often comes down to the graphics card and the drivers you have installed.
Make sure that you have the latest drivers installed for your graphics card. However, also do keep in mind that in recent times there have been problems with the latest driver releases causing performance issues (e.g for Nvidia 30xx series).
The incompatibility issues, if present, have been usually solved very quickly.
Additionally, make sure that your Windows OS is up-to-date and test the performance of Air Link again.
9) Adjust Refresh Rate and Graphics Settings
When facing performance issues, it’s almost always a good idea to start with the lowest settings and move upwards from there.
- Open Oculus Software on your PC
- Go to Devices and select your headset
- Select “Graphics Preferences”
- Set the refresh rate to 72Hz
- Toggle the “Automatic” option for “Rendering Resolution” off
- Decrease the “Rendering Resolution” to the minimum value
If this combination gets rid of your lagging issues with Air Link, start raising the values and find the optimal graphics-performance ratio that best fits your preferences.
10) Adjust Oculus Air Link Bitrate
By default, Oculus software will automatically determine and adjust the Air Link bitrate value based on your network and router performance.
In most cases, this will also provide you with the optimal performance-quality ratio.
Mainly for troubleshooting and problem isolation purposes, it is worth setting the bitrate to a low fixed value. If this fixes your lagging issues, there might be unexpected traffic congestion and/or interference in your network.
It is also quite likely that the problem might be caused by the fact that your current router is just not good enough for wireless VR gaming purposes.
11) Purchase Dedicated Router
If you have tried everything up until this point and nothing seems to solve your Oculus Air Link performance issues, my recommendation is to purchase a dedicated router for your Air Link setup.
Some routers (especially the older/cheaper ones provided by your ISP) are simply not cut for this purpose.
If you are willing to make the expense and wondering which one to buy then luckily most modern routers will do just fine. If you want to be sure, these 3 routers are recommended by Guy Godin, the lead developer of Virtual Desktop (the go-to software prior to Air Link)
- Low End – TP-Link Archer A6
- Mid-range – Asus AX55
- High End – Asus RT-AX86U
The setup of a dedicated router is really not difficult at all. You just connect your main router with the new dedicated router with an ethernet cable and configure it to be in “Access Point mode”. The basic topology of the setup is shown in the image below.
If you are unsure about how to exactly connect and configure the dedicated router, you can either read an article I wrote or watch my step-by-step instruction video below:
You can also watch the video about the performance (real-time bitrate, network latency, and Half-Life: Alyx gameplay) I am getting from my setup.
12) Contact Oculus Support
As the last resort, I recommend creating an Oculus support ticket. When creating the ticket, make sure to include
- Your PC specs (CPU, GPU, RAM)
- Logs from the last 24 hours
- Description of your setup and a list of steps you have already taken to solve the issue.
When including a detailed description of your problem upfront, you`ll have a much higher likelihood of getting an adequate response from the Support team and getting the issue solved more quickly.
HARDWARE USED FOR TESTING AND WRITING THE ARTICLES:
* Meta Quest 2 (My “daily driver” headset, which I absolutely love & recommend)
* Lenovo Legion 5 Pro (AMD Ryzen 5 5600H, Nvidia Geforce RTX 3060, 16GB RAM)
* TP-Link Archer C6 (budget dedicated router for Air Link, see my full setup tutorial)
ESSENTIAL QUEST 2 COMFORT ACCESSORIES:
* VR Cover Foam Replacement (one of the easiest & cheapest ways to improve headset comfort)
* BoboVR M2 Head Strap (reduce pressure on your head and improve the overall fit of the headset)