
Are you trying to enjoy some wireless PC VR gaming on your Quest 2 headset but simply can not get Air Link working properly? Whether the headset is unable to find your PC, the connection won’t launch or it does launch but the connection is lost after some time.
Since various problems with Air Link seem to be quite common, I did some research and testing on my own to compile a list of possible solutions to the different issues.
Follow these steps if Oculus Air Link is not working properly:
- Check for PC compatibility
- Turn everything off and back on again
- Use Air Link Built-In Connection Benchmarking Tools
- Follow Air Link setup best practices
- Change network profile to private
- Update software & drivers
- Disable firewall / antivirus (temporarily)
- Disable VPN
- Check Oculus Debug Tool settings
- Restart your router
- Close / Uninstall Conflicting Software
- Force using dedicated GPU (laptops)
- Opt into Public Test Channel
- Reset experimental settings
- Do a clean Oculus software install
- Remove multiple IPv4 addresses
- Test with Virtual Desktop / Oculus Link
- Buy a dedicated router for Air Link
- Check Oculus forum / Reddit threads
- Factory reset
- Contact Oculus support
Let does next dive into each of the different solutions in a bit more detail!
Note! You are sure to also find useful information from my previous articles about Oculus Air Link proper setup and troubleshooting Air Link lagging and performance issues.
Check for PC Compatibility
While researching the topic, I saw so many people trying to get Air Link working with a PC that fails to meet the requirements. This is often very unlikely or straightforward impossible to achieve (minimum requirements are there for a reason).
Go and check the requirements for Oculus Link and make sure your PC stacks up. One of the most common problems for people seems to be that their graphics card just doesn’t have enough computing power for Air Link and VR in general.
Also keep in mind that if your PC specs are on the lower end, you might have a difficult time getting optimal performance, especially for the more demanding games. If you are interested, I have actually gathered real-life user performance feedback for Half-Life: Alyx in one of my previous articles.
Turn Everything Off and Back On Again
If you have verified that your PC has enough computing power to run VR games, the next step is very simple: just turn everything off and then back on again.
- Disable Quest Link (Settings → System → Quest Link)
- Restart your PC
- Restart your headset
- Enable Quest Link again
- Launch Air Link Connection
With software, it’s quite often the case that starting from a “blank sheet” helps with a variety of different problems. This is actually my go-to solution whenever I am having trouble connecting to my PC and establishing an Air Link connection.
Use Air Link Built-In Connection Benchmarking Tools
Starting from Meta Quest Build version 42 you have the option to use the Air Link built-in connection benchmarking and troubleshooting tools to help you determine and solve the root cause of your issues.

Follow these steps to access the Air Link connection benchmarking tools:
- Go to “Quick Settings” (click on the clock from the universal menu)
- Click on “Settings” (top-right of your screen)
- Open the “System” menu item
- Locate and select “Quest Link” from the menu
- Scroll down to see the benchmarking tools
Although these automated checks are directed more towards improving your connection quality and solving Air Link lagging issues they might also help to troubleshoot more general issues with Air Link.
If any of the automated checks fail for you, then go ahead and click on the link behind the metric for information about improving and solving the issue.
Follow Air Link Setup Best Practices
If you want your Air Link setup to work without issues, there are some “golden rules” that you should follow. The most important steps you can take to ensure a problem-free Air Link experience are:
- Use an ethernet cable to connect your PC and router
- Create and use a dedicated 5Ghz Wi-Fi network for your headset
- A 2.4GHz network or a “mixed” 2.4/5Ghz network is no good for Air Link.
- Avoid excessive traffic in the 5GHz network (ideally only for the Quest 2). Configure all other devices in your home to use the 2.4GHz WiFi network
- Be close to the router (ideally in the same room with straight visibility)
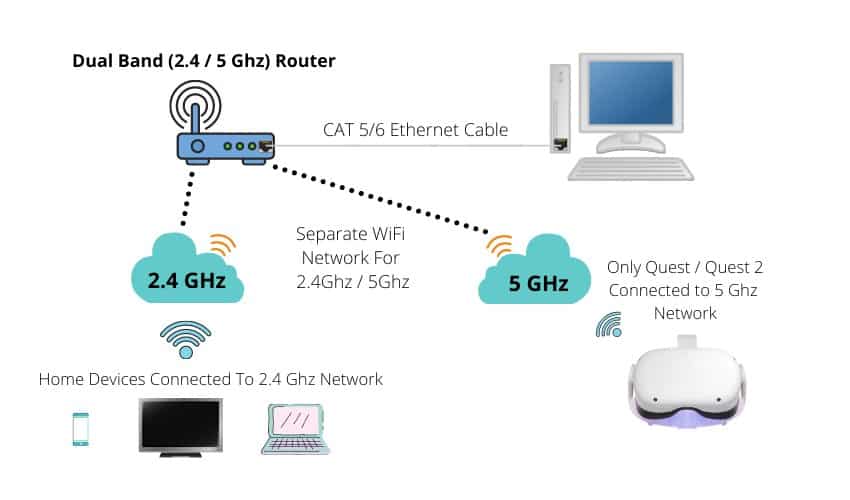
If you get these things right, you have already done at least half of the equation of getting Air Link working without issues. You can find a more detailed description of the steps from my previous articles here and here.
Change Network Profile to Private
One certain network configuration aspect that has caused a variety of different problems with Oculus Air Link is the chosen network profile (public or private).
People who have configured their ethernet connection as “Public” have had problems starting from bad performance to their PC not being detected by the headset.
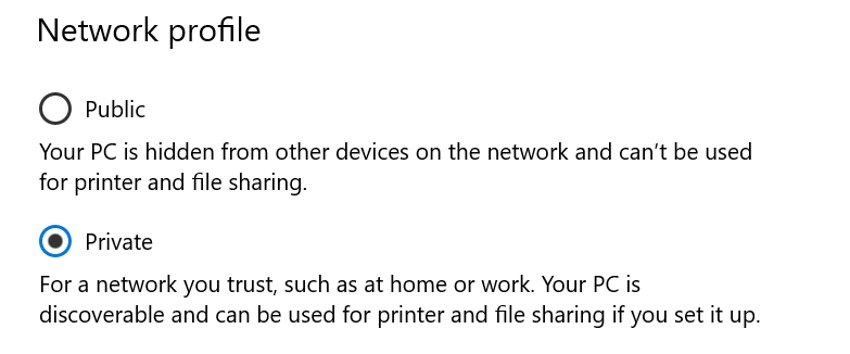
You can check and change your current network profile following these steps:
- Open Windows Settings (type “Settings in the search bar)
- Select “Properties” for Ethernet connection
- Make sure the “Private” option is selected and “Save“
If your local network was previously set to “Public”, then test your Air Link connection again after changing to “Private” and you might be up for a pleasant surprise.
Update Software & Drivers
The general golden rule for Air Link and software, in general, is to make sure that all your software and drivers are up-to-date. This ensures that you have the latest compatibility and bug fixes applied to your system.
That being said, make sure you have:
- The latest Oculus Software installed on your PC
- Headset updated and running on matching software release
- Windows updates applied
- The latest graphics card drivers installed
There is a caveat here, though.
Sometimes the latest set of software/driver releases may actually cause issues instead of solving them. For example, Nvidia 30XX graphics card owners have had to downgrade their drivers to get Air Link working in the past.
If in doubt, I recommend you to keep an eye on the Oculus forum and related Reddit threads. If something is out of the ordinary, people here are sure to notify others and discuss the matter in more detail.
Note! I am currently running on the latest Nvidia drivers (512.33) with a GeForce RTX 3060 and I have had no problems with Air Link.
Disable Firewall / Antivirus (Temporarily)
I am going to start with the fact that disabling your firewall and/or antivirus is generally almost never a good idea. That being said, for debugging your Air Link connectivity issues, I am going to ask you to do exactly that (temporarily)
Third-party Antivirus software (for example McAfee, Avast, and others) have been known to often cause issues. For this reason, disable your Firewall as well as Antivirus software and check whether you are now able to establish an Air Link connection.
If you were now successful in your attempt, determine which software was causing the connection problem and re-enable both of them. Use google and try to find a permanent solution (adding exceptions, etc) for your problem where both Antivirus and Firewall remain enabled on your PC!
When adding exceptions, the following applications should be added to the whitelist:
- C:Program FilesOculusSupportoculus-clientOculusClient.exe
- C:Program FilesOculusSupportoculus-runtimeOVRRedir.exe
- C:Program FilesOculusSupportoculus-runtimeOVRServer_x64.exe
- C:Program FilesOculusSupportoculus-runtimeOVRServiceLauncher.exe
Note! Oculus states in their support documentation that port 5669 (TCP) must be open. Make sure your firewall is not blocking it!
If disabling the firewall and antivirus had no effect on your Air Link connection then leave them enabled and proceed to the next steps.
Disable VPN
If you don’t have any VPN service installed, then move on to the next step.
If you do, then you must know that some VPN software providers are known to cause issues when trying to use Oculus Air Link (e.g NordVPN). For debugging reasons, go ahead and disable your VPN and try establishing an Oculus Air Link connection again.
If the connection now succeeds, you can either keep the VPN disabled when using Oculus Air Link or try to work around the problem by adjusting your VPN settings.
Check Oculus Debug Tool Settings
Oculus Debug Tools allows us to configure various advanced settings to tweak and improve Oculus Air Link performance. Sometimes, however, when not done right, the setting changes can actually cause Air Link to crash or not to work at all.

Please check that your Oculus Debug Tool (C:Program FilesOculusSupportoculus-diagnosticsOculusDebugTool.exe) has the following settings:
- Encode Dynamic Bitrate – Default
- Encode Bitrate (Mbps) – 0
If they differ for you, then change them back to the given defaults. Restart your Oculus Software and try launching Air Link again.
Note! If you want to learn more about Oculus Debug Tool settings and how to configure them properly, I have written a detailed article explaining just that.
Restart / Reset Your Router
I have personally found that restarting my router sometimes helps to improve the overall experience and reduce unexpected lagging. Some people have reported that restarting the router has also helped them with Air Link disconnection issues.
Since it is so easy to test out and can not do any harm, then go ahead and restart your router and see if it has any positive effect on your current problem. Plugging the power cord for a couple of seconds is the easiest way to do this.
If you feel comfortable with routers and tech in general, resetting your router might be another step you can take to potentially solve your issue. Do keep in mind that you will have to reconfigure both your 2.4GHz and 5Ghz networks for your home devices and VR headset to use.
I have previously written about the topic of configuring routers for wireless VR gaming in more detail here and here (the latter is a configuration tutorial for setting up a secondary dedicated router specifically for Air Link)
Close / Uninstall Conflicting Software
Problems with conflicting software was an issue that I personally faced. I had just bought my Lenovo Legion 5 Pro laptop (see why I bought it) and during the setup process, it recommended enabling the “Network Boost” feature in the Lenovo Vantage software.
When I got to actually using Air Link, each and every game crashed and started stuttering (~1 fps) after about 5 seconds of gameplay. After debugging the problem, it turns out I had to disable the “Network Boost” feature in Lenovo Vantage and Oculus Air Link started working properly again.
Here is a list of conflicting software that has been reported to cause issues with Oculus Air Link:
- Lenovo Vantage (Network Booster)
- Lenovo Nerve Sense
- MSI Afterburner
- Razer Cortex
- Windows Xbox Game Bar
- Geforce Experience (Nvidia overlay and Shadowplay)
- McAfee, Avast / AVG / ESET Norton antivirus
- WebRoot, MalwareBytes
- PunkBuster, Riots Vanguard
- NordVPN, Bitdefender VPN, PIA, Proton VPN, Surfshark
- Asus GameFirst V
- SteamVR OpenVR Input Emulator addon, ALVR
If you have any of the software running when facing problems with Air Link, then try closing or uninstalling and testing again.
The list above is incomplete of course and for that reason recommend that you test out the “bare minimum” approach – open your Windows Task Manager and kill all running processes that you absolutely don’t need right now. After that, test if it makes any difference for Air Link
Force Using Dedicated GPU (Laptop)
If you are a laptop user, your Oculus Air Link issues might be caused by the fact that the system is using the integrated graphics card (GPU) for Oculus processes (instead of the more powerful dedicated GPU).
The Oculus files/processes that we are interested in are the following:
- C:Program FilesOculusSupportoculus-runtimeOVRRedir.exe
- C:Program FilesOculusSupportoculus-runtimeOVRServer_x64.exe
- C:Program FilesOculusSupportoculus-runtimeOVRServiceLauncher.exe
- C:Program FilesOculusSupportoculus-clientOculusClient.exe
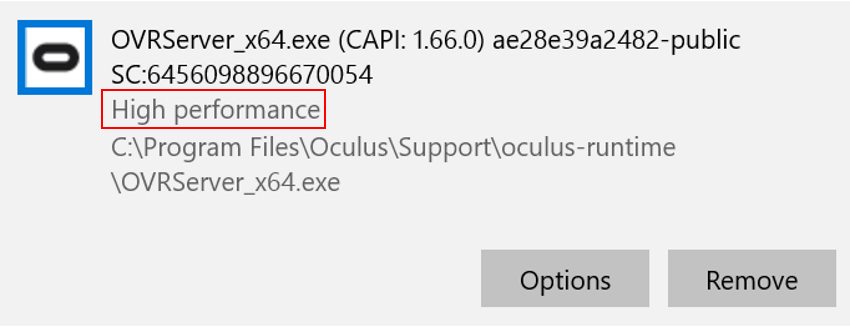
To force Windows to use your PC’s dedicated GPU for these Oculus processes:
- Press Windows Key and search for “Graphics Settings“
- Click “Browse” and add all of the above files.
- For each file added, click on “Options“
- Select “High performance” mode from the settings
- Save and restart your laptop
After restarting, try launching the Oculus Air Link connection again and see if the problems are gone.
Opt Into Public Test Channel
In some cases, your current Oculus Air Link issues might be solved by updating your Oculus software and headset to a newer release (with potential improvements and bug fixes).
Oculus Public Test Channel allows you to get early access to software releases that are officially not rolled out yet. You can opt into the public test channel by enabling the feature in Oculus Software (Settings → Beta).
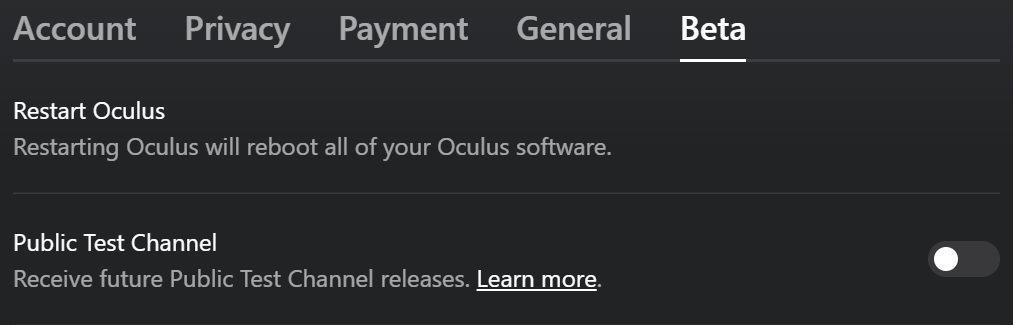
There is also an option to enable the Public Test channel in the Oculus mobile app (Device → Advanced Settings).
Keep in mind that this is not some “magic wand” to help solve all of your issues. However, if you are lucky, it might just be that a bug that is causing your Oculus Air Link not to function properly has been addressed in a newer software release. So go ahead and test this step out.
Reset Experimental Settings
Another thing you can do that can potentially help you solve your ongoing Air Link connectivity/crashing issues is resetting the experimental settings from your headset (Settings → Experimental Features)
One specific setting that has caused a variety of issues for Quest 2 users in the past is the 120Hz refresh rate option. These issues seem to be generally fixed now.
However, experimental settings are exactly what the name indicates – experimental. For this reason, reset the settings to default and try establishing Air Link connection again.
Do an Oculus Software Clean Reinstall
Sometimes Oculus software can run into unexpected states and a set of configuration files where regular uninstall/reinstall doesn’t have the desired effect.
For this reason, it is a good idea to manually clean any leftover files and do a clean Oculus software reinstall:
- Uninstall Oculus software using Windows “Add or remove programs”
- Delete Oculus folders from:
- C:Program Files
- C:Users[YOUR_USER]AppData
- C:Users[YOUR_USER]AppDataLocal
- C:Users[YOUR_USER]AppDataLocalLow
- C:Users[YOUR_USER]AppDataRoaming
- C:OculusSetup-DownloadCache
- Restart Your PC
- Download Oculus Setup and retry the installation
After Oculus software installation completes, enable Air Link again and see if you have more luck establishing the connection.
Remove Multiple IPv4 Addresses
This step is for users who have configured multiple static IP addresses for their network adapter. If you are currently wondering what in the world I am talking about, then this is probably not you.
You check if your IPv4 addresses are allocated automatically following these steps:
- Open “View Network Connections” (search bar)
- Right-click on “Ethernet” connection and select “Properties“
- Select “Internet Protocol Version 4 (TCP / IPv4)” and click “Properties“
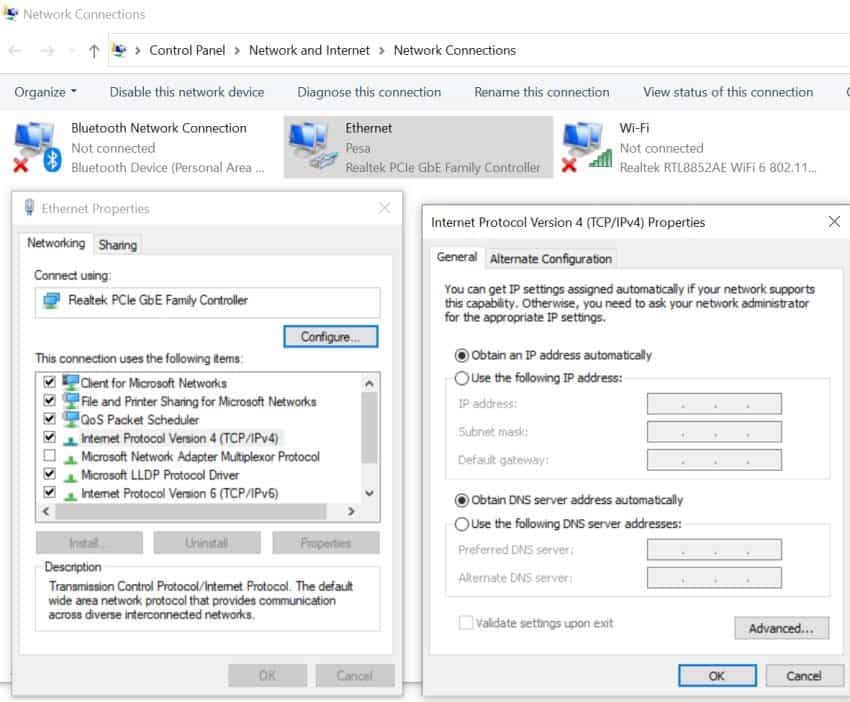
If you see the option “Obtain IP address automatically” enabled, then there is nothing you need to do and this step does not apply to you. If however, you have set a static IP, then go to “Advanced” and check if there are multiple IPv4 addresses configured (and leave only one).
Try Testing With Oculus Link / Virtual Desktop
One sure thing to try out is to use the regular wired Oculus Link and/or Virtual Desktop for troubleshooting purposes.
For example, you can test Oculus Link with the charging cable that came with your Quest 2 headset. Make sure to disable “Air Link” prior to establishing the regular Oculus Link connection.
If you are successfully able to establish an Oculus Link connection (and achieve optimal performance), you’ll know that your PC is good enough and the problem is either in your router, network, or Air Link-specific configuration.
You could also test wireless PCVR with Virtual Desktop, which is much more polished compared to Air Link at this point. Granted, you will have to spend some dollars to get Virtual Desktop in the first place.
Trying different software implementations will give you additional insight into the Air Link problems you are having. Or you may decide to stick with Virtual Desktop and not spend any more time on problem debugging.
Buy a Dedicated Router for Air Link
Sometimes you can fiddle around and test different changes in hopes to get Air Link working properly when in reality there was nothing you could actually do (with the hardware you currently have).
If you are currently using the router provided by your internet service provider (ISP) to get Air Link working, chances are that here lies the root cause of your issues. If you have followed the best practices for Oculus Air Link and verified that you can get a decent performance out of wired Oculus Link, then it is probably time to get a new router.
Luckily, getting a router for Air Link does not have to be expensive! I personally got mine for 40$ and it has proven to offer excellent performance. Go ahead and read my dedicated router full setup guide and also watch my step-by-step video tutorial below.
The router is half the price of the official Oculus Link cable and only a bit more expensive compared to most third-party Link USB cables. But here you get the full freedom and convenience of wireless PCVR – it’s a no-brainer when you think about it.
Putting in the effort to get Air Link working properly gets a SOLID green light from me, but the final decision is up to you of course.
Check the Oculus Forum / Reddit threads
Another step you can take that might save you hours of troubleshooting is to check the Oculus forum and Reddit threads for any ongoing problems (e.g issues with the latest software release) and/or announcements.
I remember recently when Facebook (Meta) had its massive outage, including VR-related services, I had huge spikes in the traffic my website was receiving. People were searching for answers to their problems.
Unfortunately, my articles probably did not help much, but they could have gotten their answer really quickly by looking at Oculus forums or Reddit threads. The same applies to problems with new software releases that regular websites are slower to pick up.
Do a Factory Reset
Although I personally do not like the solution, as a last resort option, you could try factory resetting your Quest 2 headset. There are two main ways to complete the factory reset on your headset described in the Oculus manual.
Note! Are you having any worries or doubts about factory resetting your headset? Click on the link to read my previous article where I demonstrate the whole process step-by-step and list specific actions to take before and after.
Contact Oculus Support
The final recommendation I can give is to ask for help from the Oculus Support team.
When creating the support ticket, make sure to:
- Include your PC specifications
- Describe your overall setup
- Include Oculus logs from last 24h
- Give a list of all the things you have done to resolve the issue yourself.
Being very detailed and specific from the beginning will save you from the “standard replies” from the Support team and get to the actual problem (and hopefully solution) more quickly.
HARDWARE USED FOR TESTING AND WRITING THE ARTICLES:
* Meta Quest 2 (My “daily driver” headset, which I absolutely love & recommend)
* Lenovo Legion 5 Pro (AMD Ryzen 5 5600H, Nvidia Geforce RTX 3060, 16GB RAM)
* TP-Link Archer C6 (budget dedicated router for Air Link, see my full setup tutorial)
ESSENTIAL QUEST 2 COMFORT ACCESSORIES:
* VR Cover Foam Replacement (one of the easiest & cheapest ways to improve headset comfort)
* BoboVR M2 Head Strap (reduce pressure on your head and improve the overall fit of the headset)
