
If you are like me, then factory resetting your Quest 2 can seem a daunting task. I avoided going through the process at all costs! Until I was faced with a technical issue I simply could not resolve otherwise.
Looking back, there was actually nothing to be afraid of! I was able to resolve the issue and had my headset back up and running in a matter of minutes. There were no issues whatsoever!
To help readers who might have similar concerns, I took the time to write this article. I am going to explain (and show) how factory resetting the Quest 2 works with steps to take before and after the process. Feel free to use the links below to quickly jump into a specific part of the article that interests you:
- WHAT HAPPENS WHEN YOU FACTORY RESET YOUR QUEST 2?
- HOW TO BACK UP YOUR GAME PROGRESS AND FILES?
- 3 WAYS TO FACTORY RESET YOUR QUEST 2
- HEADSET SETUP AFTER FACTORY RESET
So without wasting any more of your time, let’s dive right in!
WHAT HAPPENS WHEN YOU FACTORY RESET YOUR QUEST 2
The first thing I am going to explain is what actually happens when you factory reset your headset.
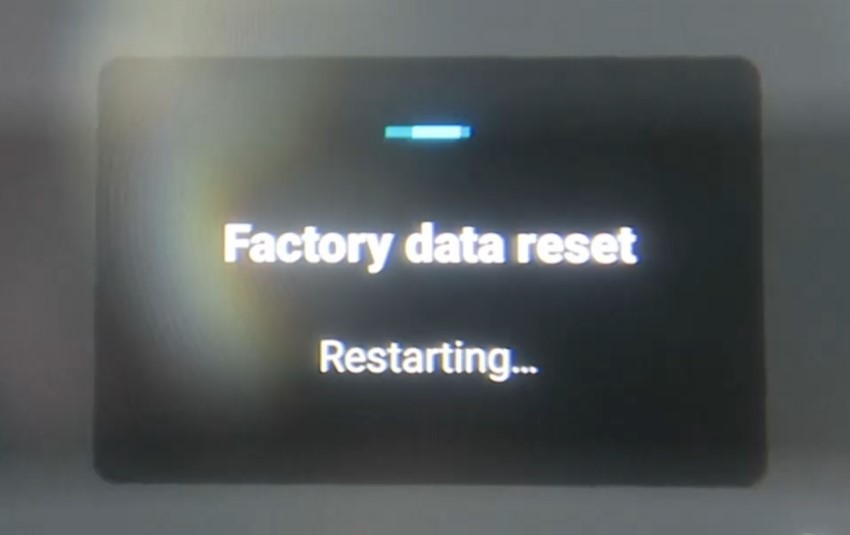
Factory resetting the Quest 2 removes all user-generated modifications (accounts, installed games and apps, photos/videos, setting changes) from the headset. It will be reverted back to the software state it was when you first received it.
Once you have initiated the factory reset there is no way to reverse the process. The headset will be wiped clean in less than a minute.
If you have your WiFi password and Oculus Mobile app ready like I did, you’ll be able to complete the headset’s initial setup and arrive back in the home environment in less than five minutes.
Note! You can watch my through-the-lens video capture that shows exactly what happens when you factory reset your Quest 2 headset by clicking on the link.
The thing to keep in mind here is that the games you have purchased are tied to your account (not the headset). You can simply reinstall them again after the factory reset (no need to repurchase any games).
Most apps and games also support Oculus cloud backup. This means that your game progress and settings are restored automatically when you reinstall the title. Continue reading to find out how.
BACK UP YOUR QUEST 2 DATA BEFORE FACTORY RESETTING
Before you factory reset your Quest 2, it might be a good idea to think about the data that you want to back up for later use.
Enable Cloud Backup to Save Your Game Progress Data
When you enable cloud backup on your Quest 2, the headset automatically backs up game progress, in-game settings the cloud. Follow these steps to enable cloud back on the Quest 2:
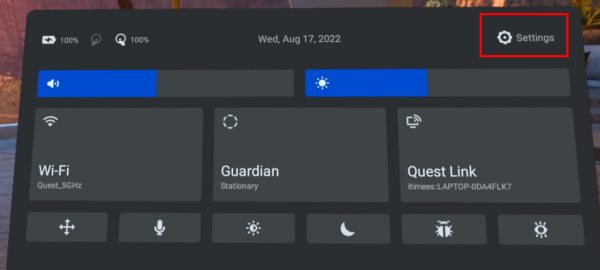
- Press the Meta (Oculus) button on the right controller to bring up the universal menu
- Open Quick Settings by clicking on the clock area
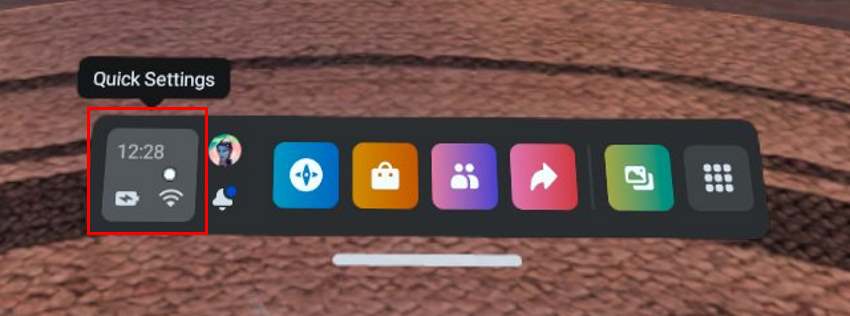
- Click Settings on the top-right of your screen
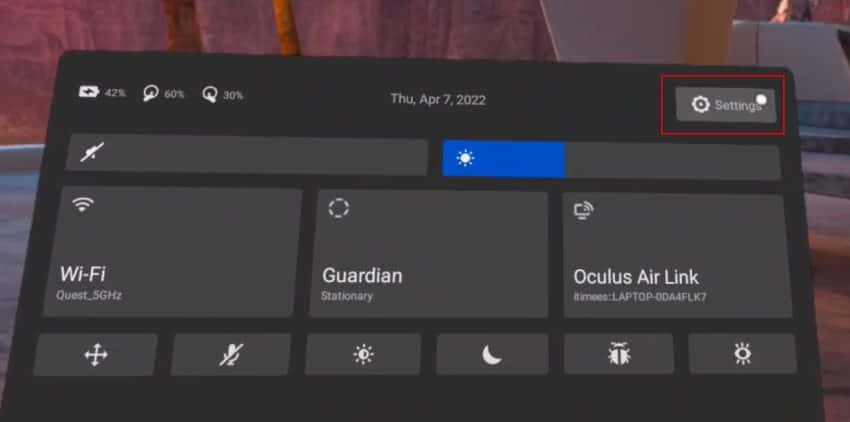
- Open System settings

- Select Backup and toggle Cloud Backup enabled
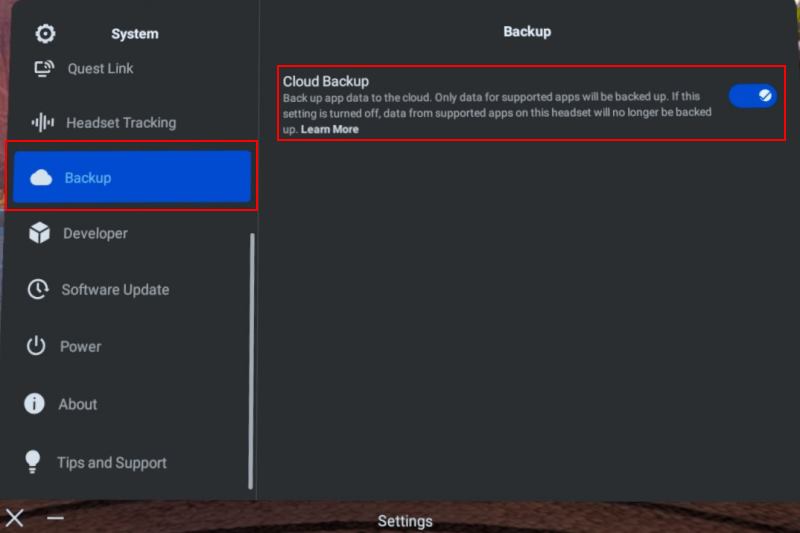
Congratulations! Your game data will now be automatically saved to the cloud (for games that support it)!
Check your Cloud Backups
Even though Cloud backup is available for all Oculus developers, it is up to game/app developers to implement cloud backup into their games (and also decide which data is backed up).
If you want to make sure that a specific game supports cloud backup and that the game progress has actually been saved to the cloud, then follow these steps:
- Open a web browser and log into your Oculus Profile
- Open Cloud Backups from the menu on the left
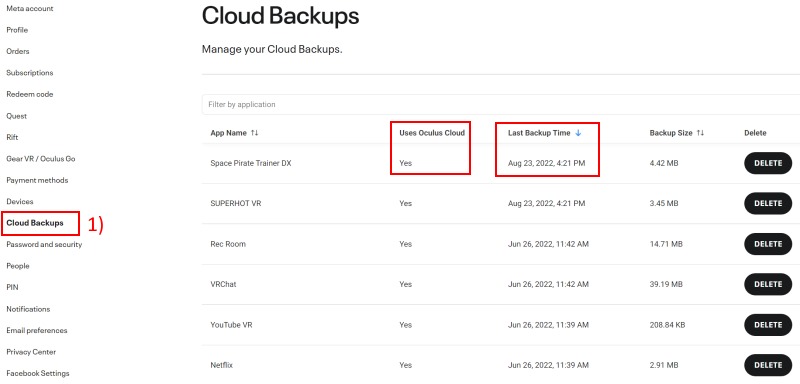
Locate the game(s) from Cloud Backups you are interested in and first make sure that they support cloud saving (“Uses Oculus Cloud” must be true). If yes, then also check the time of the last backup to make sure your latest game progress and settings have been successfully saved.
Transfer your Photos & Video Files
Check and see if you have any photos and/or videos on your Quest 2 that you want to transfer to your PC or your phone. Besides media files, also check to see if there are browser downloads or other files that you want to save for later.
HOW TO FACTORY RESET YOUR QUEST 2
The two most common ways to factory reset the Quest 2 is from the boot menu of the headset or using the Oculus mobile app. Both of these methods are demonstrated in the official Meta support video below:
Another much less-known method for factory resetting the Quests 2 is the following:
- Open a web browser and log into your Oculus Profile
- Open Devices from the menu on the left
- Locate your headset and select Delete Device Data
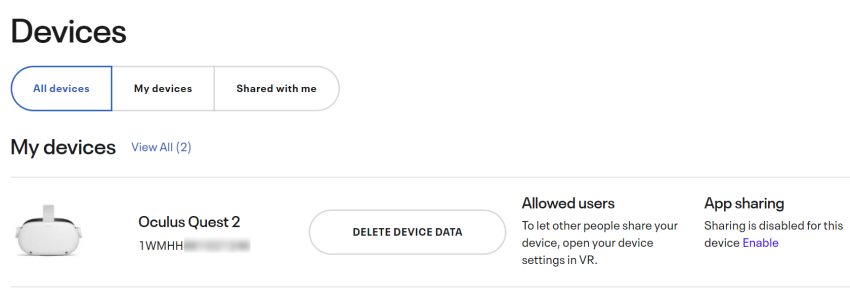
Once executed there is no way back! The headset will be wiped clean the next time it is powered on and connected to the internet (it will then automatically receive the command you issued).
SETTING UP YOUR QUEST 2 AFTER FACTORY RESET
Complete the Headset Initial Setup
Once you have initiated the factory reset on your Quest 2 and the headset has finished deleting data, it will automatically guide you to the initial setup of the headset.
For those that don’t remember, during the initial setup of the Quest 2, you will learn how to use the headset (adjust straps and IPD setting, watch the safety video, etc). You will also have to configure the connection to your WiFi network and pair the headset to the mobile app.
You can watch my full step-by-step video of the Quest 2 initial setup from the Youtube video below:
The whole process is very easy (as it should be) and takes about five minutes to complete. Just make sure to have your WiFi password and Meta Quest app on your mobile ready.
Reinstall Games
After you have completed the initial setup of the headset you will arrive in the Meta (Oculus) home environment. When you now open your App Library you will see that all the games you have purchased are still listed in your library.
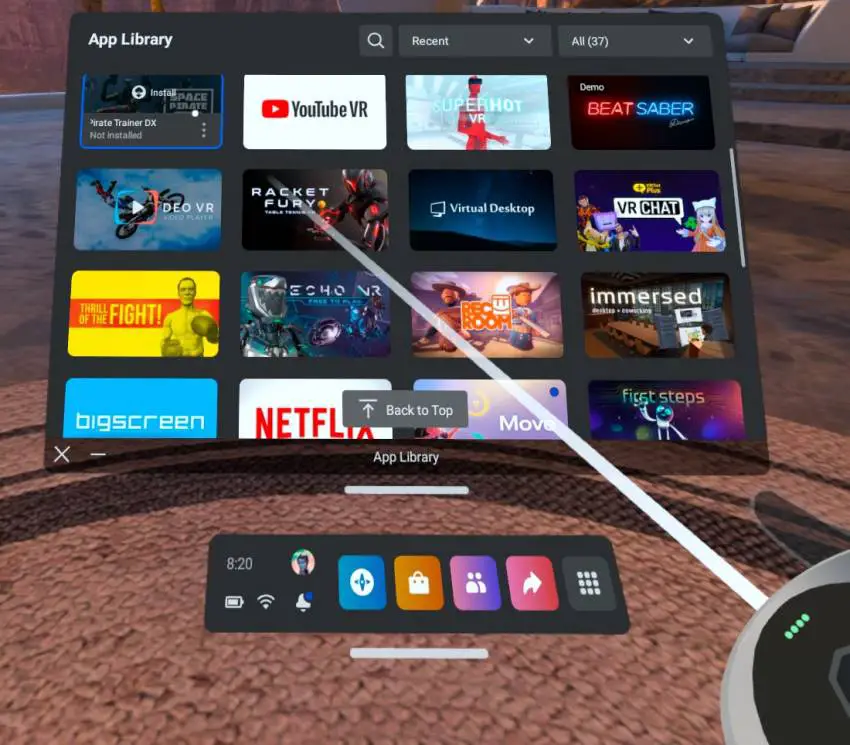
All you have to do now is reinstall the games that you want to continue playing. When you enabled cloud backups, you should be able to continue right where you left off before factory resetting the headset.
(Re)enable Developer Mode
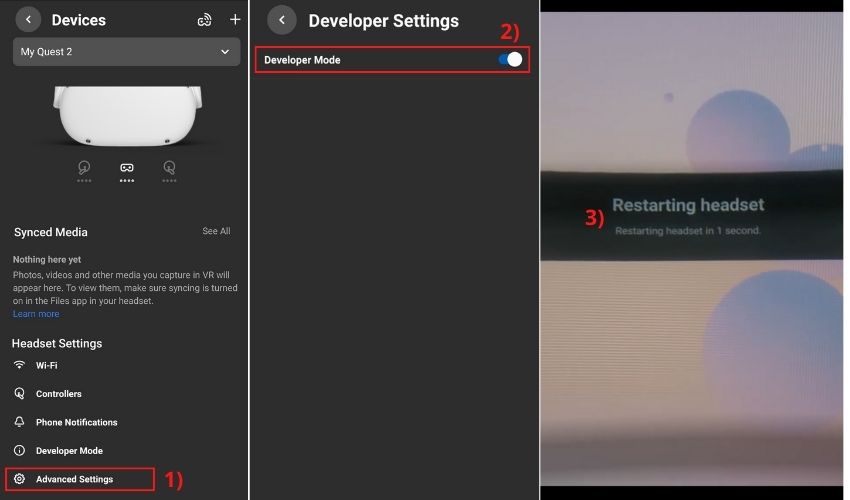
If you previously had developer mode enabled on your Quest 2, you have to re-enable it after the factory reset. If you didn’t (and you don’t want to sideload apps to your headset), then proceed to the next step.
Re-enabling developer mode after factory is easy:
- Open the Meta Quest app on your phone
- Tap on Devices (bottom right)
- Connect your headset to the app
- Tap Developer Mode
- Toggle Developer mode option enabled
- Reboot your Quest 2 headset
Enable Quest Link / Air Link
The next step to take if you were previously using your Quest 2 as a PCVR headset, is to re-enable Quest (formerly Oculus) Link and/or Air Link. The location for this in the user interface changed recently, and here is how to do it:
- Press the Meta (Oculus) button on the right controller to bring up the universal menu
- Open Quick Settings by clicking on the clock area
- Click on Settings (top-right of your screen)
- Open System settings
- Open Quest Link from the menu and toggle
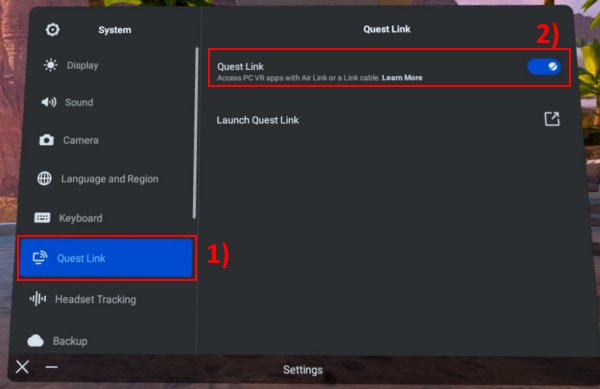
Once Quest Link is enabled, you will also get the option to enable Air Link in the same prompt that is used for the regular wired link connection.
Restore Settings
The final step to take after factory resetting your Quest 2 is to restore the settings changes that you previously had applied. Whether that be the home environment, text size, or adding the secondary accounts that were previously configured.
Note! If you are having any issues during or after factory resetting your headset, make sure to read my troubleshooting guide for the most common problems that might occur.
And that’s it, folks! In conclusion, I would like to say that factory resetting isn’t really something to be afraid of. Having gone through the process numerous times lately, I know I will be more willing to also do it in the future. I hope this article helped to ease some (or all) of your concerns as well!
HARDWARE USED FOR TESTING AND WRITING THE ARTICLES:
* Meta Quest 2 (My “daily driver” headset, which I absolutely love & recommend)
* Lenovo Legion 5 Pro (AMD Ryzen 5 5600H, Nvidia Geforce RTX 3060, 16GB RAM)
* TP-Link Archer C6 (budget dedicated router for Air Link, see my full setup tutorial)
ESSENTIAL QUEST 2 COMFORT ACCESSORIES:
* VR Cover Foam Replacement (one of the easiest & cheapest ways to improve headset comfort)
* BoboVR M2 Head Strap (reduce pressure on your head and improve the overall fit of the headset)