
There seems to be a lot of confusion in regards to the Quest 2 display and refresh rate settings. This is partly because the headset can function both as a standalone and PC VR headset and partly because there have been just so many changes to the platform over time.
I thought it would be a good idea to clarify things a bit and create this resource to give a holistic view of the topic. If you are looking for quick answers, then you should know that:
The default refresh rate of the Quest 2 in standalone mode is 90 Hz (home environment and most games) while some titles still launch at 72Hz and a few can run at 120Hz (display maximum) when enabled from Experimental settings. For Oculus Link / Air Link users can manually switch between 60, 72, 90, and 120Hz refresh rates.
There’s a lot more to discuss and without wasting any more time, let’s dive in!
History Lesson – Quest 2 Refresh Rate Progression
The Quest 2 was originally announced on the 16th of September 2020 at Facebook Connect with shipping starting on October the 13th.
Even though the Fast-Switch LCD Display used in the headset was advertised to support 90Hz (no mentions of 120Hz at that time), the Quest 2 initially shipped with the refresh rate configured at 72Hz for both standalone mode and Oculus Link.
On November 16, 2020, Oculus software v23 started rolling out which changed the default refresh of the Quest 2 to 90Hz for all system software (home environment, Explore, Store, Browser, etc).
Game developers were also allowed (and encouraged) to start shipping at a 90Hz refresh rate natively with titles such as Superhot, Beat Saber, Echo VR, and a couple of others being the first to implement the change.
Oculus software v23 also brought 90Hz support for Oculus Link, with users now being able to switch between 60, 72 and 90Hz refresh rates in the Oculus PC app.
About half a year went by and starting from April 13, 2021, Oculus software v28 brought 120Hz refresh rate support for Quest 2 native games (has to be turned on manually from Experimental features). Cubism was the first game to offer 120Hz support, followed shortly after by titles such as EchoVR, Eleven table tennis, and a couple of others.

Oculus then finally also enabled 120Hz refresh rate support for Oculus Link and Air Link with the release of Oculus software v29 which started rolling out on May 17, 2021.
Quest 2 Refresh Rate in Standalone Mode
So now that we have gone over the brief history of how Oculus (now Meta) has improved the Quest 2 and the platform, it’s time to go into more details. We are going to start with Quest 2 being used in standalone mode.
Here are the key takeaways about Quest 2 refresh rate when used in standalone mode:
- The default refresh rate is 90Hz (home environment and most games)
- 120Hz support must be manually enabled (Experimental Features)
- only applies for games that have been optimized for 120Hz
- Some games still launch at a 72Hz refresh rate by default
- It’s possible to override the default refresh rate settings using SideQuest)
As I have been writing here for the blog and creating videos for Youtube, I have actively monitored the actual refresh rate set by different games.
You should know that surprisingly many games still launch at a 72Hz refresh rate (for example Thrill of the Fight, Rec Room, VRChat). I also tested Space Pirate trainer and even though the game supports 90Hz, the setting must be manually enabled from the game settings (72Hz by default).
Superhot supports a 120Hz refresh rate but the game actually starts at 90Hz by default and you must enable the high refresh rate mode from game settings. Of the games I tested, Echo VR did launch at 120 Hz right off the bat.
How to Check Quest 2 Refresh Rate?
In order to check the actual refresh rate of different Quest 2 games, you are going to need a PC (doesn’t need to be a gaming PC) and a USB cable to connect to your headset. If you do, follow these steps:
- Enable developer mode on your Quest 2
- Install Oculus Developer Hub on your PC
- Install OVR Metrics
- Turn your headset on and connect to your PC
- Make sure your headset is detected in Oculus Developer Hub
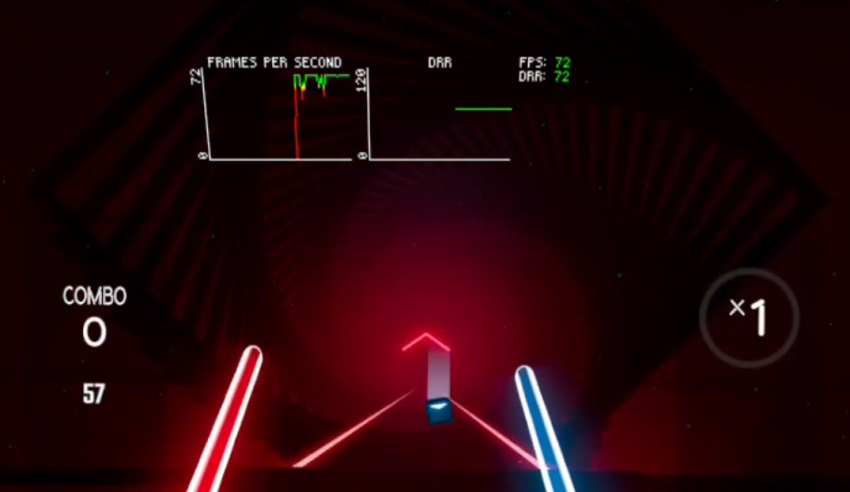
- Enable “Metrics HUD” from “Device Manager”
- Check that you see an FPS overlay in VR
- Click on the Metrics HUD settings “cogwheel” icon
- Enable the “Display Refresh Rate” metric
- You should now see the “DRR” refresh rate metric in VR
I have demonstrated how the OVR Metrics VR overlay generally works in the Youtube video below.
So go ahead and test different games you were previously playing and see if they are actually using the refresh rate you thought they were. You might be surprised!
How to Change Quest 2 Refresh Rate Settings?
The general rule for Quest 2 standalone games is that they have already been optimized for the best balance between quality and performance. I mean, the game developer knows what’s best, right?
That’s not necessarily always true though. One of the reasons is that the games in the Oculus library must also work with the original Quest headset which isn’t as capable in terms of hardware when compared to Quest 2.
This is also why for many games in the Oculus library, you will find the option to raise the refresh rate from in-game settings (whether it is from 72Hz to 90Hz or from 90Hz to 120Hz).
But not all games have this option available. That’s why I am next going to show you a way you can modify the refresh rate for each and every title.
Follow these steps to override and change the Quest 2 default refresh rate settings:
- Enable developer mode
- Set up SideQuest on your PC
- Connect your headset and PC
- Allow USB debugging in the headset
- Open “Device settings and tools” in SideQuest
- Change the refresh rate to the desired value
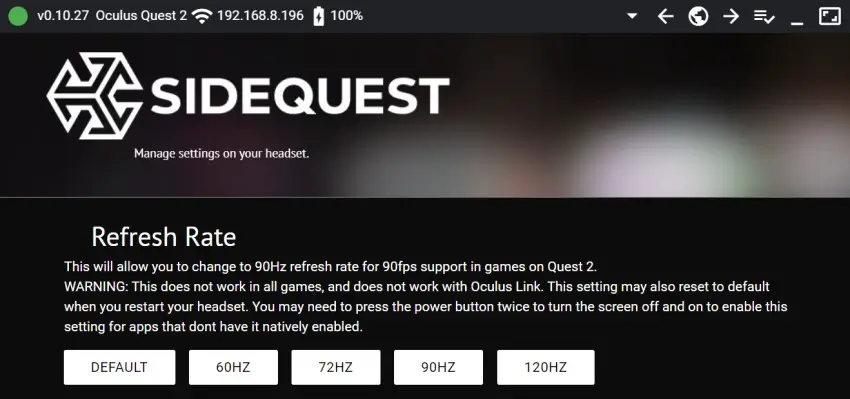
This change will be system-wide (applies to the home environment and all games) and will remain active until you reboot the headset.
You can also change the refresh rate by executing the corresponding ADB command using Oculus Developer Hub or from the “Run ADB Commands” menu item in SideQuest. Again, the change will only persist until the next headset restart.
If you want some tips on how to optimize for a higher (or lower) refresh rate, I have given some guidelines in my previous article explaining all the different settings you can modify for the Quest 2.
Quest 2 Refresh Rate for PC VR (Link / Air Link / VD)
If you are using your Quest 2 as a PC VR headset (Oculus Link / Air Link or Virtual Desktop), you can manually adjust the refresh rate between 60, 72, 90 and 120Hz.
The thing to keep in mind is that the Quest 2 refresh rate in standalone mode and PC VR are two different entities. This basically means that the refresh rate changes you make in standalone mode don’t apply to PC VR and vice-versa.
Change Refresh Rate for Oculus Link / Air Link
If you are using Oculus Link or wireless Air Link for PC VR with your Quest 2 (which I suspect most of you are), then adjusting the settings is pretty basic.
In order to change the refresh rate of the Quest 2 with Oculus Link or Air Link follow these steps:
- Open Oculus PC software
- Open “Devices” from the menu on the left
- Click on the headset image
- Scroll down and open “Graphics Preferences”
- Set desired refresh rate and save
I have demonstrated the process and explained how the resolution and refresh rate interact with each other in the Youtube video below:
Note! If you want to change the Oculus Link / Air Link refresh rate to 120Hz, you must first enable the 120Hz option from headset settings (Experimental Features). Otherwise, the actual refresh rate will be downgraded to 90Hz.
If you want to know more about optimizing the refresh rate and overall performance of the Quest 2 with Air Link, make sure to read my detailed resource about the topic.
When applying and testing the changes you have made, make sure to use the Oculus Heads Up Display to monitor the performance of your current setup.
Adjusting Refresh Rate for Virtual Desktop
If you are using Virtual Desktop for playing PC VR games on your Quest 2, then you have to change the settings from the Virtual Desktop app installed on your headset.
In order to change the Quest 2 refresh rate for Virtual Desktop, follow these steps:
- Open the Virtual Desktop app in VR
- Open the Streaming Tab
- Change the “VR Frame Settings”
- Restart the game or SteamVR
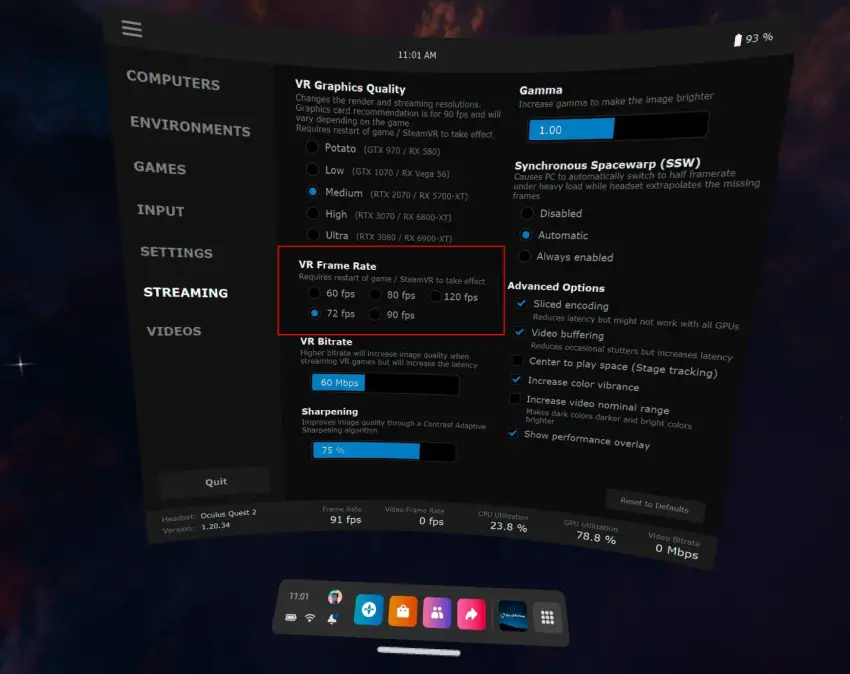
If you want to configure the frame to 120 fps, make sure you have enabled the 120Hz option from Quest 2 settings (Experimental features).
When making changes to the refresh rate and/or VR graphics quality, make sure to enable the “Show performance overlay” to monitor the performance of your setup.
What about SteamVR Refresh Rate?
If you are looking at your SteamVR settings and seeing the refresh rate only listed as a number without the option to change it, then don’t worry. This is the way it is supposed to be.
You can’t change the Quest 2 refresh rate from SteamVR settings. Instead, you have to change it in Oculus PC Software (for Oculus Link / Air Link) or Virtual Desktop, and the new value will then also appear in SteamVR
If you do not see any changes, try restarting SteamVR and check again.
HARDWARE USED FOR TESTING AND WRITING THE ARTICLES:
* Meta Quest 2 (My “daily driver” headset, which I absolutely love & recommend)
* Lenovo Legion 5 Pro (AMD Ryzen 5 5600H, Nvidia Geforce RTX 3060, 16GB RAM)
* TP-Link Archer C6 (budget dedicated router for Air Link, see my full setup tutorial)
ESSENTIAL QUEST 2 COMFORT ACCESSORIES:
* VR Cover Foam Replacement (one of the easiest & cheapest ways to improve headset comfort)
* BoboVR M2 Head Strap (reduce pressure on your head and improve the overall fit of the headset)
