
The primary benefit of using SideQuest is that it allows users to gain access to a large collection of VR titles, demos, and experimental games that are not (yet) available in the official Oculus store.
But that’s not all!
The application is also packed with different tools that allow you to customize your VR experience and change various advanced settings of the headset. I took the time to test and explain all the different tools that are available and gathered them into a single detailed resource of information.
So without further ado, let’s get started!
SideQuest Folders
The “SideQuest Folders” section lists different directory locations associated with SideQuest. By clicking on the folder buttons, the application automatically opens the specific locations in your default file browser.
- OPEN MAIN APP FOLDER – the location where SideQuests holds all the configurations, temporary and storage files, and other data required for SideQuest to operate properly. The actual SideQuest executable is installed in another location (Program Files by default). In most cases, the main app folder is not needed for regular users but it might become helpful when you want to do a clean reinstall of SideQuest. In that case, delete the folder(s) manually after uninstalling SideQuest.
- OPEN APK BACKUP FOLDER – here is where SideQuest creates both the game data backups as well as full game APK backups. Can be useful when you want to move your backups to another PC.
- OPEN ADB FOLDER – the directory that holds the ADB executable and other associated tools. Can be helpful for troubleshooting ADB issues.
For most users and normal scenarios, you won’t be needing to open or use these file locations.
Proximity Sensor
The proximity sensor of your Quest 2 is used for detecting whether the headset is actively worn or not. If the sensor detects that the headset is not used, it turns off the display and goes to sleep after the configured period.
By clicking on the “Disable” button, the proximity sensor of the Quest 2 will be disabled and the display will remain turned on even if you remove the headset.
You can also disable or enable the Quest 2 proximity sensor using the following ADB commands
//Turn off sensor:
shell am broadcast -a com.oculus.vrpowermanager.prox_close

//Turn on sensor:
shell am broadcast -a com.oculus.vrpowermanager.automation_disable
If you want to learn more about the proximity sensor (e.g the sensor location) and other ways to disable it, click on the link to read my previous article about the topic.
Experimental Mode
Turning on the experimental mode in SideQuest enables access to new features of the Quest 2 that have not yet been officially released to the wider public.
The most well-known example is the Passthrough API functionality which allowed developers to start creating augmented reality experiences for Quest 2 (projecting virtual items into the physical environment).
In order to run the Quest 2 games utilizing the passthrough API functionality, you initially had to manually enable the experimental mode from SideQuest (or using the corresponding ADB command). This is no longer required since the functionality is enabled by default.
However, in the future, Meta might release similar new features which require enabling the experimental mode on the Quest 2 manually. The ADB command for this is:
adb shell setprop debug.oculus.experimentalEnabled 1
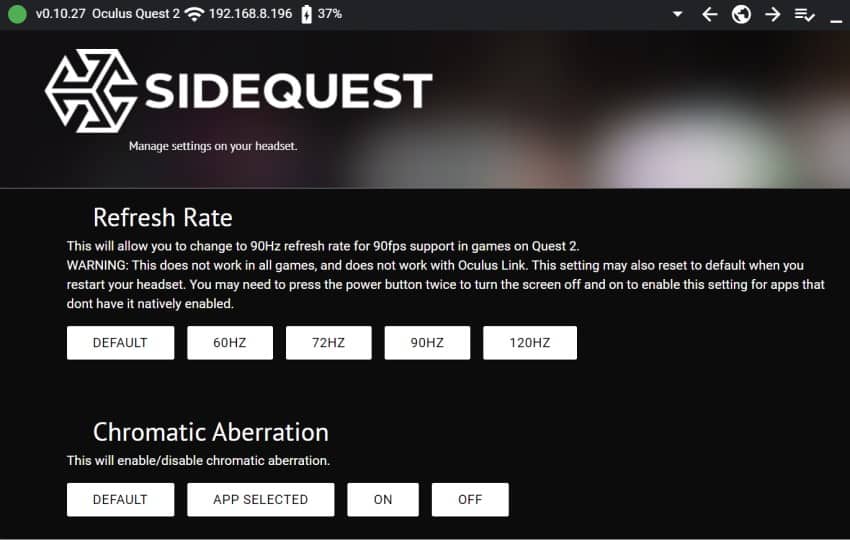
Refresh Rate
Modifying the refresh rate in SideQuest settings changes the frequency of how many many times per second the display of the Quest 2 is able to draw a new image. For example, a refresh rate of 90Hz means the display is updating the image 90 times per second.
A higher refresh rate means a smoother and more fluid VR gaming experience. However, this also means more load on your Quest 2, and the performance will start degrading for most games when you go higher than 90Hz.
Note! The refresh rate settings change only apply when Quest 2 is used in standalone mode. Oculus Link / Air Link refresh rate should be changed from the Oculus PC software.
The default refresh rate for most Quest 2 standalone games is either 72Hz or 90Hz (optimized and set by the game developer). Some games are even optimized to run at 120Hz (when you have enabled the 120Hz mode from Experimental settings)
If you want to override the default refresh rate of a game and go for a higher value, you are likely to experience some performance issues.
However, if you are willing to make compromises on the image quality for a higher refresh rate, it is often possible to get the game running properly by modifying additional SideQuest settings (e.g lowering the default texture size)
And vice-versa, if you prefer better image quality over a higher refresh rate then you can go ahead and try lowering the latter while raising the default texture size (e.g 2048) for a more detailed image.
The ADB command for changing Quest 2 refresh rate:
// Refresh rate [value] can be 60, 72, 90, 120
adb shell setprop debug.oculus.refreshRate [value]
Chromatic Aberration
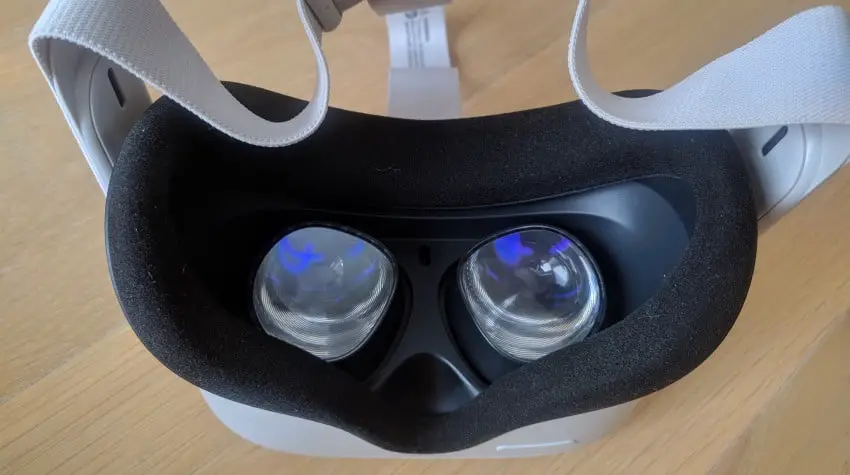
Chromatic aberration in the Quest 2 is the failure of the lenses to focus all colors to the same point, which creates an outline of unwanted color along the edges of objects (see the image below).

To combat the issue, the Quest 2 uses a shader to apply chromatic aberration correction (that counters the original chromatic aberration). You can still clearly see the phenomena in VR if you turn your head away from an object (so it’s not in the center anymore) and try to glance at it near the edge of the image by only moving your eyes.
Chromatic aberration (correction) is enabled by default and there is no need to change it. However, if you want to test it out, you can try turning it off from SideQuest settings and compare the difference.
ADB command to disable chromatic aberration (correction):
//0 for disabling, 1 for enabling (default)
adb shell setprop debug.oculus.forceChroma 0
Guardian (Enable / Disable)
As the name indicates, this functionality enables you to disable the boundary guardian completely. This feature is most commonly used by VR game developers during the active development phase.
However, if you happen to have a very large playing area (think of a football field) and want maximum immersion without the guardian boundary distraction, disabling the guardian could also be beneficial.
The ADB command to disable/enable Quest 2 guardian:
//Disable Guardian
adb shell setprop debug.oculus.guardian_pause 0

//Enable Guardian
adb shell setprop debug.oculus.guardian_pause 1
Note! You can also disable the guardian from your Quest 2 settings when you have developer mode enabled (System – Developer – Toggle “Guardian” option off)
Full Rate Capture
Enabling full rate capture in SideQuest changes the frame recording from 25-30 fps (frames per second) to match the target refresh rate and the fps you are actually getting (60, 72, 90, or 120 fps).
I have demonstrated the difference in the Youtube video below. On the left, you can see a video recorded with the default settings. On the right, is the recording with full-rate capture turned on and the game running at 90Hz (the recording shows a frame rate of 89fps in the metadata).
The final video itself is rendered at 60fps (Youtube does not allow a higher frame rate). You can see clearly that the video on the left is choppy while the one on the right is much more smooth and pleasant to watch (and much more representative of the actual VR experience).
So if you are planning to record anything with the Quest 2 built-in recording video, make sure to first turn on the full rate capture option. Ideally, you should also change the recording resolution, which I am discussing later in the article
The ADB command to turn on full rate capture for Quest 2:
adb shell setprop debug.oculus.fullRateCapture 1
Paste Text To Your Device
One hugely annoying thing about VR (at least for me) is filling in long text and passwords during the registration and/or login process for games and websites. Selecting single characters from an on-screen keyboard is not an effective nor convenient way to do this.
It’s true that the Quest 2 does allow bringing some specific keyboards into VR (virtual 1:1 representation of your physical keyboard) but the support is currently very narrow and I doubt many are using the functionality.
The “Paste text to your device” feature in SideQuest allows you to fill text and password fields in the headset. All you have to do is activate the desired input field in the headset and then type (or copy and paste) your text in SideQuest and hit “Send”.
I personally use a password manager for storing all my passwords and in the Youtube video below, you can see an example of how easy it was to paste the password into SideQuest and from there already straight to the headset.
Set FFR (Fixed Foveated Rendering) Level
Fixed foveated rendering is a performance optimization method where only the pixels in the center of your view are computed fully and independently by the GPU. The textures on the edges are rendered at a lower resolution to reduce the load on the GPU.
Most developers and games utilize dynamic fixed foveated rendering, where the FFR level is automatically adjusted based on real-time hardware utilization and the complexity of the scene.
Using SideQuest it is possible to override the default rendering settings and optimize either for performance (high FFR) or image quality (FFR set to low or turned off). Make sure to also disable dynamic FFR to force your custom foveation level to be applied.
I tested this and truth be told, the algorithm also does a splendid job adjusting the fixed foveated rendering level automatically in real-time and generally I see no need to change the FFR settings.
For example, when I pushed for a higher texture size in Beat Saber, I could see the algorithm dynamically adjusting the FFR level (up to the maximal level) to compensate for the higher load. And when the GPU was underutilized, it automatically pushed for higher quality on the edges of your view.
This way you get the best of both worlds. However, if you want to play around with the different FFR levels, here are the corresponding ADB commands:
// Disable dynamic FFR
adb shell setprop debug.oculus.foveation.dynamic 0

// Set FFR Level between 0 - 4 (Higher = Better Performance)
adb shell setprop debug.oculus.foveation.level 4
Set Video Capture Size
Whenever you are going to record videos on the Quest 2 using the built-in recording functionality, you should know that by default the videos are recorded at a 1024 x 1024x resolution. This means that when you look at the video on a wide-screen display the recording doesn’t fill up the whole display.
SideQuest allows you to override the default recording resolution to the following values:
- 480 (852×480 pixels)
- 720 (1280×720 pixels
- 1080 (1920×1080 pixels)
You can see an example of how different recording resolutions look like from the video I made below:
I personally always record my videos at 1080p (Full HD) resolution since it’s the modern day norm and de-facto standard. A couple of things to keep in mind when recording in 1080p:
- You can expect some performance overhead since it requires more hardware resources to record at a higher resolution.
- The recordings can feel as if part of the top and bottom have been cut off when compared to the actual view you see in VR (default aspect ratio changed from 1:1 to 16:9)
The ADB command to change Quest 2 recording resolution:
adb shell setprop debug.oculus.capture.width [value]
adb shell setprop debug.oculus.capture.height [value]
Set CPU and GPU Level
By default, both the Quest 1 and Quest 2 dynamically scale the GPU and CPU performance depending on the actual load, power consumption, and the internal temperature of the headsets.
SideQuest allows you to override the default algorithm and set your GPU and CPU load to fixed performance levels at a 0-4 scale (where 0 is the lowest and 4 is the best performance).
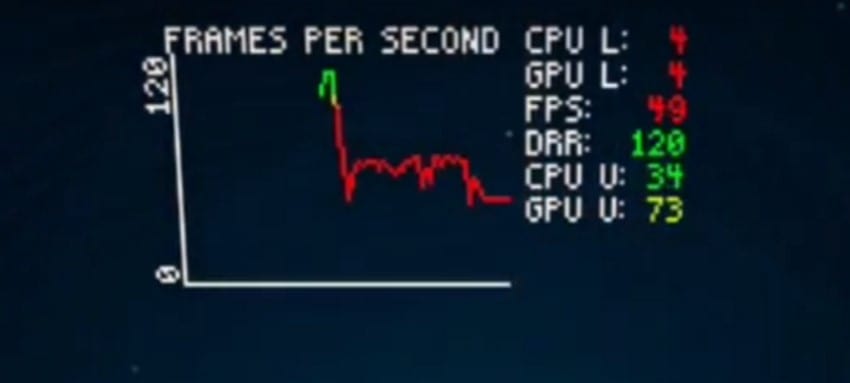
Contrary to the common belief, based on my testing there is no significant performance gain when you manually set the GPU and CPU to the maximum level in SideQuest. I have demonstrated this in the Youtube video below:
As could be seen from the video, when you overload your headset (e.g raising the refresh rate and/or texture size), the algorithm already automatically pushes the maximum performance out of the GPU and CPU.
I also tried setting the GPU/CPU levels to the maximum via SideQuest with different games and I could see no performance gain in terms of the hardware utilization or frames per second you can get out of your headset.
There might be some corner cases (e.g a sudden load spike in a game) where keeping the hardware performance set to maximum levels at all times could be beneficial, but generally, it is best to leave the CPU/GPU level settings to default.
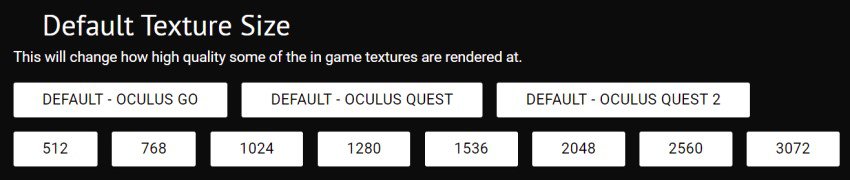
Default Texture Size
The Meta Quest 2 comes with a single LCD panel that is able to output a resolution of 1832 x 1920 pixels per eye. What you may or may not have known is that due to the hardware limitations of the mobile chipset, virtually no games are actually rendered at the native resolution of the headset.
The actual rendering resolution of most games with the Quest 2 is set to 1440×1584 per eye. This is the default texture size (1440) when you compare it to the different texture size values available in SideQuest.
Similar to changing the rendering resolution settings for Air Link / Link via Oculus PC App, you can use SideQuest to push for a higher rendering resolution when using the Quest 2 in standalone mode.
For most games, you can change the Quest 2 texture size from the default value (1440) to 1536 (1536 x 1690) for a slightly crispier image without noticeable degradation in performance.
You can aim for even higher values, but this usually means that you have to lower the refresh rate (e.g from 90Hz to 72Hz) to balance out the extra computing power that is needed for rendering the game at a higher resolution.
The ADB command to the change texture size on the Quest 2:
adb shell setprop debug.oculus.textureWidth [value]
adb shell setprop debug.oculus.textureHeight [value]
Capture Video Bitrate (Go Only)
For those that don’t know, Oculus Go was the first standalone VR headset that Oculus (Meta) released. The video capture bitrate allowed users to record their videos at a better quality. If you don’t have an Oculus Go headset, this setting is irrelevant to you.
SideQuest Settings Not Working? Try These Steps
Sometimes, you apply a certain setting in SideQuest and even though the green success confirmation appears at the bottom of the application, you don’t see the desired results in VR. No need to worry!
Just follow the upcoming steps if SideQuest setting changes seem to be not working for you.
Reconnect Your Headset to SideQuest
The first thing you can try to solve the issue is to unplug the USB cable, reboot your headset and then reconnect your headset to SideQuest. Make sure you are seeing the green circle in the connection details that confirms the headset is successfully connected.

If you are having any trouble connecting your headset to SideQuest, click on the link to read my article about troubleshooting the issue.
Press the Power Button Twice After Changing the Settings
Sometimes the settings changes are actually successfully forwarded to your Quest 2 but the headset fails to apply them right away. In order to solve the issue, you can try to put your headset to sleep (briefly press the power button) and then wake it up again by pressing the power button again.
Make Setting Changes in the Home Environment
Based on my personal experience, I have had the most success applying SideQuest setting changes when I am in the Oculus Home environment (not in VR games). To give you a specific example, texture size changes won’t take effect at all when you have already loaded a VR game.
Most settings do take effect when you change them while running a game, but based on my testing, I saw a lot of discrepancy in terms of the performance you can expect. It’s just best to change all your setting in the home environment (or while the headset is in standby mode)
Monitor Changes with HUD
Oculus Developer Hub allows you to enable the Metric HUD (heads-up display) that shows an overlay of your current settings and various different metrics in VR. You can see the list of all the different statistics explained in the Oculus developer manual.
By using the Metric HUD you can confirm whether certain settings have applied or if and what effect they have on the headset performance.
Confirm Setting Changes with ADB Command
Another way to make sure that certain setting changes have applied is to query them straight out of the Android operating system of your headset using the adb getprop command. The ADB command can be executed via the “Run ADB Commands” menu item in SideQuest.
So for example, if you want to know the current value set for refresh rate the command is following:
adb shell getprop debug.oculus.refreshRateYou can find a list of Android system properties items from the Oculus developer manual pages and also by looking at the examples I gave earlier in the article,
Note! The adb getprop only returns values if you have changed the default settings using either SideQuest settings or executed the corresponding adb steprop commands.
Reapply Settings After Headset Reboot
The thing to keep in mind is that all of the changes you make to your Quest 2 via SideQuest are active until you reboot your headset. After each restart, you have to reapply all the changes once again.
HARDWARE USED FOR TESTING AND WRITING THE ARTICLES:
* Meta Quest 2 (My “daily driver” headset, which I absolutely love & recommend)
* Lenovo Legion 5 Pro (AMD Ryzen 5 5600H, Nvidia Geforce RTX 3060, 16GB RAM)
* TP-Link Archer C6 (budget dedicated router for Air Link, see my full setup tutorial)
ESSENTIAL QUEST 2 COMFORT ACCESSORIES:
* VR Cover Foam Replacement (one of the easiest & cheapest ways to improve headset comfort)
* BoboVR M2 Head Strap (reduce pressure on your head and improve the overall fit of the headset)
