It is no secret that wireless PC VR gaming has been available for Oculus Quest and Quest 2 users for some time now (via Virtual Desktop). With the v28 update, however, Oculus finally released native and free wireless PC VR gaming support for Oculus Quest 2 users – Oculus Air Link has arrived and is here to stay!
In this article, we will be going through the Oculus Air Link setup process step-by-step. We are also going to look at various operational and performance problems you might be facing and offer some solutions to fix the issues.
Did you hear? Facebook (Meta) is going all-in on virtual reality and the metaverse. Get a Quest 2 headset and be a part of the future of entertainment!
Oculus Air Link Setup
To complete the setup of Oculus Air Link, follow these steps:
- Make sure your Oculus software and Oculus Quest 2 are updated to version 28+
- Enable Air Link in Oculus software (Settings → Beta)
- Enable Air Link in your Quest 2 (Settings → Experimental Features)
- Launch Air Link connection in your Quest 2 (Quick Settings → Oculus Air Link)
If something was left unclear, feel free to watch the video below showing the exact process of setting Oculus Air Link up and launching the actual wireless connection.
Although this should be enough to get the basic Oculus Air Link setup working, there are a couple of things to keep in mind if you want a good gaming experience (which I am sure you do).
Setting Oculus Air Link Up for Low Latency
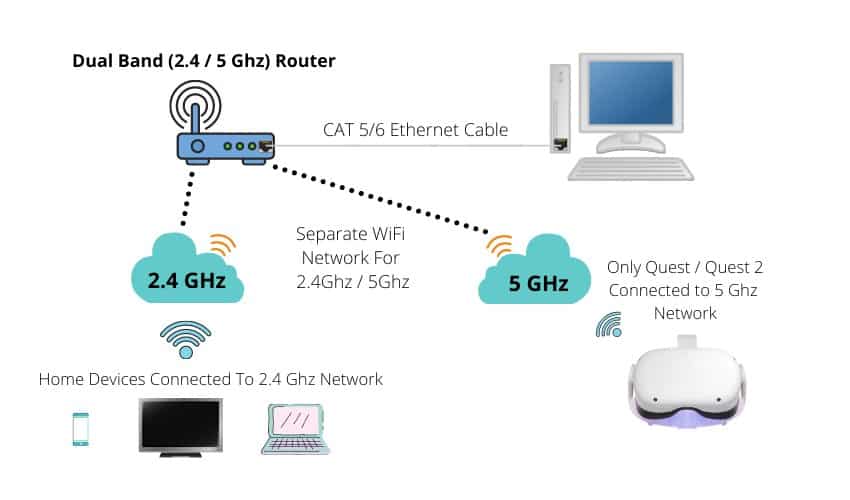
Whereas the regular Oculus Link setup (over USB cable) is pretty straightforward, Air Link is a bit more technically nuanced in order to get optimal performance out of your setup. The basic topology of an optimized Air Link setup that I would recommend is following:

If you want to get the best performance out of your Oculus Air Link setup (Low latency & No lagging), follow these steps:
- Use an ethernet cable to connect your PC and Router
- Use a dedicated 5GHz Wi-Fi network for Your Quest 2
- Place the router in the same room as your play area (with direct sight to your headset)
- Avoid mesh network configuration
- Fine-tune your router settings
- Change network mode to 802.11ac or 802.11ax only
- Find and use the least congested Wi-Fi network channel
- Change channel width to 40 or 80 MHz
- Disable Smart Connect
- Disable Quality of Service (QoS)
- Consider purchasing a dedicated router for your Air Link setup
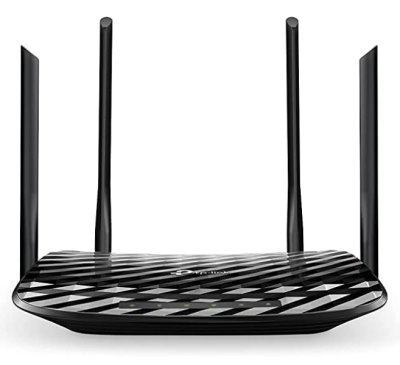
Wireless PCVR gaming does not have to be expensive! TP-Link AC1200 router (recommended by Guy Godin, developer of Virtual Desktop) has proven to offer excellent performance at a reasonable price! See my step-by-step video tutorial on how to set the router up.
If something was left unclear or you are unsure as to have to make the required changes, I have described each of the steps in great detail in my previous article 13 Ways to Fix Virtual Desktop Lagging Issues. Be sure to check the article out as there is loads of useful information for establishing a good wireless PC VR setup.
Troubleshooting Oculus Air Link Issues
Although the setup of Oculus Air Link is relatively easy (in most cases), you might still bump into different problems that stop you from using the functionality properly. Next, we are going to look at the most common Oculus Air Link related issues and offer different solutions to solve them.
Oculus Air Link Not Showing Up
In case Oculus Air Link option is not available either in your Oculus software or your Quest 2 headset, follow these steps:
- Make sure that the Oculus PC App and your Oculus Quest 2 are updated to v28 or higher
- Opt into the “Public Test Channel” in Oculus App (Settings → Beta)
- Log out and back in the Oculus PC App (Settings → Account)
- Reset “Experimental Settings” in Quest 2 (Settings → Experimental Features)
- Restart your PC and Quest 2 (multiple times if needed)
- Factory Reset your Quest 2
The thing to keep in mind with the Oculus v28 update is that Oculus is rolling it out in increments. If you haven’t received the latest update yet then do not worry – you will get it eventually. However, there are a couple of things you can try to force an update on your Oculus Quest 2 headset:
- Manually check for new updates (Settings → About)
- Fully charge your headset and leave it turned on (or in sleep mode)
- Switch Wi-Fi network (e.g create a mobile hotspot)
- Restart your headset (multiple times)
With the Oculus PC app, it is slightly easier. You just download and install the latest Oculus software and it will install the latest release. If you get stuck and are still unable to get the Air Link option available, feel free to watch the following video for additional ideas to try out.
Oculus Air Link Not Working (or Unexpected Lagging)
When you seem to have done everything correctly, but are still experiencing unexpected lagging or lag spikes, check the following:
- Oculus Debug Tools
- “Encode Bitrate (Mbps)” value should be set to 0
- “Encode Dynamic Bitrate” value should be set to “Default”
- Disable 00inputemulator plugin (SteamVR addon)
- Manually adjust “Bitrate” (Oculus Dash)
- Update your GPU drivers to the latest version
Update (November 2021): I have written a dedicated article on 21 steps to take if you can’t get Air Link working at all. When you are facing performance problems, make sure to read my article on solving Air Link lagging issues.
One very common scenario for unexpected lagging with Oculus Air Link is that the users who have previously used Oculus wired Link connection, have made custom configuration changes that are really not compatible with Air Link.
Open “Oculus Debug Tool” from Program Files\Oculus\Support\oculus-diagnostics\ and make sure that your Encode Bitrate is set to 0 and “Encode Dynamic Bitrate” to Default like in the image below.

If you are experiencing lagging and low FPS with Steam games specifically, make sure to try disabling the SteamVR OpenVR Input Emulator which has been known to cause performance issues.
Be sure to also check out the official Oculus Air Link support manual for additional tips on the setup and troubleshooting any issues you might be facing.

