

Feeling frustrated and ready to pull your hair out because you simply can’t get your SteamVR games to perform properly? I know the feeling because I have been through this! (for Oculus Link as well as wireless PCVR).
To help you out of the ruts, I have compiled a list of steps you can take to hopefully solve your current lagging issues with SteamVR. Make sure you stick around till the end of the article, where I share additional resources that could potentially help you solve your issues.
Without wanting to waste any more of your time, let’s get started!
1) Check your PC Specifications
The first thing to consider when running into performance issues is whether your PC has good enough specifications for VR gaming. And do keep in mind that minimum does not mean optimal.
I have seen so many people asking for help in forums / Reddit threads when in reality there is often not much they can do. Sure, sometimes lowering the graphics settings and tweaking configuration might get you a tolerable result with a low-end PC, but more times than not, you should be thinking about upgrading your hardware.
I have previously written an article listing the minimum and recommended specifications for VR gaming along with real-life user performance feedback for Half-Life: Alyx. Based on this information you should get a pretty clear idea of whether your PC is the bottleneck or if there are potential steps you can take to solve your current problems.
2) Restart your PC / Headset / Router
Starting from a “blank sheet” by restarting your PC and headset should be your default course of action each time you are facing unexpected performance issues. It’s simple and often effective!
Personally, I almost always restart my setup each time I try different fixes for either hardware or software-related issues on my PC. This way you can be sure that all the changes have been applied and there are no other conflicting factors in play.
When it comes to wireless PC VR, I have also found that restarting the router is often an effective way of overcoming lagging and stuttering issues. Sometimes routers just “get tired” after a while and need a small nudge, so make sure you try restarting.
3) Reset Everything to Default Values
If you have modified VR-related settings during your troubleshooting process or at some point earlier, go ahead and restore the default values. There is a decent likelihood that your SteamVR performance issues are caused by misaligned and/or conflicting settings.
For example, there were thousands of people jumping in to test Oculus Air Link as it rolled out, only to be greeted by intolerable lagging for each and every game. As it turned out, this was caused by previous optimizations done for Oculus Link (adjusting Encode Bitrate value in Oculus Debug Tools).
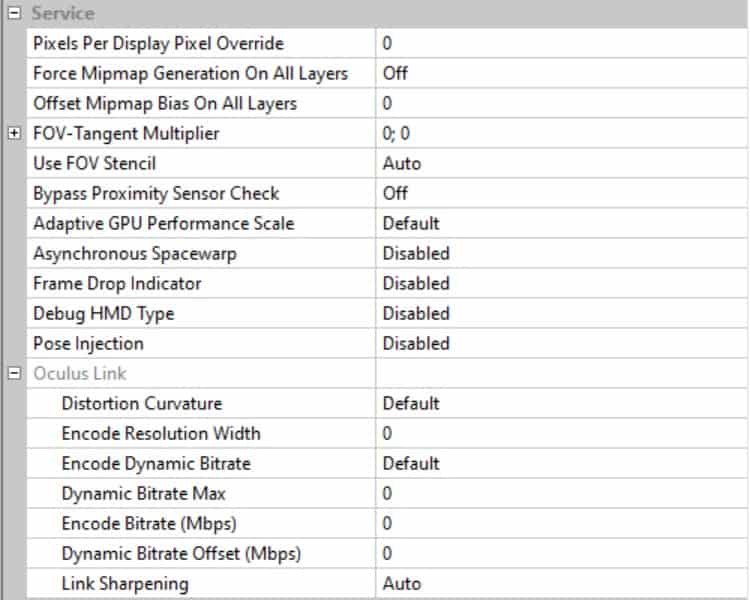
There are settings like that may work for one scenario, but not for others (or be outdated altogether). We want to start troubleshooting from a blank sheet and for this reason, it is a good idea to restore default values of:
- Oculus Debug Tool (0-s are for default values)
- Oculus Software (Resolution, bitrate etc)
- SteamVR
If you are unsure, then Google how to restore the default values. Or you might also go with the route of uninstalling and then reinstalling the software.
4) Measure Performance
If after restarting your devices and resetting everything to default values, you are still experiencing lag with your SteamVR games, it is time to dive deeper into the potential root cause of the problem.
If you are an Oculus (Air) Link user, then go ahead and open Oculus Debug Tool (located at “C:\Program files\Oculus\Support\Oculus-diagnostics” by default). In the bottom section, under “HUDs”, enable the Performance HUD in Oculus Link mode.
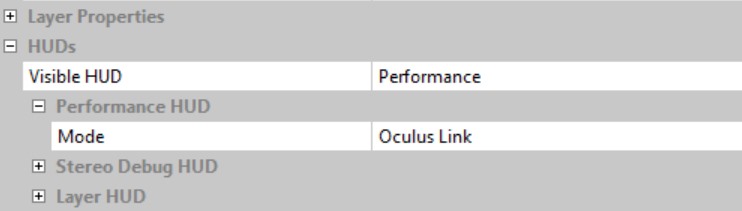
Enabling Oculus Link performance HUD (heads up display) will display a performance overlay when you are in VR. You will see something similar as in the picture below:
Here you should take note of the first graph (top left) and see which VR streaming process is taking up most of the time (and causing lagging):
- Encode (red) – the time it takes the encoder (GPU) to receive the video frames and encode them.
- Transfer (green) – Network latency (in case of wireless PC VR).
- Decode (blue) – the time it takes your Quest 2 to decode the compressed video again.
I have described each one of these VR streaming subprocesses, what they mean and what to do about them in my previous Virtual Desktop optimization article. You can also find my detailed article explaining Oculus HUD and the different overlay modes that are available here.
5) Test With the Lowest Settings
Depending on your PC specifications and the VR games you are trying to play, it might be a good idea to start from the lowest graphics settings and start optimizing upwards from there.
- Set refresh rate to 72 Hz in Oculus Software
- Toggle the “Automatic” option for “Rendering Resolution” off
- Decrease the “Rendering Resolution” to the minimum value
Restart Oculus Software and SteamVR afterward (Steam will automatically readjust values based on Oculus Software) and see what kind of performance you are getting. Start raising the resolution incrementally and try to find the optimal balance between graphics and performance.
Note! If you are using Virtual Desktop, see my tips for optimizing the VR-related settings.
6) Raise Priority of VR Processes (Task Manager)
Although this tip is aimed more at people with a lower-end PC, I personally almost always still do this, despite the fact that I have a pretty decent gaming laptop (wrote an article about it).
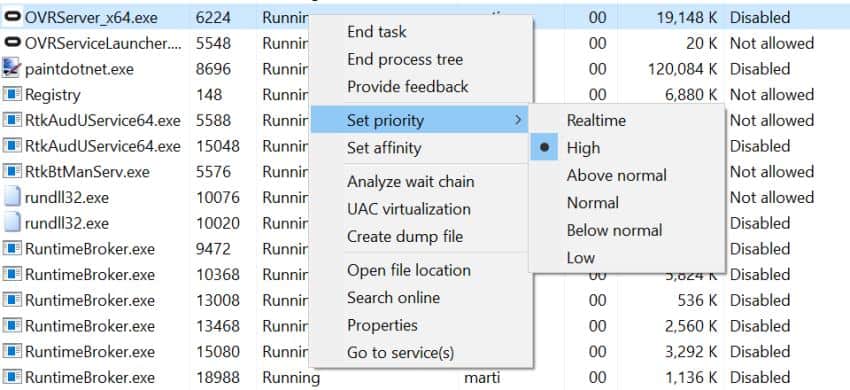
Before starting to play VR games, I open Windows Task manager and raise the priority of the following VR-related processes:
- OVRServer_x64.exe – shows up when oculus software is launched.
- vrserver.exe – shows up when steamVR is launched
- vrcompositor.exe – shows up when you actually start a steamVR game.
It is probably more of a placebo effect, but I always seem to get a smooth experience when I have told Windows specifically to prioritize processes related to VR. Since there is nothing to lose here anyway, go ahead and test it for yourself.
7) Stop Unnecessary Processes
Another tip that is aimed at people with lower-end PC-s (but is helpful for others as well) is to stop any unnecessary Windows processes before starting VR gaming.
Open Windows Task Manager and under the “Processes” sort the list by both “CPU” and “Memory” utilization and see which applications take up the most system resources.
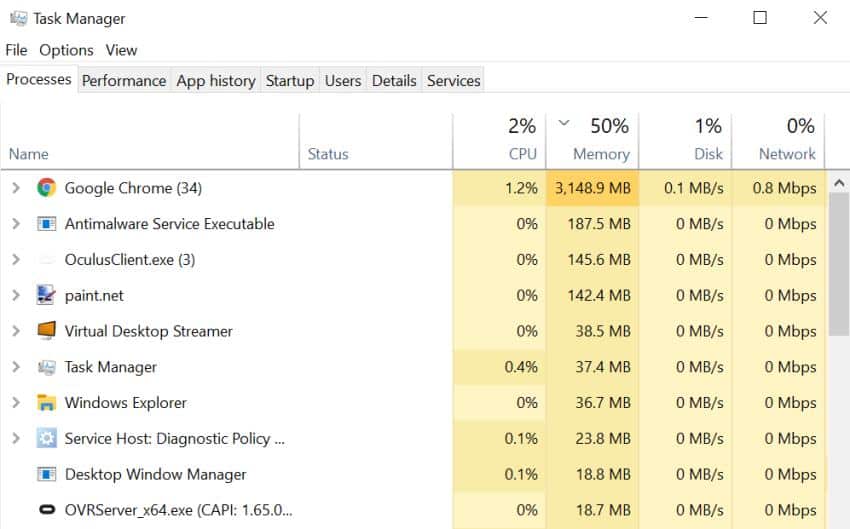
Google Chrome? Kill it. Photo editing? Gone! We want all of our precious system resources allocated for VR only. That’s the way to ensure optimal lag and stutter-free PC VR performance.
8) Disable GeForce Experience Overlay
When I personally installed the graphics drivers for my Nvidia GeForce RTX 3060 GPU I opted not to install GeForce Experience at all. However, since the default option is to include it in the installation, my guess is that many of you have it installed.
And if you have enabled Geforce Experience overlay, this might be the reason causing lagging issues with your SteamVR games. To disable the feature, open Geforce Experience, click on the cogwheel “Settings” option and toggle the “In-game overlay” option to be disabled.

9) Update Graphics/Windows drivers
If you are not satisfied with the performance you are currently getting, it is worth trying to do a full Windows update and install the latest drivers for your graphics card.
This may or may not help with the performance issues, but my general recommendation is to always keep your software and drivers up to date. In the context of VR, updating your GPU drivers is especially important, since new releases often contain bug fixes and performance improvements.
Note! Do keep in mind that some releases of both Nvidia, as well as AMD GPU drivers, have caused performance issues with Oculus Link and SteamVR games. When in doubt, search Oculus forums and Reddit threads for potential issues with certain driver releases.
10) Reinstall Oculus Software / SteamVR / Virtual Desktop
Sometimes lagging and general performance issues might be caused by either Oculus or SteamVR getting into a “corrupted” state. I personally faced Oculus Link connectivity issues at one point which were solved by reinstalling the Oculus software.
So if you use Oculus Link or Air Link, then go ahead and try reinstalling the Oculus Software. I would personally recommend doing a “clean reinstall” by manually deleting leftover files and configurations before reinstalling.
You can also find a manual on how to do a clean reinstall to SteamVR here. If you are a Virtual Desktop user, it can’t hurt to reinstall the software both on the headset as well as on the computer.
11) Try Alternative PC VR methods
When I first tried playing Half-Life: Alyx using Oculus Air Link I was “welcomed” with massive stuttering and the game becoming unresponsive in the end.
What helped me narrow down the problem was testing the game out with the regular wired USB Oculus Link. Since it worked fine there, it was clear that the problem was with the network and/or router I was using. After further debugging, it turned out to be the “Network boost” feature that was enabled in my laptop that was causing the issue.
If you are currently using wired Oculus Link, test the same scenarios with Air Link or Virtual Desktop and vice versa. If SteamVR games are causing you problems, try something from the native Oculus library. For example, Google Earth VR is available both from Steam as well as the Oculus store and can give you a good comparison point.
Test different things that help you narrow down the problem and get closer to the actual solution.
Bonus Recommendations
In case this article didn’t help you find a solution to the performance issues you are having, I have good news for you. The truth is that there are so many different reasons why your performance might be subpar at the moment.
If you are having performance issues with Air Link & SteamVR, make sure you watch my youtube video below:
I have also previously covered the topic of Oculus Link / Air Link / Virtual Desktop lagging and performance extensively in some of my other articles. Make sure to check out the following resources for additional potential fixes and different ways to troubleshoot your current performance issues:
- 13 Ways to Fix Virtual Desktop Lagging Issues – Ultimate Guide
- Oculus Air Link Laggy / Stuttering? (11 Ways to Fix)
- Oculus Air Link PROPER Setup & Troubleshooting Guide
- Oculus Air Link Network & Wi-Fi Setup (7 Questions Answered)
- Here is How To Fix Oculus Link Lagging Issues (Oculus Quest 2)
The truth is troubleshooting VR performance issues is often frustrating and time-consuming. I sincerely hope that this and my other articles have been of help and you found your way to a pleasant lag-free VR experience. Cheers!
HARDWARE USED FOR TESTING AND WRITING THE ARTICLES:
* Meta Quest 2 (My “daily driver” headset, which I absolutely love & recommend)
* Lenovo Legion 5 Pro (AMD Ryzen 5 5600H, Nvidia Geforce RTX 3060, 16GB RAM)
* TP-Link Archer C6 (budget dedicated router for Air Link, see my full setup tutorial)
ESSENTIAL QUEST 2 COMFORT ACCESSORIES:
* VR Cover Foam Replacement (one of the easiest & cheapest ways to improve headset comfort)
* BoboVR M2 Head Strap (reduce pressure on your head and improve the overall fit of the headset)